The Road to Wondercon Skyrim Ancient nord helmet.

LORDXBLACKWOOD

Well-Known Member
RPF PREMIUM MEMBER
After many years of costumes from the depths of space its time to travel to the land of the barbarian. Skyrim! I've been playing the game for quite a while and decided I wanted my own set of horns. Ive been kicking around a couple different ideas but one thing I know for sure is i want some fur on the suit. So ive narrowed it down to three choices.

Banded iron armor.

steel armor.

Ancient nord armor.

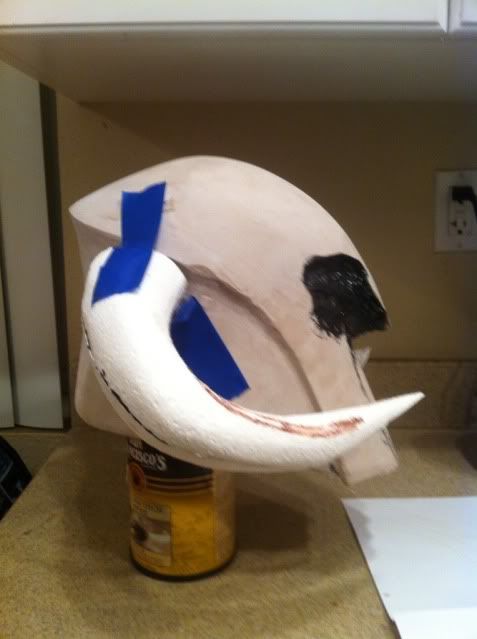
Im really leaning toward the ancient nord armor for the fact that I havent seen anyone really do it and Ive started sculpting the nord helm.

I also thought I would rather have dual war axes vs. a weapon and shield.

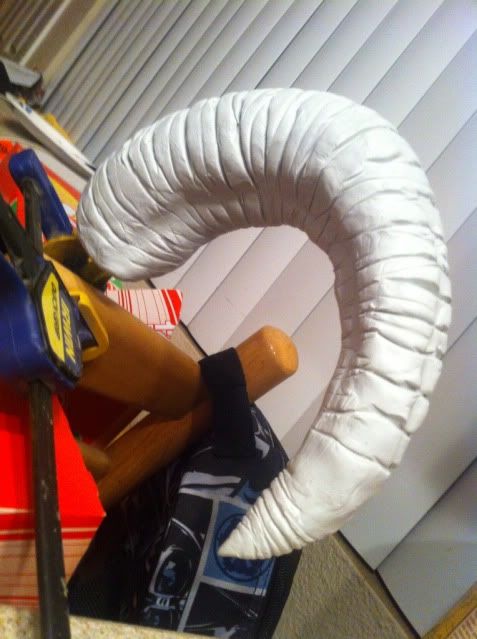
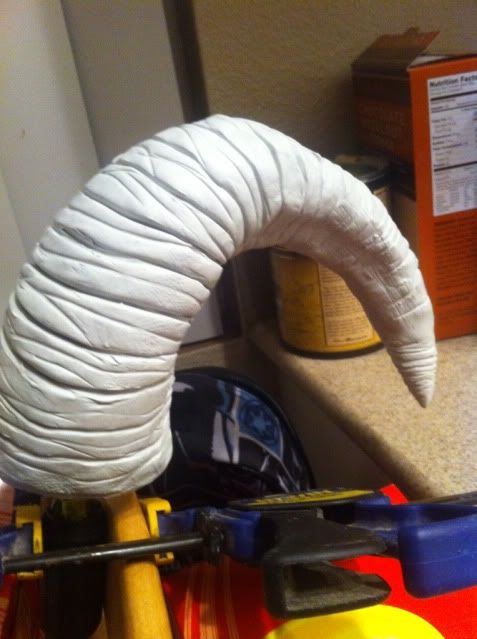
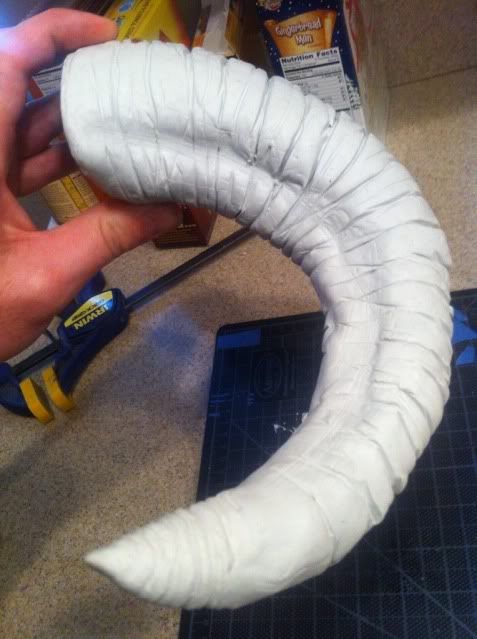
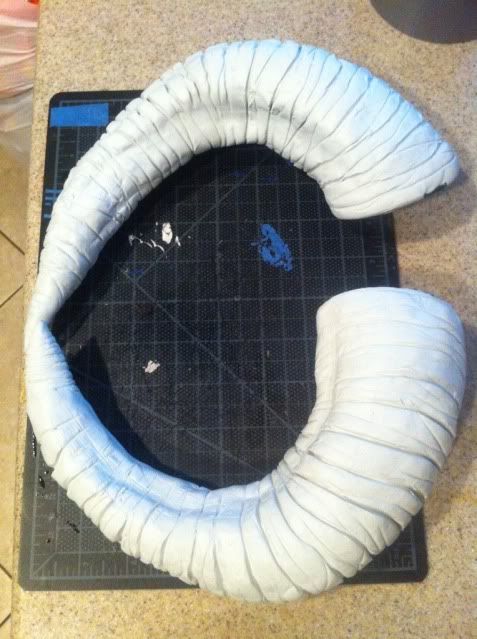
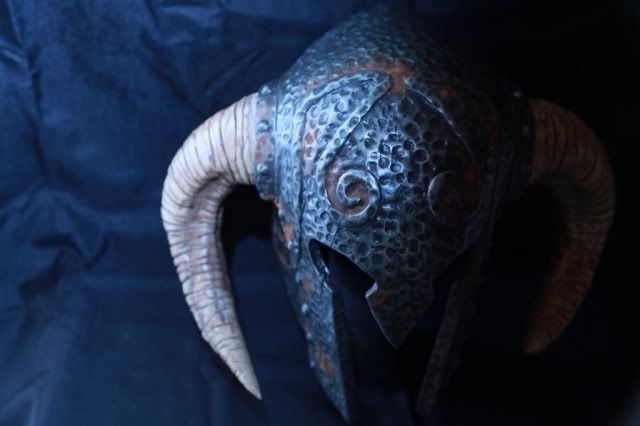
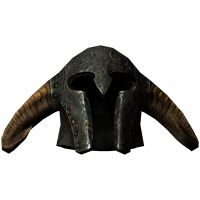
Here is the start of the helmet. Volpins helm of Ygnol build has been extremely helpful. Two days of building so far. Here is a pic of the game model.

30277AA1-ECDC-4B82-96DA-198D9757E700-9285-000006D01D55D573.jpg


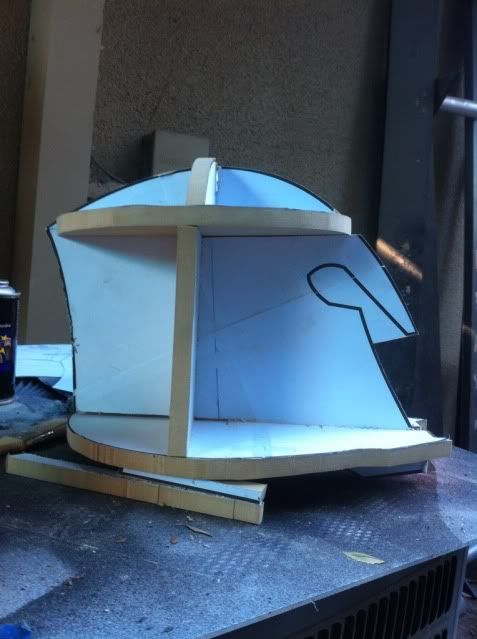
I took screen caps and threw them into inkscape for some simple blueprints. Cut them out onto mdf and made the general skeleton.
1F03D524-65C6-468F-B64E-69FE781928BC-9285-000006CFF78C6720.jpg
E2E7DC68-74E0-483F-8CC6-96E2C99B17ED-9285-000006CFFCC015A1.jpg


then I filled the skeleton with Insulation foam. Tips for anyone using this foam is go with the pink stuff from home depot over the white styrofoam from lowes. The pink foam is alot denser and holds detail better.

8CA3712A-21FE-4C94-A3A0-02F922D53F34-9285-000006D00AA2A680.jpg
68657F3D-1140-4F36-865C-260D9FC8B4E4-9285-000006D005DDF982.jpg


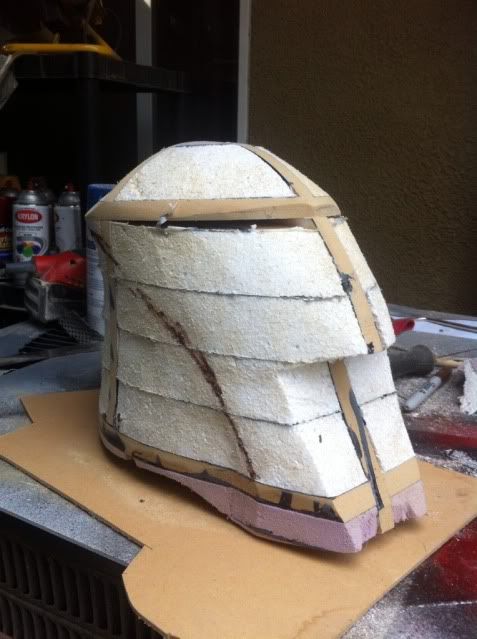
Onto step 3. I sealed the foam with onyx before bondo. If you dont seal the foam first the bondo will eat and corrode the foam.....not good haha.
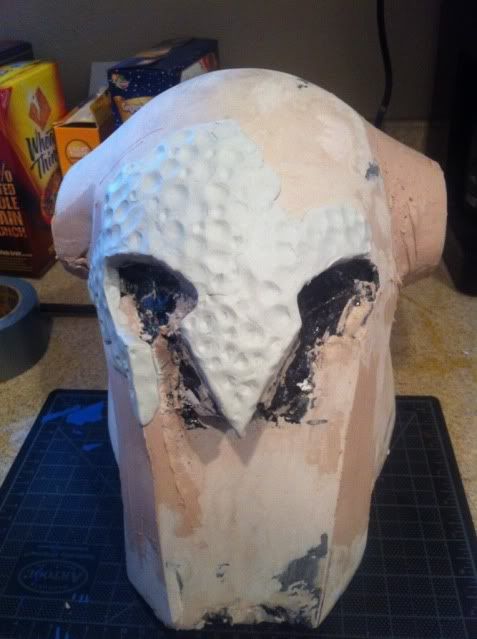
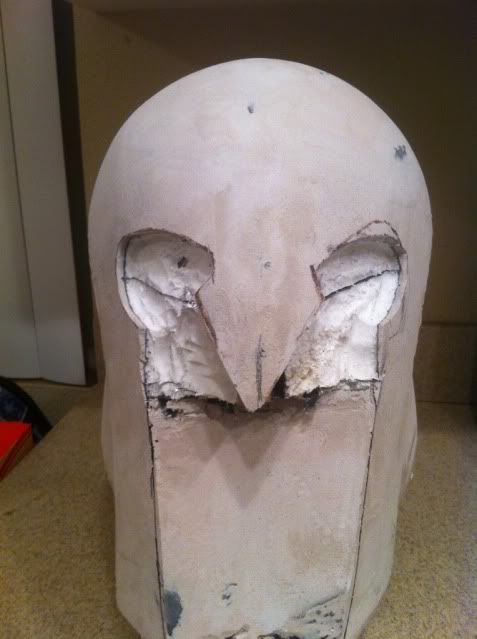
Now just roughing out the shape before I move onto step 4 which will be using apoxie sculpt to do all the detail work.

F8F785AC-F680-474E-AC34-236A0CB93756-9285-000006D0146948F0.jpg
AC04984C-AC5A-4AEA-9979-969072C9BA7C-9285-000006D01146BE46.jpg
78C5BA56-0C46-4C41-9559-BF38C01CD704-9285-000006D01841C0C6.jpg


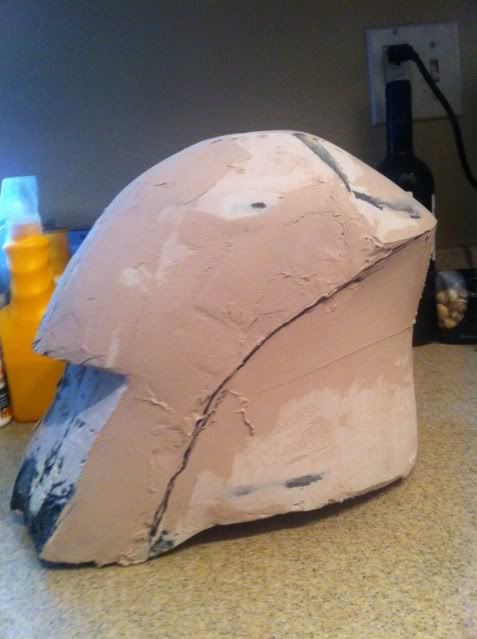
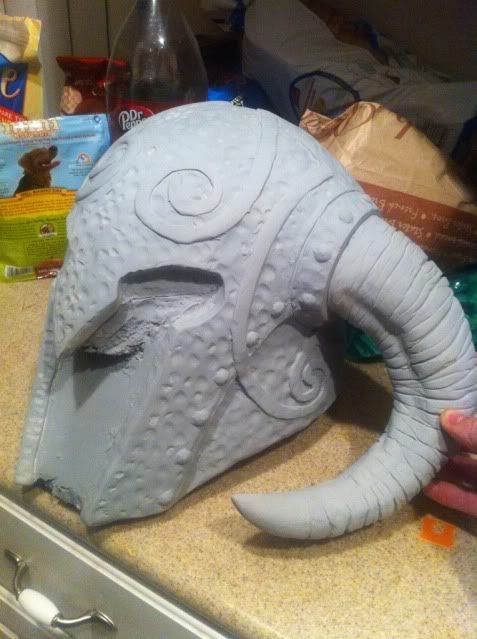
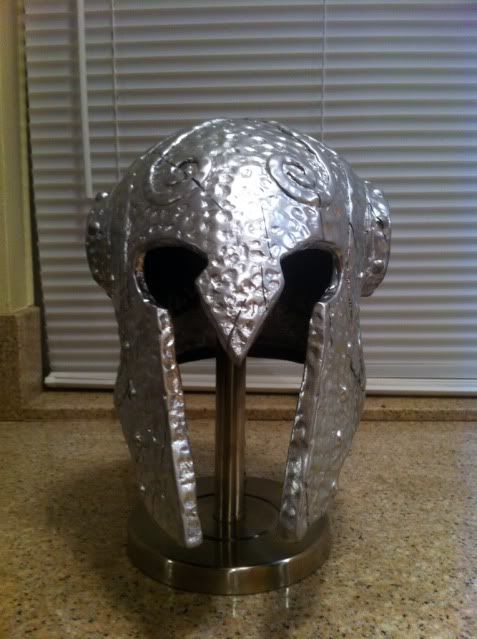
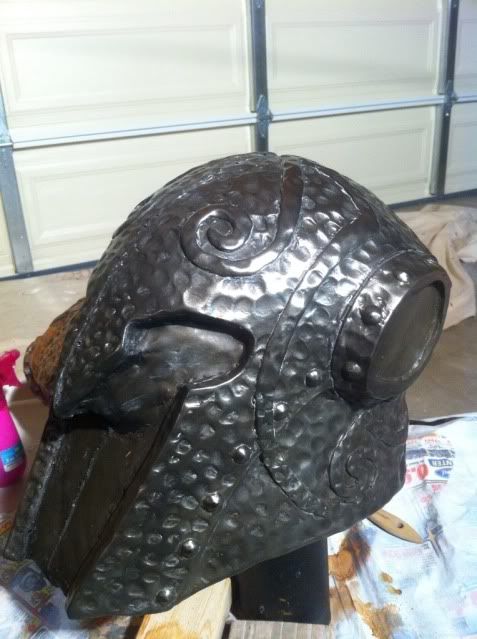
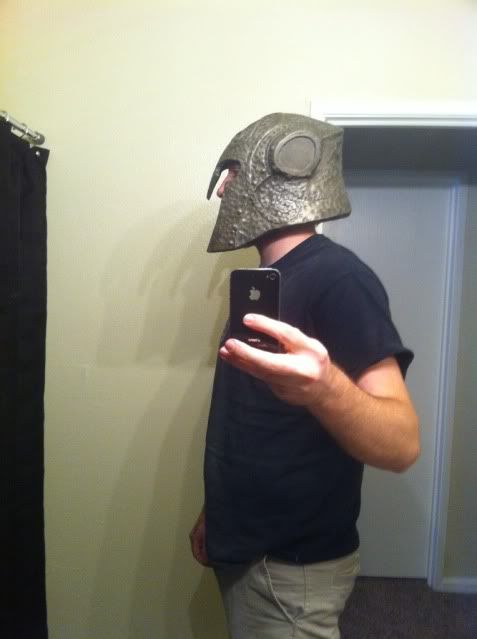
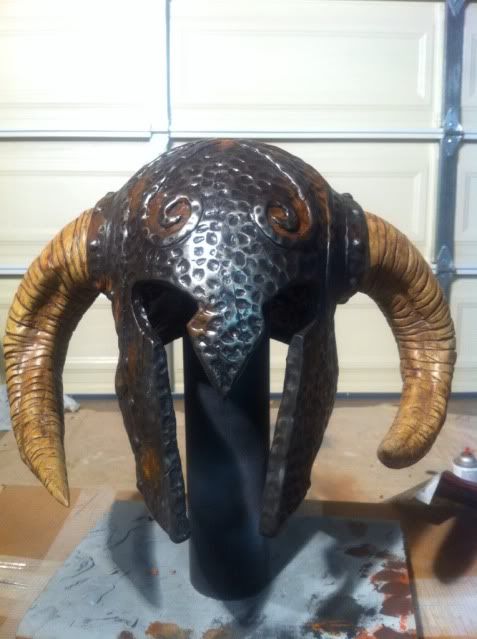
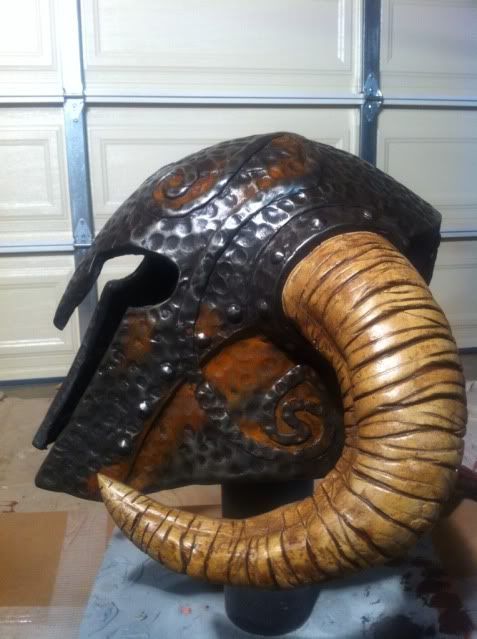
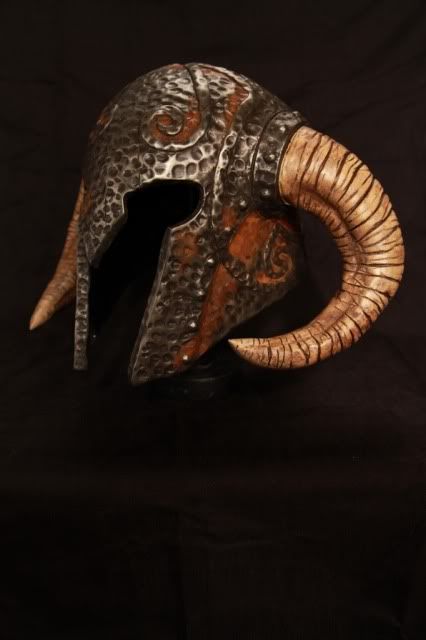
Still working the the area on the face to the recessed curved section underneath the horns. Im still thinking it need to be more broad and round vs. the angle its at now. I would love to get some thought from different sets of eyes on this. The grand scheme is to cold cast it.(like there is any other choice really) And do the rest of the armor in sintra or wonderflex.
 
got some more work done on this in the midst of some other commission stuff.

did some more general shaping and cut out the eyes. I will be redoing the the cheeks to be a little more flared out and a ridge on the inside. As for the symmetry im going to be just eyeballing it. Not going to get crazy on it since this is supposed to be and ancient handmade object not machine perfect.

89310E21-119E-46C2-9550-D77E4467D456-15123-00000C6C9D9C1AFF.jpg
E31C8F3B-F29D-460F-BB34-3FA91FCB798F-15123-00000C6CA6C35AAB.jpg
334AA099-07B1-40F7-ADD5-18CD4540F6BC-15123-00000C6CA3B6FFB2.jpg


Im pretty close to doing the texture on the helmet. Ill most likely start on the horns tommorow as well.

Getting closer!
 
today..i made horns.

did a rough fitting before a plastic strut in my mouse broke and i had to go get a new one.

79FFFBB9-233B-4158-910E-8EA522E7DC16-16978-00000D9BFBE03F1B.jpg
0358A18E-E1D1-474A-986A-EA91A77AC819-16978-00000D9C03E4FA90.jpg
44058B9E-E5AC-49AF-A963-1508BA56F43E-16978-00000D9BFF9F2183.jpg


still getting the fitting just right. still need to attach the rings for the horns. may shape the horns a little as well. Next step is to make the area around the eyes a little thicker, seal the foam on the horns and start the detail work. Little by little
 
Small but somthing im very proud of update.

got one of the horns all detailed up heres some excessive pictures:)

140B092D-2BAF-4A19-845D-E40BFE827AD0-18592-00000F4288CDCF96.jpg
B2F982AA-7464-42EC-AFF2-4F790FBD1D3E-18592-00000F428D9288FA.jpg
7F65719A-CDE5-4D44-B2EE-52FADD6D43EB-18592-00000F429095C152.jpg
76048255-513D-4C91-A4C2-A82D39908124-18592-00000F4293D66A7C.jpg
2B220AF9-1B91-40B0-8168-FB5214B3A51D-18592-00000F4296A85477.jpg


more to come!
 
I used two peices of 3/4 insulation foam to get the width of the horn and to have enough space for the twisting of the horn. Then I just looked at a ton of ram horns to get the grooved "muscle" type look. As for the rings I used apoxie sculpt to get those in. Focusing on deeper grooves on the outside and more faint tightly spaced on the inside.
 
second horn is finished excuse the excessive blue tape. the horns wont be stand alone until they are molded. I think I need to raise the horn on the left side to match. Other than that its pretty close to being finished. Heres more excessive pictures!

81F7C8E0-01D3-4CB7-BD27-775D6FB6E628-19053-00000FA2C7F76275.jpg
8FF0252F-98C1-4E3A-8238-A19F7FA34AF6-19053-00000FA2CBF24679.jpg
DF297F52-F61B-4E61-BB7F-276519CCBF2D-19053-00000FA2CED44DEA.jpg
9BAB5679-C1C1-4B6B-B883-D186058A97A0-19053-00000FA2D278E333.jpg
062E4956-9294-4E0A-B99E-E48C1EA167B1-19053-00000FA2D658F430.jpg
0B3977DC-1108-49FB-B22B-B3F148BA1E79-19053-00000FA2D983FBE9.jpg
E0080141-C1A7-4771-AA0F-C01BADB763CB-19053-00000FA3216EEE9A.jpg
 
Here is where is sits today. Been working on it in between commission kits.

I re positioned the horn mounts to be more even. Like i said before i didnt want to break out the contour gauge as this is supposed to be an ancient nordic helmet. I am going to be filling in the small gaps between the rivits, just threw a quick coat of primer so they weren't bright gold.

D419CDCF-EF0B-4036-AEDC-FB8FD551880D-25075-0000156783838D09.jpg
2356A5B3-8FA2-4B9C-9FDA-753A6792D893-25075-0000156787DBFA4B.jpg
23147A3A-634B-402A-8F0F-D9B0069A3B8F-25075-000015678B58AB5F.jpg


Next is finishing the apoxie sculpt then to do the scroll work. Almost there!
 
Made a TON of progress for this. It's just about ready for some rubber. I am going to need to sand off and redo the two scrolls on the forehead, I made a stupid mistake of trying to eyeball them instead of just making a template to make sure they were the same. Other than that I'm pretty happy with it. I've made some pucks and attached them to the horns so they will be easier to mount. The horns are sitting pretty flush to where they meet the helmet. This has been a fun (sometimes discouraging) project so far. I'm really excited to have my first helmet that I've sculpted to wear. Here's a pic of where it's at now!

EB17AEB9-FC8C-4086-97C9-BBC71D52D039-6040-0000039A4EC8C0B7.jpg


I'm hoping to have this fixed and molded by next weekend. Stay tuned!
 
This is all finished up and ive started pulling a few of these. This is the first pull out of straight resin. Ill be working on a cold cast pull next. Pretty happy with how these came out. They will take the normal amount of clean up but no sweat there, that's to be expected. I learned alot molding this thing, next time I pour rubber will look completely different. Anyways on to the pics!

The gashes were done after the pull they are not in the mold.

176348D7-2D71-4E7F-8C3A-ABD53FA7D38E-1949-00000238D420F7B3.jpg
09EA3653-D7B7-432F-89EF-48701C9F7604-1949-00000238D7D63774.jpg
D2F011C1-4377-48FD-B13A-8764A392ADBE-1949-00000238DB925331.jpg
239995FE-45E8-43DF-AAEC-7FDCEF0EC9FF-1949-00000238DEE5AD76.jpg


trying to grow the beard out for wondercon
D057245F-AC27-47F3-90C0-614BC25D3884-1949-00000238E2867993.jpg
 
I've gotten alot further with the helmet. Kudos to volpin for suggesting the iron oxide for the rust. He is absolutely right about a little going along way with this stuff. I've gone back and knocked down quite a bit from this pic. I don't want the thing to look like its going to break with a little knock.

3784E5CA-DD15-42FE-9D19-10E3CACB76DF-3180-00000382704B8824.jpg


Here is the second one I've pulled, I think I finally have the solution to sanding though the cold cast on the seam figured out. When my new batch of resin arrives ill be testing out this theory, In the meantime this is what the cold cast looks like with a rough cleanuup and polish to really bring out the metal powders shine. I really like how the cold cast looks vs. the painted one. The cc has such a rich look to it i hate to even weather the thing. A girls gotta get dirty though, and this one isn't going to avoid some good ol rust.

9CB5653F-8EB8-4CD4-829D-8D27729DB953-3180-000003826AA9F5BA.jpg


and to wrap up this post here is a few pics to show the fit of the helmet before I painted it. It fits really nice and with a small bit of padding to keep it snug its going to be suuuper comfy.

6259358A-5014-4BBB-8A7F-7EC27A79CB5A-3180-00000382737588FA.jpg


been working on the horns as well. Trying to find a nice balance between the game and real life horns. The molds have a few more bubbles than i would like in the recesses of the horn rings than i would like. I broke out my small set of file and knocked them out in no time at all. I dont have any pics at the moment of the horns as iv'e been waiting till they are both finished to post it up. The next update should be of a completed helmet. Next up is to start on to the armor. I have just over two months left to get the rest of the suit done. Just moved into a house as well so now having a garage has made things much nicer to work on. Anytime i get the bug I can head out into the shop, beats the hell out of a apartment backyard.
 
This thing is all done, still need to find someone to do some final pics with. Really happy with how it turned out, especially being my first helmet sculpt ever. Now on to the armor!!

9C5B8B46-5C0B-481F-BF6A-BF67753E95DC-704-0000006406DFA428.jpg
C88F7127-108E-4538-BD2F-0E7EFECB35B9-704-000000640AA61261.jpg
8D618199-5D81-4DD0-8BCB-405B7CBFFA1D-704-00000064110511A9.jpg
019B0AC5-0AE5-41D8-9AD5-4A9E3F758773-704-000000641445239E.jpg
 
Back
Top