-
Welcome to the Project Runs Forum!
This forum is intended for interest gauging and active runs. Due to the transient nature of this forum, please keep all research and ongoing discussion in one of our main forums so your information is not lost.
Only Premium Members can start a new run.
You are using an out of date browser. It may not display this or other websites correctly.
You should upgrade or use an alternative browser.
You should upgrade or use an alternative browser.
The Mummy Hamunaptra key 3.3
- Thread starter Jintosh
- Start date
For some reason I thought I was on the list. If possible would like to be added to the list. Option 4 please.
When it came time to order the springs for the Run, if people hadn't responded by that time, then they were removed from the list.
Or your response got lost.
")
pmshope
New Member
dcast
Active Member
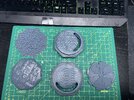
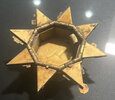
I didn't do the offical printing of these for the run, but I have done the full set of parts. I normally try to print at 30 to 40 degree angle but in this case I printed level. I wanted to avoid additional layer lines. Not saying this is correct, just what worked for me on my resin printer ( Anycubic Mono x, Sun Lu white resin).Hi MTB, I could use your advice... Most of the pieces printed well the first time for me, but I'm having trouble with the bottom--five tries so far. If you have time, would you mind sharing a screenshot of the bottom in your slicer, to show the general orientation and supports?
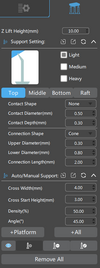
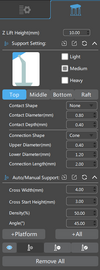
Here is the bottom of mine...not much to see...but I did put my support settings in the screen shot to help...Note: I used the heavy supports, I read from one of the forums it's better to go with heavy supports. The logic is...even though you use more resin for heavy supports, it is still less than a failed print. Seemed like solid advice...so just passing that along.
Cheers
Devin
Last edited:
Another tip is if there is a section that is mostly interior, but sometimes shows, you can use a gold metallic Sharpie (Office max, etc) to color the edge and not have to paint the surface. In dcast's picture, you can see that the bottom is rotated and shows just small TIPS of the bottom when looking from the top. It's the little triangles. If you painted these, the paint might rub off when rotating. But a similar color marker can do the same job without rubbing like paint might.
P.S. I can make custom adjustments if desired.
P.S. I can make custom adjustments if desired.
pmshope
New Member
Thank you, dcast! I've been moving that direction and hesitant to print it level because of the suction factor, but this is very interesting! How did you use that many supports without destroying the artwork on the bottom? I'm intrigued now, though, and will definitely give this a try.I didn't do the offical printing of these for the run, but I have done the full set of parts. I normally try to print at 30 to 40 degree angle but in this case I printed level. I wanted to avoid additional layer lines. Not saying this is correct, just what worked for me on my resin printer ( Anycubic Mono x, Sun Lu white resin).
View attachment 1710601
Here is the bottom of mine...not much to see...but I did put my support settings in the screen shot to help...Note: I used the heavy supports, I read from one of the forums it's better to go with heavy supports. The logic is...even though you use more resin for heavy supports, it is still less than a failed print. Seemed like solid advice...so just passing that along.
View attachment 1710602and a picture of my printed parts (below)...I would do one of my bottom piece, but I am traveling....PM me if you need any help. When I get back, hoping to do my paint and build. Otherwise, MTB and Jintosh have been very helpful and responsive on the thread. :0)
Cheers
Devin
View attachment 1710603
Cheers,
Paul
Opus Penguin
Well-Known Member
I'm down for #1 if still available.
dcast
Active Member
Hi Paul,Thank you, dcast! I've been moving that direction and hesitant to print it level because of the suction factor, but this is very interesting! How did you use that many supports without destroying the artwork on the bottom? I'm intrigued now, though, and will definitely give this a try.
Cheers,
Paul
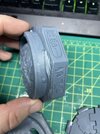
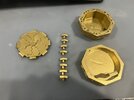
Here's a picture of the bottom of my key. I kept the contact depth and diameters fairly shallow ( my support settings in the photo)and then used a high grit sand paper to remove any dimples from the supports. There was actually very little sanding. Hope this helps
Devin
Attachments
KamenOtaku
New Member
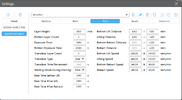
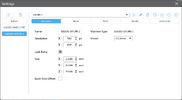
Ok gang, having some issues with my prints and I hope y'all can give me some pointers, as I'm still fairly new to 3d printing. I'm providing images of the issues and my printer settings. I'm using an Elegoo Saturn 2 8K, with Elegoo 8K resin and Chitubox V1.9.4. I tried to emulate MTB's settings as best I could.
The biggest issue is the bottom portion keeps detaching from the supports on both default light and medium support settings. I did increase the support heights after the first failure, but left it the same otherwise, using auto add.
The others issues are some layer separation, primarily at the corners, the flexing of the semi-circular lip portion of the track area, and the overall texture of the areas touching the supports, where it gets wrinkly raisin-y.
I'm going to try some of dcast's tips now, with heavy supports, but if anybody has suggestions I'd really appreciate it! Thanks!
Attachments
-
 Screenshot 2023-06-19 211349.png63.3 KB · Views: 115
 -
 Screenshot 2023-06-19 211334.png63.4 KB · Views: 120
 -
 IMG_1865.jpg1.2 MB · Views: 114
 -
 IMG_1864.jpg1.2 MB · Views: 117
 -
 IMG_1863.jpg2 MB · Views: 112
 -
 Screenshot 2023-06-19 210051.png98.8 KB · Views: 133
 -
 Screenshot 2023-06-19 210034.png59.8 KB · Views: 118
Ok gang, having some issues with my prints and I hope y'all can give me some pointers, as I'm still fairly new to 3d printing. I'm providing images of the issues and my printer settings. I'm using an Elegoo Saturn 2 8K, with Elegoo 8K resin and Chitubox V1.9.4. I tried to emulate MTB's settings as best I could.
The biggest issue is the bottom portion keeps detaching from the supports on both default light and medium support settings. I did increase the support heights after the first failure, but left it the same otherwise, using auto add.
The others issues are some layer separation, primarily at the corners, the flexing of the semi-circular lip portion of the track area, and the overall texture of the areas touching the supports, where it gets wrinkly raisin-y.
I'm going to try some of dcast's tips now, with heavy supports, but if anybody has suggestions I'd really appreciate it! Thanks!
Layers coming apart usually means you need to increase exposure time. Your exposure time appears to be at 4 seconds, so that needs increased.
Try to match the other settings. The Heavy supports that MTB recommends, but connection depth, for instance is .3 on yours and .2 on MTB's. The greater connection depth may be one of the causes of your heavy pitting...
Last edited:
dcast
Active Member
I would agree with Jintosh, check your exposure time for your resin and make sure to have the exposure time dialed in for your printer and resin type. General rule of thumb is the lighter the resin color the lower the resin time. This does guideline does not apply to transparent resins. Also, settings for a specific color does not translate into the same settings for a different brand of resin for the same color. ( So white Anycubic Resin might have a different exposure time than Sunlu's white resin) If you have not dialed in your resin's exposure time make sure you do, that is VERY important. I use the Cones of Calibration tool on the website.
TableFlip Foundry - Tabletop gaming immersion accessories
The directions on the website are bit confusing so you can google the "cones" on youtube for a quick tutorial on how to use them. Or try the youtube link below:
Also, definitely increase your support size to heavy.. remember if you are printing anything with a larger contact area, like the bottom, you will need that additional strength when you are pulling your print off of the FEP. ( light supports are more for smaller 1/4 inch figurines where you are wanting to keep fine details, and medium supports would be more for things like the flaps).
I am by no means an expert, but I am sharing what I have learned from hours of googling and printing projects using different combinations of resins and part sizes. From what I can tell, it's still everyone's best guess and everyone has their process and settings. As time goes on you'll see what works for you. I do however highly recommend dialing in your resin exposure settings.
Hope this helps.
Devin

TableFlip Foundry - Tabletop gaming immersion accessories
The directions on the website are bit confusing so you can google the "cones" on youtube for a quick tutorial on how to use them. Or try the youtube link below:
I am by no means an expert, but I am sharing what I have learned from hours of googling and printing projects using different combinations of resins and part sizes. From what I can tell, it's still everyone's best guess and everyone has their process and settings. As time goes on you'll see what works for you. I do however highly recommend dialing in your resin exposure settings.
Hope this helps.
Devin
KamenOtaku
New Member
Awesome! Thank you so much! I've already updated a few settings like y'all suggested, so we'll see. I appreciate it!
KamenOtaku
New Member
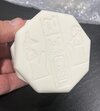
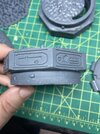
So after a few more printing tweaks I’ve gotten it to the point where I’m happy! Thanks for the help everybody, and thanks to Jintosh for creating this awesome prop! This is gonna make my proposal on Saturday that much more special! Thanks again!
So after a few more printing tweaks I’ve gotten it to the point where I’m happy! Thanks for the help everybody, and thanks to Jintosh for creating this awesome prop! This is gonna make my proposal on Saturday that much more special! Thanks again!
View attachment 1715909
Totally Awesome!!
Yes, if it's for a proposal, the bright gold is appropriate. It makes it look like the Book of the Living from The Mummy.
Well done!
--edit--
I noticed you turned the bottom half CLOCKWISE when looking at it from the top. I tend to turn the bottom counter-clockwise, but I designed it so it would work either way.
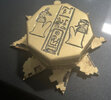
I am SO glad that this key came up for sale, and I was able to see how the mechanism worked. I would have never envisioned a vertical piece inside the open area of the key, since that piece was never visible in the movies. And doing it right is a much tighter fit on closing the key's flaps than my 2.0 key. Far better this way!
Similar threads
- Replies
- 61
- Views
- 7,062
- Replies
- 37
- Views
- 2,767
Done / Completed
Full 1/48 TIE Bomber 3D Printed Kit (and magnet/armature kits)
- Replies
- 11
- Views
- 1,274
- Replies
- 67
- Views
- 7,467