Heya! It's been a while since I've posted up a build thread on here but after putting in a bunch of time researching and sourcing materials I thought I'd share it here with you all.
So my next costume is of a character that always stood out to me reading the books as a kid and was great to see him portrayed so well in the Hobbit films by Luke Evans as Bard the Bowman, so I've been planning to get this costume made for a while now.
I started sourcing materials early last year and I've only just started to finally put it all together.
So here's the obligatory pile of materials 'n' stuff before starting the project, including various pelts, leathers and fabrics amongst other pieces. I also picked up the Black Arrow replica from Weta as a cool alternative prop to carry around instead of the Bow and Quiver:

To begin with I needed to start preparing the fabrics. I ordered a really nice loosely woven linen that looked pretty close to what was used that I ordered in from the UK last year, though it was only available in a natural colour so I needed to dye it up grey:

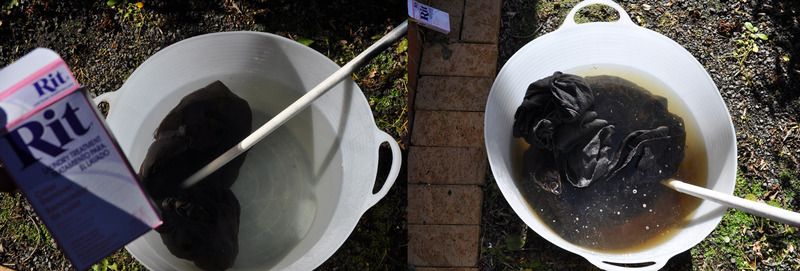
In addition to dyeing, I needed to fade the fabrics for the pants and sash so I gave them a quick wash through with a little bit of RIT colour remover which brought them back to a nice light faded tone:
For the Construction of the costume, my plan is to basically start from the inner layers of the costume and work out from there, so I started first with the pants.
They're a super baggy "Cossack" style of pants so I just used my standard go-to pants pattern and just widened the legs a heap. I included the side pockets too so I'd be able to carry around my phone and wallet at events since they're covered up by the shirts anyway.
I drew my pattern up on to some extra fabric for a mock-up to make sure it was all looking right before transferring it on to the pre-faded cotton upholstery fabric that I'll be using for the actual piece. Once I'd cut and sewed the main parts together I then added a drawstring waistband and draw-string ankle cuffs to gather them in at the bottom:

Next on the list was the grey linen under-shirt. Like with the pants, I made a mock- up by laying out a shirt pattern on some fabric and drawing out the changes and extra parts onto it by eye. I then roughly sewed it all together and tried it on to make sure the fit was right:

I then pulled the mock-up apart and laid it out onto the linen fabric then cut out all the pieces. Since it was a very loosely woven fabric I made sure to go around all the edges with an over-locker and slip-stitched most of the hems for a nice, neat finish:

I added in a thin strip of black interfacing down the fronts to support the buttons. I got some self-cover buttons that I made up using the same fabric as the shirt but then had to sew the button holes in by hand, as my machine didn't like doing it on the loose weave and just chewed it up.
I left the bottom un-hemmed for the time being as I needed to make sure it was a bit shorter than the over-shirt once I had that done:

For the Over-Shirt, I used a handwoven, raw Tussah Silk that I had to import in by the bolt from India which is the same fabric used on the original costume(Though I think the stuff I got was just a little bit thicker).
I followed the same pattern as the under-shirt except for the change in the collar and no shoulder seam or sleeves. They used a sleeveless version when worn with the coat on set to help keep the actor a bit cooler, so it seemed like the natural choice to go with") .
.
When sewing it together, I had to bring out the big guns with the industrial machine for this one, as my regular machine didn't like the Tussah Silk at all. I also had to slip-stitch around the collar, sleeve and the front hems by hand so give it that invisible hemmed look.
Then, to finish it off I marked out where the lacing holes up the front would be and stretched them out using a large cooking chopstick to try and keep their shape a little, since I couldn't use eyelets:

I then quickly threw the sash together by cutting strips of the brown linen fabric I'd faded earlier:

I then folded them, sewed them together, rolled it right-side out and pressed the seam before cutting it to the correct length.
So here's where I'm up to so far:

Next on the to-do list will be the Coat and gloves!
So my next costume is of a character that always stood out to me reading the books as a kid and was great to see him portrayed so well in the Hobbit films by Luke Evans as Bard the Bowman, so I've been planning to get this costume made for a while now.
I started sourcing materials early last year and I've only just started to finally put it all together.
So here's the obligatory pile of materials 'n' stuff before starting the project, including various pelts, leathers and fabrics amongst other pieces. I also picked up the Black Arrow replica from Weta as a cool alternative prop to carry around instead of the Bow and Quiver:

To begin with I needed to start preparing the fabrics. I ordered a really nice loosely woven linen that looked pretty close to what was used that I ordered in from the UK last year, though it was only available in a natural colour so I needed to dye it up grey:

In addition to dyeing, I needed to fade the fabrics for the pants and sash so I gave them a quick wash through with a little bit of RIT colour remover which brought them back to a nice light faded tone:

For the Construction of the costume, my plan is to basically start from the inner layers of the costume and work out from there, so I started first with the pants.
They're a super baggy "Cossack" style of pants so I just used my standard go-to pants pattern and just widened the legs a heap. I included the side pockets too so I'd be able to carry around my phone and wallet at events since they're covered up by the shirts anyway.
I drew my pattern up on to some extra fabric for a mock-up to make sure it was all looking right before transferring it on to the pre-faded cotton upholstery fabric that I'll be using for the actual piece. Once I'd cut and sewed the main parts together I then added a drawstring waistband and draw-string ankle cuffs to gather them in at the bottom:

Next on the list was the grey linen under-shirt. Like with the pants, I made a mock- up by laying out a shirt pattern on some fabric and drawing out the changes and extra parts onto it by eye. I then roughly sewed it all together and tried it on to make sure the fit was right:

I then pulled the mock-up apart and laid it out onto the linen fabric then cut out all the pieces. Since it was a very loosely woven fabric I made sure to go around all the edges with an over-locker and slip-stitched most of the hems for a nice, neat finish:

I added in a thin strip of black interfacing down the fronts to support the buttons. I got some self-cover buttons that I made up using the same fabric as the shirt but then had to sew the button holes in by hand, as my machine didn't like doing it on the loose weave and just chewed it up.
I left the bottom un-hemmed for the time being as I needed to make sure it was a bit shorter than the over-shirt once I had that done:

For the Over-Shirt, I used a handwoven, raw Tussah Silk that I had to import in by the bolt from India which is the same fabric used on the original costume(Though I think the stuff I got was just a little bit thicker).
I followed the same pattern as the under-shirt except for the change in the collar and no shoulder seam or sleeves. They used a sleeveless version when worn with the coat on set to help keep the actor a bit cooler, so it seemed like the natural choice to go with
. When sewing it together, I had to bring out the big guns with the industrial machine for this one, as my regular machine didn't like the Tussah Silk at all. I also had to slip-stitch around the collar, sleeve and the front hems by hand so give it that invisible hemmed look.
Then, to finish it off I marked out where the lacing holes up the front would be and stretched them out using a large cooking chopstick to try and keep their shape a little, since I couldn't use eyelets:

I then quickly threw the sash together by cutting strips of the brown linen fabric I'd faded earlier:

I then folded them, sewed them together, rolled it right-side out and pressed the seam before cutting it to the correct length.
So here's where I'm up to so far:

Next on the to-do list will be the Coat and gloves!


