The Fountain replica Tree bubble (Ideas?!)

msmuse101

New Member
Ok so i'm fairly new to building models but so far i've built up a fair few and have began to custumise things. Most of my builds are ships, either BSG or studio ghibli based but after coming across this picture I have no doubt about what I want my first scratch build to be!
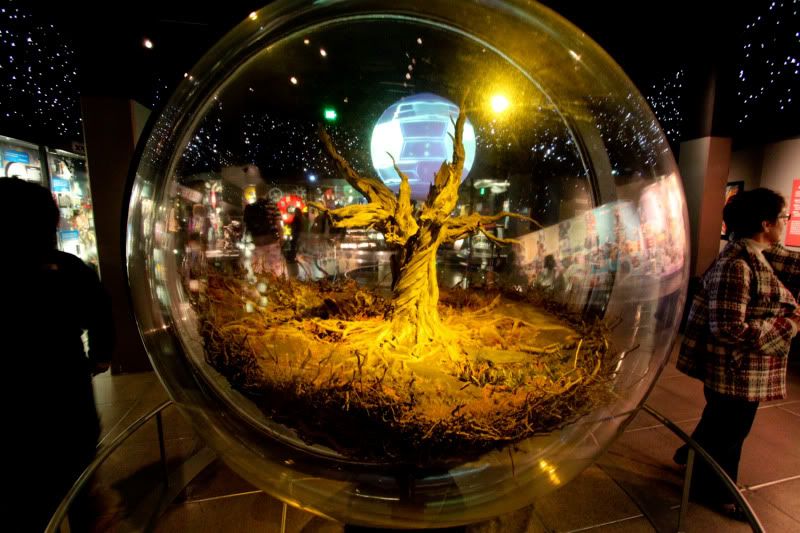
20100103-Seattle2009-15011274.jpg


So, I don't think i can even think about starting this for another year or so (I need to build up my skills, techniques and tools first) but I just wanted to get some advice about this as you guys seem to be in the know!

This pic above is from a model in the Sci-Fi Museum. Seattle, Washington. I have no idea who built it or what it's made from.

So where should I start? What material would you reccomend? Has anyone attempted this kind of thing before?

I also know this is going to be difficult to do but is it even possible?

Thoughts, opinions, tips all welcome!

Cheers = D
 
I remember the Movie and the Tree was one of my favorite models.

To create the Display model you showed I believe that the Bubble is made of Glass (at least it looks like Glass) the Tree could have been create a number of ways, Carved out of Green Carving Foam (Which many studios use for ease of use and it's cost), then sealed and painted to look like a real tree.

The other option is possibly real Tree branches blended with Green foam and bondo, or another paste that would be sandable or easy to Carve for the "Tree Bark" look.

If you are planning on creating a Miniature version, you could create it by starting out with a Wire Armature bent and shaped to look like the Tree and branches, then cover the Wire with Super Sculpey III which you can find at most Hobby stores, Sculpt in your Details, and when you are satisfied with the details, Bake it in the Oven for about an hour or so on low heat (I use a lower temp than was suggested on the Box, I think I used 100 Degrees for an hour or so, just keep an eye on the Sculpt so it doesn't Burn!)

The great thing about Super Sculpey III is that you can Sculpt it, Bake it, Carve it, and if you want add more material to it and Bake it again!

I hope that helps...
 
Yeah It helps lots cheers!

Yup It would deffo be mini version as this one apears to be about 5 ft tall (i havn't the time, money or patience for that!)

Think I'll look into that super sculpey stuff, never heard of it before! I'm not a sculpter and i've never tried but hay, you gotta start somewhere!

Cheers for the advice!
 
Ahhh very nice! I saw that prop when I was in Seattle a couple of years ago. It was favorite prop there! Looking forward to seeing the progress on this build.
 
Check local hobby stores that specialize in model railroading and dioramas. They may already have a tree that you'd be happy with.

If not, you can try the sculpey, as already mentioned, or you can try celluclay. Celluclay is a very fine papermache that modelers use for groundwork in dioramas. You can use it around a wire armature, as well. You'll also need materials to create the ground, so this will be helpful.


As for the sphere, you'll spend forever looking for a glass sphere, that's in a good size, that you can work in and it still be affordable.

I suggest checking out plastruct Plastruct, Inc. - Online Product Detail. Look for the hemispherical domes. Part number is typically VHH-xxx, where the xxx is the decimal representation of the diameter of the dome; i.e. a 5" wide dome is VH-500, or a 3.5" wide dome is VHH-350.

For a decent size display piece, I'd recommend 5" minimum, but probably closer to 6". You know what they say, go big or go home ;).

I'd also buy a few smaller, 1" domes, to practice seam sanding. You'll need to glue two hemispheres together, but you'll end up with a horizontal seam. You won't be able to eliminate it all together, but with practice, you can get pretty damn close.

You'll need watch crystal cement, package of assorted, modeler's grade sanding pads and Future Floor Wax, though, now sold as Pledge floor wax with Future Shine (I believe in the UK, it goes by a different name; read through this article to check http://www.swannysmodels.com/TheCompleteFuture.html ).

The watch crystal cement and sanding pads you can get from micromark.com. The Pledge/Future, from any grocery store.

The sanding pads should include 2400, 3200, 3600, 4000 and 12000. Sometimes, they include a 6000 and you have to buy the 12000 seperately, but it's worth it. Start sanding with wet/dry sandpaper from the autoparts store - it should be in the 1200-1800 grit range. Then get progressively finer. When you're done sanding, brush on a coat of Future. It's self leveling and will fill in all the micro-abrasions from the sanding. When you're finished, you should have a barely visible, horizontal seam.

-Fred
 
Back
Top