The Bride of Frankenstein by MOEBIUS - Finished pics page 3

I've got the movie, so I just had to. :cool
I've got all of the '30s/'40s Universal horror movies, so I've been following this build since the start. Really amazing job too. You have a real talent for texture and detail.

Now that's an excellent collection! (y)thumbsup:thumbsup
 
Not even close.
bride_of_frankenstein.jpg


....wait, which was which, again? :lol

You did an amazing job on this figure kit General! When you see the screen cap comparison, it's pretty obvious how clean the monsters clothes are compared to the tattered clothing Karloff wore. I wonder why Moebius chose to model it that way? Maybe a licencee decision?
 
Last edited:
Not sure why the tattered clothing was ommited from the sculpt.
I have seen one or two other builds of thise where the modeller did some modification to create the tattered clothing.
While I did consider this, my main intent was to build this to the best standards I could without having to worry about modding any of the existing parts.

Well, you certainly exceeded standards in my book! Nice job!
 
Really, I'm blown away from the support I've been getting.
Maybe when I get better at this, I can make my own instructional DVD to offer...
 
I'm new (At least to this type of creature building. Could you explain what you meant by "I use plastic weld for the majority of parts. This stuff is great because I can use it to "melt" seam lines shut" and how you do that? I always just used Testors and filler. Also, my kit didn't come with the little painting booklet... Do you know where I could find that online? Great build!
 
This is a great and useful thread. I just started work on my first ever figure kit. Here is my monsters head....
 

Attachments

  • image.jpg
    image.jpg
    449 KB · Views: 144
I'm new (At least to this type of creature building. Could you explain what you meant by "I use plastic weld for the majority of parts. This stuff is great because I can use it to "melt" seam lines shut" and how you do that? I always just used Testors and filler...
Plastic Weld is a solvent cement manufactured by Plastruct that essentially works the same way as Testors (assuming you're referring to Testors' styrene cement in the orange tube, that is)--it temporarily melts the mating surfaces of two plastic parts, and after it cures/hardens the parts are bonded together. With practice you can learn to use either product so that a small amount of the melted styrene "oozes" out of the seam as you press the parts together, and after it's cured you just sand off that "oozed" styrene and you have a seam-free (or nearly seam-free) surface that requires little or no filler.

Of course, this also depends on how well the kit you're building is engineered. Most of Moebius' kits are engineered so that their seams are almost invisible once the parts are cemented together, but older kits like the Aurora figure kits and AMT's original Star Trek and Star Wars kits tend to have gaps that will need to be filled no matter how experienced you are.
 
Last edited:
A question for the group.While painting the love seat, I had the base masked off with blue painters tape and it is gunky now. How would you clean that to preserve the glossy finish? Suggestions? Again, my first project like this. It's so fun... Here are a couple shots of my monsters so far...
IMG_5046.jpgIMG_5047.jpg
 
Finished mine. I'm happy for a first go at something like this. It was a fun learning experience. Now, as soon as Batman comes out....IMG_5064.jpg
 
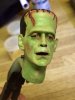
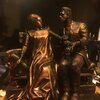
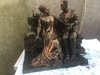
So, I bought this kit, and on arrival put a little bit of it together, and then put it under a bed in a spare room, with the cursed intention to get back to it eventually. I always intended on finishing it, but with bad painting skills, knew I'd take a different route, and had some bronze paint/aging/sculpt nouveau waxes/ modern masters stuff, that when the day came, I'd try and do it like an old bronze piece. Yesterday, the day came. That's when I realised I bought the kit in 2012, and it had sat 50% assembled under a bed for the last 8 years. Only feels like yesterday being so excited to receive it, being a Universal Monsters fan. How the **** did 8 years pass, and it still only feels like last year taking receipt of it.

Bronze look isn't for most people, but the point is…. finishing a project that has laid around for many years, even having lost inspiration, really is a cool thing to do in this time. The inspiration and love of this stuff, to get back into things and creating stuff, has started to reinvigorate me.

My plan yesterday was to live stream the painting on Twitch, but got called into work, so lighting was bad when I finished. I wish I had time lapsed it at least, rather than take a few pics.

On the Twitch note…. I think a lot of us here would love to watch someone's progression on a project on a live stream on Twitch. So, if someone has the set up, please consider it. Might be a good earner too.
 

Attachments

  • IMG_6524.jpg
    IMG_6524.jpg
    1.5 MB · Views: 113
  • IMG_6495.JPG
    IMG_6495.JPG
    2 MB · Views: 107
  • IMG_6521.PNG
    IMG_6521.PNG
    5.3 MB · Views: 88
Last edited:
This thread is more than 4 years old.

Your message may be considered spam for the following reasons:

  1. This thread hasn't been active in some time. A new post in this thread might not contribute constructively to this discussion after so long.
If you wish to reply despite these issues, check the box below before replying.
Be aware that malicious compliance may result in more severe penalties.
Back
Top