Hi all!
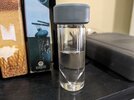
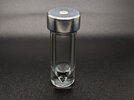
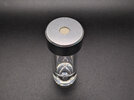
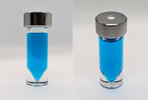
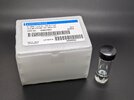
I am offering a few highly authentic looking replicas of the Compound V vial from The Boys as a pre-painted kit with GLASS vial:
RUN #1 RESERVATIONS
I have been re-watching The Boys and Gen V, and I thought it might be nice to have a vial or two of Compound V in my collection.
Imagine my surprise when I went online and discovered that glass vials with the conical internal bottom are not only insanely expensive, but also only sold in cases of 6. It appears that Wheaton has a patent/trademark on the "V-Vial®", which means they can set the price, as is quite common in the medical and scientific industries. No wonder they waved those vials around in the show so much; they're elite!
I was wondering if there might be interest in a mini-run of these, where I could do a group buy fromFisher Scientific Zoro (best price I could find) and offer them individually. I'm not looking to make a profit; I just wanted to get one for myself. I checked eBay, Amazon, Etsy, all the usual suspects, and there doesn't seem to be anything better out there. And these are shiny and new!
SPECS:
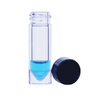
After much searching and research, I have concluded that the Boys V-Vials are 10 mL in size, which is the largest available. Specs from Wheaton are as follows:


Additional tech specs can be found here.
(As you can see, I am being transparent about my supplier. I am getting no special deal. This is a group buy.)
PRICE:
Price is $30 USD for each vial kit, free shipping in the US, $10 FLAT to ship rest-of world. Shipping is combined for multiple vials.
WHAT YOU GET:
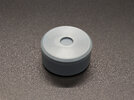
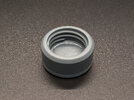
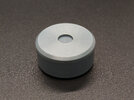
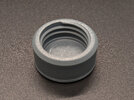
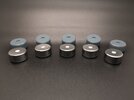
I am also providing a painted, resin 3D printed lid that more closely matches the TV show (at no extra cost). It will be finished as follows:
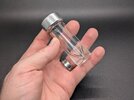
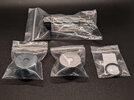
Therefore, you will receive:

HOW TO ASSEMBLE:
Simply insert the provided o-ring into the painted lid, add your liquid, and screw on tightly to ensure an airtight seal.
You'll have to provide the blue or green Compound V fluid yourself, but this is my recommended recipe:


![The.Boys.S01E03.1080p.BluRay.x264-SHORTBREHD.mkv_snapshot_30.23_[2024.06.10_18.38.41].jpg The.Boys.S01E03.1080p.BluRay.x264-SHORTBREHD.mkv_snapshot_30.23_[2024.06.10_18.38.41].jpg](https://therpf-f28a.kxcdn.com/forums/data/attachments/1476/1476470-c052780032cb7993cc87155bea8e8663.jpg)
![The.Boys.S04e04.1080p.Web.H264-Ethel.mkv_snapshot_00.29.24_[2024.06.20_20.02.02].jpg The.Boys.S04e04.1080p.Web.H264-Ethel.mkv_snapshot_00.29.24_[2024.06.20_20.02.02].jpg](https://therpf-f28a.kxcdn.com/forums/data/attachments/1476/1476471-6f96bdfcdb2e92a02275d12bf205c241.jpg)
![The.Boys.S04e04.1080p.Web.H264-Ethel.mkv_snapshot_00.54.53_[2024.06.20_20.04.23].jpg The.Boys.S04e04.1080p.Web.H264-Ethel.mkv_snapshot_00.54.53_[2024.06.20_20.04.23].jpg](https://therpf-f28a.kxcdn.com/forums/data/attachments/1476/1476472-4249f2845815a914e2e4a64031d15bbe.jpg)
HOW TO ORDER:
If you're interested, please DM me or post a reply to this thread; I will add your name to the Reservations list above.
I will not take any payment until the supply is in-hand, and I will provide photos (with painted caps) in this thread as proof that I have them ready to go. I will ask for payment at that time. Once I have done so, you will have ONE WEEK to provide payment or your reservation may go to someone else!
TURNAROUND TIME:
It takes as much as a month for Zoro to ship me the vials, so I will keep you posted in the thread. Once I have the vials, I will be taking payments and shipping daily!
WHAT'S NEXT:
If there are more requests after the current run is completed, I may consider another run.
The vials of green "Temp" V are much smaller and offered in another Run thread. Only the larger vials for blue V are being offered in this thread.
Thanks for your consideration!
Bill
I am offering a few highly authentic looking replicas of the Compound V vial from The Boys as a pre-painted kit with GLASS vial:


RUN #1 RESERVATIONS
- Astyanax
- CaptainEpic77 (shipped)
- Tuckanator (shipped)
- Tuckanator (shipped)
- ZombieBait (shipped)
- DarthPlatypus (shipped)
- Starganderfish (shipped)
- Starganderfish (shipped)
- 1ShareBeingLove (shipped)
- Skyfall1701 (shipped)
- PccChocolate (shipped)
- slimgiggity (shipped)
- SoggySandwich (reserved)
- Fuzethehostage (reserved)
- prateekm9x (reserved)
- Pallando (reserved)
- Rab (reserved)
- TimDRX (reserved)
I have been re-watching The Boys and Gen V, and I thought it might be nice to have a vial or two of Compound V in my collection.
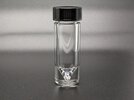
Imagine my surprise when I went online and discovered that glass vials with the conical internal bottom are not only insanely expensive, but also only sold in cases of 6. It appears that Wheaton has a patent/trademark on the "V-Vial®", which means they can set the price, as is quite common in the medical and scientific industries. No wonder they waved those vials around in the show so much; they're elite!
I was wondering if there might be interest in a mini-run of these, where I could do a group buy from
SPECS:
After much searching and research, I have concluded that the Boys V-Vials are 10 mL in size, which is the largest available. Specs from Wheaton are as follows:
- Outer Diameter: 24 mm (~15/16")
- Inner Diameter: 24 mm (~15/16")
- Height: 72mm (~2-13/16")
- Capacity: 10 mL
- Material: Borosilicate Glass, Type 1

Additional tech specs can be found here.
(As you can see, I am being transparent about my supplier. I am getting no special deal. This is a group buy.)
PRICE:
Price is $30 USD for each vial kit, free shipping in the US, $10 FLAT to ship rest-of world. Shipping is combined for multiple vials.
WHAT YOU GET:
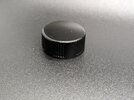
I am also providing a painted, resin 3D printed lid that more closely matches the TV show (at no extra cost). It will be finished as follows:
- Airbrush in high-gloss black, then
- airbrush Alclad II Polished Aluminum, then
- airbrush Alclad Aqua-Gloss clearcoat.


Therefore, you will receive:
- 1 x 10 mL glass V-Vial with closure
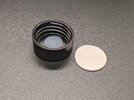
- 2 x resin 3d-printed custom lids (1 finished, 1 unfinished)
- 1 x o-ring (R-12, AS568 #115, 11/16" ID, 7/8" OD)
- 8 x pre-cut self-adhesive vinyl dots

HOW TO ASSEMBLE:
Simply insert the provided o-ring into the painted lid, add your liquid, and screw on tightly to ensure an airtight seal.
You'll have to provide the blue or green Compound V fluid yourself, but this is my recommended recipe:
- 50% distilled or RO water
- 50% ISO alcohol (to prevent fungus)
- 1-2 drops glycerin (to prevent settling)
- Food coloring to preference (1 drop is too much for 10mL...make a large batch)
![The.Boys.S01E03.1080p.BluRay.x264-SHORTBREHD.mkv_snapshot_30.23_[2024.06.10_18.38.41].jpg The.Boys.S01E03.1080p.BluRay.x264-SHORTBREHD.mkv_snapshot_30.23_[2024.06.10_18.38.41].jpg](https://therpf-f28a.kxcdn.com/forums/data/attachments/1476/1476470-c052780032cb7993cc87155bea8e8663.jpg)
![The.Boys.S04e04.1080p.Web.H264-Ethel.mkv_snapshot_00.29.24_[2024.06.20_20.02.02].jpg The.Boys.S04e04.1080p.Web.H264-Ethel.mkv_snapshot_00.29.24_[2024.06.20_20.02.02].jpg](https://therpf-f28a.kxcdn.com/forums/data/attachments/1476/1476471-6f96bdfcdb2e92a02275d12bf205c241.jpg)
![The.Boys.S04e04.1080p.Web.H264-Ethel.mkv_snapshot_00.54.53_[2024.06.20_20.04.23].jpg The.Boys.S04e04.1080p.Web.H264-Ethel.mkv_snapshot_00.54.53_[2024.06.20_20.04.23].jpg](https://therpf-f28a.kxcdn.com/forums/data/attachments/1476/1476472-4249f2845815a914e2e4a64031d15bbe.jpg)
HOW TO ORDER:
If you're interested, please DM me or post a reply to this thread; I will add your name to the Reservations list above.
I will not take any payment until the supply is in-hand, and I will provide photos (with painted caps) in this thread as proof that I have them ready to go. I will ask for payment at that time. Once I have done so, you will have ONE WEEK to provide payment or your reservation may go to someone else!
TURNAROUND TIME:
It takes as much as a month for Zoro to ship me the vials, so I will keep you posted in the thread. Once I have the vials, I will be taking payments and shipping daily!
WHAT'S NEXT:
If there are more requests after the current run is completed, I may consider another run.
The vials of green "Temp" V are much smaller and offered in another Run thread. Only the larger vials for blue V are being offered in this thread.
Thanks for your consideration!
Bill
Last edited:





![The.Boys.S01E03.1080p.BluRay.x264-SHORTBREHD.mkv_snapshot_30.21_[2024.06.10_18.38.18].jpg The.Boys.S01E03.1080p.BluRay.x264-SHORTBREHD.mkv_snapshot_30.21_[2024.06.10_18.38.18].jpg](https://therpf-f28a.kxcdn.com/forums/data/attachments/1471/1471795-226d7d87bbdcd332a5aa9eead989482b.jpg)
![The.Boys.S01E03.1080p.BluRay.x264-SHORTBREHD.mkv_snapshot_45.28_[2024.06.10_18.37.18].jpg The.Boys.S01E03.1080p.BluRay.x264-SHORTBREHD.mkv_snapshot_45.28_[2024.06.10_18.37.18].jpg](https://therpf-f28a.kxcdn.com/forums/data/attachments/1471/1471797-a596322f3559da46be59b13a91061c8d.jpg)
