You are using an out of date browser. It may not display this or other websites correctly.
You should upgrade or use an alternative browser.
You should upgrade or use an alternative browser.
The Batman 2022 Batarang Replica
- Thread starter Matthew Gresham
- Start date

batfan10
Sr Member
Thats really awesome! Thank you and your brother for sharing and reaching out and thank you to her for sharing. Your brothers came out really good!She's really nice and approachable. This was her advice to him so you know he's not just making things up lol
That's the one he finished and painted, too.
He reached out to Rut for weathering advice on it. She said for the film they painted and sealed them in Alumaluster silver/chrome. Then used black acrylic on top of that. After the acrylic dries use alcohol and cotton swabs to remove the black around the edges and lighten up spots for weathering. It won't mess up the silver.
My brother ran with that idea, but tweaked it. After he sanded, primed, sanded, primed, and sanded some more, he used Chrome Krylon spray paint. Alumaluster is expensive and this was his first one so he went the cheaper route. After the silver dried he used black acrylic from a paint set he got at Hobby Lobby. Thinned it with water. Brush on. Let that dry fully. He says if it doesn't dry fully before you use the alcohol it'll come off in chunks/chips instead of layers. So make sure it's dry first or else you won't get the rubbed light areas, just chipped effect with hard edges if that makes sense.
The small scratches he used a push pin. It'll scratch the black without ruining the silver underneath. For the surface scratches/marks that don't quite go all the way thru to the silver... He just used the paint brush handle and Zorro'd it a little to give that abused look lol
He used the 70% alcohol and had great results. Don't know if 90% will do any better or worse (he didn't want to try the 90 mid way thru after starting with the 70) but he wanted me to share that detail.
Little tip, the alcohol will smooth out brush strokes if you go too thick with the black. Just be patient and gentle. It's fun and very rewarding doing something new and having successful results.
Thank you and your brother for sharing so much about his technique. Could I ask what he used to seal the chrome paint before applying the black acrylic? I've heard a lot of clears can dull the metal.
dirtyjawa
Active Member
He didn't seal it. It's rattle can Krylon paint so he didn't bother with sealing it. It's kinda like 2 in one automotive paint, seals itself.Thank you and your brother for sharing so much about his technique. Could I ask what he used to seal the chrome paint before applying the black acrylic? I've heard a lot of clears can dull the metal.
It's stronger than acrylic so the alcohol won't mess it up.
NZ17
Member

batfan10
Sr Member
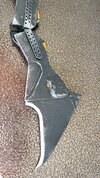
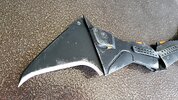
Finished my painting. Sadly between the humidity and my impatience the way they did it for the movie wasnt workinf out so I went more with the drybrushing. I did use the scratching technique wich helped alot. I did also use 99% alcohol wich I think was too strong and did start taking off the spreypaint so I covered that with silver acrylic.
Attachments

Last edited:
Ghostsoldier
Sr Member
It looks pretty awesome to me. ")
Rob
Rob
Toa Quarax
Well-Known Member
Here's some screenshots from the movie showing the removable Batarang/Chest Glyph/knife/whatever it's supposed to be called (the companies making figures are going with Batarang, so I will too):
Riddler's apartment:


Gotham Square Garden:


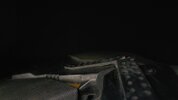
Unless I'm missing something, it only appears separate from the chest piece for a total of 5 different shots, and in each of those it seems to be the version with the connector bridging the gap between the two sections of the Batarang. In the shot of him cutting the cable and falling, you can see that the detail on the handle sections of the prop are mirrored on the back side, with maybe two circular magnets added to connect to the chest piece, and the curved blade sections are a bit thinner than the handles (also the grapple launcher on his right arm seems to be missing for whatever reason):


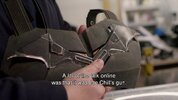
The version of the Batarang that's straight and has the two ends connected without any gap that was shown by property master Jamie Wilkinson in the "Batmobile and Batsuit" promotional featurette was probably intended for the scene where he cuts the police barrier to enter Riddler's apartment (judging by the lack of bullet damage), but I think you can actually make out the gap between the two parts of the Batarang in that shot if you look closely, meaning it wasn't used there:
Prop connected at the ends:


The gap in the movie:

So the version Jamie Wilkinson was obviously made, but doesn't appear to have made it into the final cut of the movie. It seems like there may have also been another unseen version of the Batarang where the two sections were connected at an even more extreme angle than the version seen in the final film, because Hot Toys is including one with their upcoming figure of Batman:
.jpg")
Riddler's apartment:
Gotham Square Garden:
Unless I'm missing something, it only appears separate from the chest piece for a total of 5 different shots, and in each of those it seems to be the version with the connector bridging the gap between the two sections of the Batarang. In the shot of him cutting the cable and falling, you can see that the detail on the handle sections of the prop are mirrored on the back side, with maybe two circular magnets added to connect to the chest piece, and the curved blade sections are a bit thinner than the handles (also the grapple launcher on his right arm seems to be missing for whatever reason):
The version of the Batarang that's straight and has the two ends connected without any gap that was shown by property master Jamie Wilkinson in the "Batmobile and Batsuit" promotional featurette was probably intended for the scene where he cuts the police barrier to enter Riddler's apartment (judging by the lack of bullet damage), but I think you can actually make out the gap between the two parts of the Batarang in that shot if you look closely, meaning it wasn't used there:
Prop connected at the ends:
The gap in the movie:
So the version Jamie Wilkinson was obviously made, but doesn't appear to have made it into the final cut of the movie. It seems like there may have also been another unseen version of the Batarang where the two sections were connected at an even more extreme angle than the version seen in the final film, because Hot Toys is including one with their upcoming figure of Batman:
Last edited:
VitalNonsense
Well-Known Member
Good work, I came to similar conclusions although I didn't have all the screenshots to back it up.Here's some screenshots from the movie showing the removable Batarang/Chest Glyph/knife/whatever it's supposed to be called (the companies making figures are going with Batarang, so I will too):
Riddler's apartment:
View attachment 1583954View attachment 1583953
View attachment 1583952View attachment 1583950View attachment 1583951
Gotham Square Garden:
View attachment 1583958View attachment 1583957View attachment 1583956
View attachment 1583955View attachment 1583969View attachment 1583968View attachment 1583967View attachment 1583966View attachment 1583965View attachment 1583970View attachment 1583964View attachment 1583963View attachment 1583962View attachment 1583961View attachment 1583960
View attachment 1583959
Unless I'm missing something, it only appears separate from the chest piece for a total of 5 different shots, and in each of those it seems to be the version with the connector bridging the gap between the two sections of the Batarang. In the shot of him cutting the cable and falling, you can see that the detail on the handle sections of the prop are mirrored on the back side, with maybe two circular magnets added to connect to the chest piece, and the curved blade sections are a bit thinner than the handles (also the grapple launcher on his right arm seems to be missing for whatever reason):
View attachment 1583974View attachment 1583973View attachment 1583972View attachment 1583971View attachment 1583980
The version of the Batarang that's straight and has the two ends connected without any gap that was shown by property master Jamie Wilkinson in the "Batmobile and Batsuit" promotional featurette was probably intended for the scene where he cuts the police barrier to enter Riddler's apartment (judging by the lack of bullet damage), but I think you can actually make out the gap between the two parts of the Batarang in that shot if you look closely, meaning it wasn't used there:
Prop connected at the ends:
View attachment 1583938View attachment 1583937
The gap in the movie:
View attachment 1583975
So the version Jamie Wilkinson was obviously made, but doesn't appear to have made it into the final cut of the movie. It seems like there may have also been another unseen version of the Batarang where the two sections were connected at an even more extreme angle than the version seen in the final film, because Hot Toys is including one with their upcoming figure of Batman:
View attachment 1583979
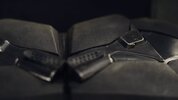
I suspect what you are guessing may be magnets may actually be the curved ends of these parts catching the light, mirrored from the front:
dirtyjawa
Active Member
Looking at the chest cavity and the way it's clicked out of the chest piece in the BTS video (pushed the bottom center and the wings fall forward), the magnets are the circles.Good work, I came to similar conclusions although I didn't have all the screenshots to back it up.
I suspect what you are guessing may be magnets may actually be the curved ends of these parts catching the light, mirrored from the front:
View attachment 1584030
Toa Quarax
Well-Known Member
Good work, I came to similar conclusions although I didn't have all the screenshots to back it up.
I suspect what you are guessing may be magnets may actually be the curved ends of these parts catching the light, mirrored from the front:
View attachment 1584030
Oh yeah, you're right. For whatever reason, I thought the clips were slightly lower down on the Batarang, even though I've been staring at it for so long lol.
Looking at the chest cavity and the way it's clicked out of the chest piece in the BTS video (pushed the bottom center and the wings fall forward), the magnets are the circles.
View attachment 1584034
That would definitely be the best place to hide them.
Last edited:
Synz314
Sr Member
Prop Store has up for auction one of the screen used ones.

Lot # 77 : BATMAN, THE (2022) - Batman's (Robert Pattinson) Batarang
Batman's (Robert Pattinson) batarang from Matt Reeves' superhero film The Batman. Batman used his batarang to cut the electric cable which threatened the lives of Gotham citizens at the arena during the climax of the film. His batarang also doubled as his
propstoreauction.com
Similar threads
- Replies
- 0
- Views
- 490
- Replies
- 0
- Views
- 299
- Replies
- 2
- Views
- 1,588
- Replies
- 2
- Views
- 872