You are using an out of date browser. It may not display this or other websites correctly.
You should upgrade or use an alternative browser.
You should upgrade or use an alternative browser.
Studio scale SPV build Captain Scarlet
- Thread starter riley1
- Start date
riley1
New Member
Hi Kevin, partially. The body shell, chassis and tyres are from a kit by Studio 2 . I turned the wheel hubs in aluminium.The rear track and detail section is all scratch built from parts identified on various Anderson forums. Namely scalextric parts,obsolete Kibri model railway kits which were a nightmare to source and two Japanese tin toy tanks I needed for the tracks . Spectrum roundals were printed together with the SPV lettering The mid intake fins I made and cast myself in resin . The Ford Zircon blue paint was colour matched from a 1967 Ford paint code found in an old book we found . That’s pretty much it really a Labour of love for sure but I’m pleased with the outcome. Thanks for looking ChrisVery nice indeed. Is it a scratchbuild?
riley1
New Member
Hi Kevin, partially. The body shell, chassis and tyres are from a kit by Studio 2 . I turned the wheel hubs in aluminium.The rear track and detail section is all scratch built from parts identified on various Anderson forums. Namely scalextric parts,obsolete Kibri model railway kits which were a nightmare to source and two Japanese tin toy tanks I needed for the tracks . Spectrum roundals were printed together with the SPV lettering The mid intake fins I made and cast myself in resin . The Ford Zircon blue paint was colour matched from a 1967 Ford paint code found in an old book we found . That’s pretty much it really a Labour of love for sure but I’m pleased with the outcome. Thanks for looking Chris
riley1
New Member
ThanksNice work, congrats !
modelerdave
Sr Member
I loved that show as a kid. Great work on the model!
riley1
New Member
Thank you for your kind commentI loved that show as a kid. Great work on the model!
Custerclan
New Member
What a superb job a truly stunning SPV could please post more pics for all of Us to drool over? Also talk about the work that went into altering the kit to get to this?
Best from Michael
Best from Michael
riley1
New Member
Hi Michael, glad you like the model .What a superb job a truly stunning SPV could please post more pics for all of Us to drool over? Also talk about the work that went into altering the kit to get to this?
Best from Michael
To give you an idea of the processes and thoughts I went through in producing the finished article, I am by my own admission a bit of a stickler for screen accuracy which is why it took so long to source the parts to accurately represent the rear detail.
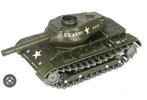
The build started out with the purchase of a studio scale SPV kit by Studio 2 which I don’t think are available now. The kit came with a good body shell and good pneumatic rubber tyres which were used in the final build . Then began the process of identifying and locating the rear track and detail. I knew this would be the hardest part of the build . There is a good identification sheet that is available on some of the Anderson forums which shows what is required and where it goes. Firstly the tracks these are from a Japanese M40 tin toy tank (see pic) . These are not only expensive but you need 2 . plan on parting with about £100+ for each one.
The track mounts I made myself after carefully measuring the fabricating a master and casting them in resin.


Next, I concentrated on the rear detail. This was a mixture of scalextric parts from the pit lane accessories set and parts from two obsolete Kibri train accessory kits shown below.
The very centre is more scalextric parts and a grid scratch built from the spares box . Overall this took a while to build and get the right metallic mechanical look
The lights you can see are from a guitar amp unit (they should be fluted really but I couldn’t find any).
The paint colour Ford Zircon Blue was colour matched from stills and a paint code I found in an old 60’s Ford brochure which I had made up in aerosol form. I added some of the panel lines by adding thin strips of masking tape before adding the final coats of colour and then removing to give a slight depression in the paint representing panel lines . Various other details were added using bare metal foil for the chrome trim and a product called trim line for the black striping on the front. Bare metal foil is more forgiving where curves are required than chrome tape.
This is just a brief overview but if you have any specific questions please feel free to ask . One final pic
Thanks for the interest
R1
Paul H Edd
Member
Wonderful. Put a smile on my face. Still one of the coolest vehicles 50+years on. Had a dinky toys version back in the day. It's a great build and nice detailing. Superb job.View attachment 1660218Just finished this it’s just under 2ft in length View attachment 1660216
Last edited:
Similar threads
- Replies
- 10
- Views
- 1,435
- Replies
- 13
- Views
- 1,043
- Replies
- 30
- Views
- 4,498
