Stormtrooper Helmets on Spikes

Here is another Halloween project for this year. I liked the scene in The Mandalorian which showed the trooper helmets on spikes and thought it would work well with my Star Wars theme.
167D029C-D5AA-4C74-8DDF-E91D11B445B3.jpeg


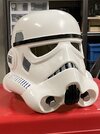
I found some vinyl helmets from China for cheap on eBay and ordered a few. I was pleasantly surprised by how good these are. The paint work is sloppy but weathering will cover this up.
60BD191C-5659-4C56-84DD-AAF2AB3C0D49.jpeg


I trimmed out the crappy eye lenses they used (flexible vinyl) and hot melted in some green welding visor material I had left over.
B11B5805-04BE-48B6-9292-2AB12FF3B739.jpegE26A86F0-CF91-4A23-928B-AC1388EF4962.jpeg

Finished product. I think this improved the overall look.

56721991-70E8-4DBD-9456-586D3C64716B.jpeg
 

Attachments

  • EA13F3DB-D3F3-4E95-A89A-276EF3474A5A.jpeg
    EA13F3DB-D3F3-4E95-A89A-276EF3474A5A.jpeg
    308.2 KB · Views: 429
Last edited:
I decided to cover up the Made In China stamp even though this wouldn’t be seen. It only took a few minutes each so why not? I filled in the lettering with CA glue and sanded flat.
3271D937-A6BD-4338-BE3A-43972316C86D.jpeg

Acrylic paint sticks well to vinyl so I just spot sprayed with Montana Shock White. The color is off but I found a can of Rustoleum white that matched perfectly and sprayed a top coat of that. I didn’t bother masking anything as it will a be getting weathered.
D8BDCC17-F691-47FC-A1E8-88E543CC47B4.jpeg
 
I dremmeled some damage into the helmets and added some acrylic brown and sand paint where I thought dirt would build up.
2E0F94C8-2FEE-4BFC-8C32-CA5E5982D402.jpegF714FDBF-0620-432A-B1CA-010DB6CC7F61.jpeg

A couple of rounds of adding grime and removing grime with isopropyl alcohol until I was happy with the result and then I added some overspray with Montana Sahara Beige, building up heavy in areas that were more exposed. I added a few random brush strokes and paint splatter with a tooth brush and sealed everything with clear matte varnish.
A7A514C3-3709-4BF9-9798-B353F2F6FB5A.jpeg


This was a quick build, the lenses were done in an evening and paint work was a couple of hours.
 
Looks great! Do you have the eBay link for the helmets? I've been using the black series helmets for this & its getting a bit expensive!
 

The helmets are about 1/8” thick and nice and sturdy. If you examine them closely you can see the master started as a 3D print as there are a very few faint print lines present.

After replacing the lenses and with a proper paint up I think these can make a great shelf display.

Oh, and they are full size and match the size of the Black Series.
 
Mine was the Hasbro. I figured it was worth it as that is what they used. If your doing three go for the cheaper vinyl for sure.

I want to add more detail, weathering, and damage eventually.

It's a really fun, no stress project.
 
I'm curious what file they used it could have been a scan of the black series
Most likely based on a scan or cast of the Black Series, yes. It has the tells.
But I think a few details must have been sharpened.

The helmets on spikes in The Mandalorian had been spotted as being Black Series, so it is only fitting. :)
 
Most likely based on a scan or cast of the Black Series, yes. It has the tells.
But I think a few details must have been sharpened.

The helmets on spikes in The Mandalorian had been spotted as being Black Series, so it is only fitting. :)
I bluddy knew the mando ones were black series!!! I was thinking about that for ages thank you for confirming that for me!!!
 
I cut up a 1” x 4’ dowel into three equal pieces, 16” each. After about an hour spinning on the disk sander I got these to a nice taper. The ones on the show have a real long taper to them but that would probably take another hour or so and I was happy enough with this. A quick coat of paint and on to the next step.
8B7D3698-797B-420D-8439-1F70C7B1B8FA.jpegD87E241E-1BA2-4EF7-839F-57579D6F2A7D.jpeg
C8D271FF-1C64-4AEB-A0A7-8B9A6780E2D3.jpeg
 
I am using electrical conduit for the spear base so I can pound some rebar into the ground and slip the spear over for quick removal at the end of the night. I modelled up a connector for the spear tip which has a bit of a flat to support the helmet.
56243BDA-9363-450E-82BD-31E75A4DA9AA.jpegF4C84B5B-96AC-44AF-954D-6138A05CC540.jpeg

All connected and waiting for final paint.
9BB31D1B-02CB-4F54-814E-DA5B47F1CF22.jpeg
2D4284D1-B421-4A29-B240-826F87247C92.jpeg
 
Last edited:
I used a hole saw to drill the holes in the tops of the helmets but the first hole was a little too big! Measure twice cut once! I patched it up a bit with the cut out piece and hotmelt and then drilled it out to the proper size. I then decided I would keep it as a blaster since the edges looked melted. A little bit of paint and it is a blaster hole!
523ECAB6-736E-40E2-A02D-701F41EAC9E0.jpeg


Couldn’t resist getting a shot of them set up in the yard. Got some pretty good looks from the neighbours but they are used to seeing weird happenings at our house. I just need to add the red cloths and this project is wrapped.
C51E0463-DE24-41D6-8211-708954EE7770.jpeg
 
I’m the local Halloween guy that goes overboard every year. It is becoming quite a draw in our neighborhood now.

I won't lie I am a little disappointed. I was hoping for weird like the neighborhood kids stay away from your house. :D :lol:


You should post some pics of your past Halloween house décor.
 
Back
Top