Punisher4u
New Member
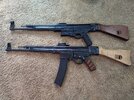
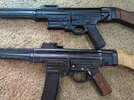
I wanted a Shoei replica STG44. Since they were sold years ago they hardly come up for sale. So I decided to build my own with a Denix and AGM replica. They each have some details that are correct and some that are completely wrong. Using parts from both with some reproduction parts I was able to get it to look about as good as a Shoei.
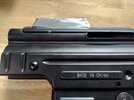
While the Denix looks decent a few feet away it is mostly inaccurate. Many of the parts are held together with wood screws. It's a pretty low quality replica. Though the receiver and grip frame are pretty close to being correct.
Since the AGM is an airsoft replica there were changes made to fit the airsoft internals. The grip frame is shaped completely different and the receiver has the whole bottom cut out. When comparing the parts to drawing I found that the barrel assembly and some of the other parts are almost perfect reproductions.
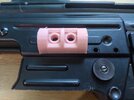
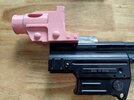
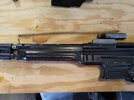
For the receiver I used the Denix. The rear sight was milled off and the AGM used. The ejection port was milled out and the AGM dust cover was fitted. That took quite a bit of time, but it looks much better than the molded dust cover. The AGM mag catch was used. The rear of the receiver was modified slightly for the AGM stock end cap to fit.
For the grip frame the Denix was used. The trigger and hammer were shaped wrong, but the pin holes were in the right location for a real fcg. The holes were drill larger and a reproduction fcg was used. The molded in safety was milled off. Using the drawings a new internal part of the safety was made and the AGM safety was attached. Reproduction grips didn't fit the grip. Since the Denix grips looked decent I reused them.
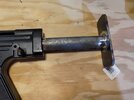
Both the Denix and AGM stocks are shaped wrong. The AGM metal parts are correct. A reproduction stock was used. The sheet metal was reformed to fit the new stock. Correct looking wood screws were used to hold them on.
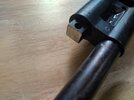
The whole AGM barrel assembly was used. All of the molding lines and ejector pin marks were sanded off. The spring hook on the gas plug was cut off. The gas holes on the gas block were drilled.
In the pictures the one on the bottom is the accurate one.
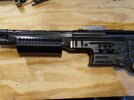
With all of the parts left over I was able to assemble a 2nd dummy. While it reused all of the inaccurate parts it still looks decent a few feet away. Not needing an inaccurate replica I decided to convert it into a Star Wars blaster.
The A280C and DLT-20A are both based off of the STG44. Actually the DLT-20A was built from a casting of a A280C and some new parts. I haven't decided which one I want yet. I'll start with the parts that are used on both.
On the side of the receiver there is a piston from a Revell model v8. Since the kit was used on other builds there are resin kits and 3d models.
I found a model of Han's blaster on Thingiverse. The piston will need to be modified to fit over the ridge on the receiver. The final version will be printed with a resin printer.
The Denix version would be the better replica to start with. When converting it to a blaster most of the inaccuracies are either removed or covered up.
The AGM version will still work. Thought the wrong grip frame may stand out.
Many of the resin kits and 3d printing options are also incorrect.
The props were only shown on screen for a few seconds. They haven't been documented in detail like the other blasters. Many of the parts are still unidentified. So in the end if it looks like a blaster it will still be good enough.
Since there is a DLT-20A on Thingiverse using a Denix as a base I thought that it would be an easy build.
Like the original prop it uses a real Browning m1919 shroud. I really don't want to use a real shroud. A piece of 1-1/2" conduit is slightly smaller than the shroud.
I printed the piece that fits over the mag well. It fits, but not very good. It also doesn't have much detail. The stock fits and should be ok to use.
The scope from the DLT-20A on Thingiverse is all one piece. That will make it harder to print.
The scope is a single point oeg. Since it is the same scope used on may blaster there are quite a few options. It could be an original, metal reproduction, resin kit, or 3d printed.
There are a few models on Thingiverse. The pieces are glued together instead of screwed. I'll probably use one as a start and remodel it to be screwed together. The bracket will probably need some changes to make it fit the receiver.
For either version of the blaster the stacking rod needs to be cut off.
The rear sight base needs to be smooth. That is one of the inaccuracies with the AGM. The STG44 had smooth sides while the MP43 and MKB42 had the ribs for a scope attachment. It's easy enough to fix by grinding it off with a flap disk.
I 3d printed the bracket that goes in front of the scope. It fits perfect on a Denix, but it a bit tight on the AGM. While the spheres and screw heads are round the larger cylinders are faceted.
While the Denix looks decent a few feet away it is mostly inaccurate. Many of the parts are held together with wood screws. It's a pretty low quality replica. Though the receiver and grip frame are pretty close to being correct.
Since the AGM is an airsoft replica there were changes made to fit the airsoft internals. The grip frame is shaped completely different and the receiver has the whole bottom cut out. When comparing the parts to drawing I found that the barrel assembly and some of the other parts are almost perfect reproductions.
For the receiver I used the Denix. The rear sight was milled off and the AGM used. The ejection port was milled out and the AGM dust cover was fitted. That took quite a bit of time, but it looks much better than the molded dust cover. The AGM mag catch was used. The rear of the receiver was modified slightly for the AGM stock end cap to fit.
For the grip frame the Denix was used. The trigger and hammer were shaped wrong, but the pin holes were in the right location for a real fcg. The holes were drill larger and a reproduction fcg was used. The molded in safety was milled off. Using the drawings a new internal part of the safety was made and the AGM safety was attached. Reproduction grips didn't fit the grip. Since the Denix grips looked decent I reused them.
Both the Denix and AGM stocks are shaped wrong. The AGM metal parts are correct. A reproduction stock was used. The sheet metal was reformed to fit the new stock. Correct looking wood screws were used to hold them on.
The whole AGM barrel assembly was used. All of the molding lines and ejector pin marks were sanded off. The spring hook on the gas plug was cut off. The gas holes on the gas block were drilled.
In the pictures the one on the bottom is the accurate one.
With all of the parts left over I was able to assemble a 2nd dummy. While it reused all of the inaccurate parts it still looks decent a few feet away. Not needing an inaccurate replica I decided to convert it into a Star Wars blaster.
The A280C and DLT-20A are both based off of the STG44. Actually the DLT-20A was built from a casting of a A280C and some new parts. I haven't decided which one I want yet. I'll start with the parts that are used on both.
On the side of the receiver there is a piston from a Revell model v8. Since the kit was used on other builds there are resin kits and 3d models.
I found a model of Han's blaster on Thingiverse. The piston will need to be modified to fit over the ridge on the receiver. The final version will be printed with a resin printer.
The Denix version would be the better replica to start with. When converting it to a blaster most of the inaccuracies are either removed or covered up.
The AGM version will still work. Thought the wrong grip frame may stand out.
Many of the resin kits and 3d printing options are also incorrect.
The props were only shown on screen for a few seconds. They haven't been documented in detail like the other blasters. Many of the parts are still unidentified. So in the end if it looks like a blaster it will still be good enough.
Since there is a DLT-20A on Thingiverse using a Denix as a base I thought that it would be an easy build.
Like the original prop it uses a real Browning m1919 shroud. I really don't want to use a real shroud. A piece of 1-1/2" conduit is slightly smaller than the shroud.
I printed the piece that fits over the mag well. It fits, but not very good. It also doesn't have much detail. The stock fits and should be ok to use.
The scope from the DLT-20A on Thingiverse is all one piece. That will make it harder to print.
The scope is a single point oeg. Since it is the same scope used on may blaster there are quite a few options. It could be an original, metal reproduction, resin kit, or 3d printed.
There are a few models on Thingiverse. The pieces are glued together instead of screwed. I'll probably use one as a start and remodel it to be screwed together. The bracket will probably need some changes to make it fit the receiver.
For either version of the blaster the stacking rod needs to be cut off.
The rear sight base needs to be smooth. That is one of the inaccuracies with the AGM. The STG44 had smooth sides while the MP43 and MKB42 had the ribs for a scope attachment. It's easy enough to fix by grinding it off with a flap disk.
I 3d printed the bracket that goes in front of the scope. It fits perfect on a Denix, but it a bit tight on the AGM. While the spheres and screw heads are round the larger cylinders are faceted.