Some blasters

JFB64

Well-Known Member
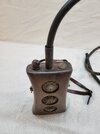
Here are three of my favorite blasters in their original iteration, which I think is the best. They are all Blaster Factory kits that were purchased here from the Junkyard. The E-11 is basically stock, as is the DL-44. Although for that I added the greeblies that go on the top of the barrel. I had acquired those years ago and am glad I finally got to use them. I also turned the mystery disk. I did more work on the DH-17. I scratch built the detail on top of the blaster between the iron sights from a block of mahogany and many bits of styrene. The scope mount is made from two pieces of aluminum. The scope rings were found on E bay and the scope was bought from Blaster Factory. That is a fantastic site. I also made the wedge on the left side near the mag well from styrene. The paint scheme for all three was inspired by zjunlimiteds E -11 build log. Very informative thread. It's really cool to finally get great examples of these blasters after wanting them for 46 years.

20230307_154025.jpg
20230307_153051.jpg
20230307_153446.jpg
20230307_152538.jpg
20230307_152636.jpg
20230307_153623.jpg
20230307_153639.jpg
 
Here is my version of Boba Fetts latest EE-3 carbine. It's built from a Webley & Scott No. 4 flare gun, that I purchased from the Junkyard last year. I used Alan Sinclair's W & S No. 1 drawings as a guide. The brass grip and the screws and bushings to attach the stock are from Blaster Factory. The stock was fashioned from a piece of walnut that I've had stored in my shop for decades. It's nice to be finally using it. The grip frame was machined from sheet aluminum using the same tools and techniques I would have used as if it was made from wood. The scope is cobbled together from two different ones. The barrel is an acrylic tube with plastic C channel attached to it. The detail on the flare gun itself is mdf and sheet styrene. The grebbles are camera parts, electrical components, patch cord jacks, many plastic kit parts, some Lego and Nerf barrel parts, an old tire pressure gauge, a gun oil can and some gun maintenance tools. The tip of the barrel is vac formed with the buck left in the piece because I wanted the under cut at the base of the cone. It's painted with Alclad chrome and Hot Metal paints. I used also Rust Oleum primer and textured paint as well as Tamiya spray cans and clear coat. The stock as several coats of Minwax wipe on polyurethane and paste wax. For weathering I used pastels, Rub n Buff and a hunk of concrete on the stock.

20230610_083731.jpg
20230610_083950.jpg
20230610_083839.jpg
20230610_084049.jpg
20230610_084201.jpg
20230610_085003.jpg
 
JFB64 - fantastic job! Question about your choice of clear coat: the clear coats I have had in the past tend to not work well with pastels, what type/brand of clear coat did you use?
 
First, thank you both for the kind words. JamesM242 you are right about the clear coat. it tended to mute most of the pastel work. I had to reapply it. I did not clear coat the other blasters and thought I would try it on this one. I will have to re think if and how I use it in the future. It was Tamiya flat clear. Here are some in process photos.

20230321_152349.jpg
20230312_095255.jpg
20230321_144959.jpg
20230418_153439.jpg
20230424_160505.jpg
20230509_150607.jpg
20230502_160835.jpg
 
The latest addition to the collection is this Jawa ion blaster. It's made of parts from at least six different SMLEs including a demilled receiver and real Mills cup grenade launcher. I machined the adapter that connects the cup to the barrel. The "power flask" was inspired by two antique powder flasks that were in the Junkyard some months ago. This one is shaped from a block of walnut and decorated with more camera parts and electrical components among other things. The cord is left over from my father's stash of stuff that I inherited. He never threw out things like that. After all you might need it some day. How right he was. The cord it permanently attached to the flask but not to the blaster. I turned an aluminum sleeve and attached the cord to it. The sleeve fits into a hole in the stock and is held in place by friction and imbedded magnets. I also added some detail to the inside of the cup. I didn't like the idea of looking into that big opening and only seeing the nut that holds the cup, so I cobbled together an "ion emitter". It's made from donor kits that I've had lying around for about twenty years. The blaster itself weighs 6lbs 10oz.

20230723_091104.jpg
20230723_091133.jpg
20230723_091150.jpg


20230723_091526.jpg
20230723_092156.jpg
20230723_091341.jpg
20230715_150431.jpg
20230723_093430.jpg
 

Attachments

  • 20230723_091530.jpg
    20230723_091530.jpg
    1.1 MB · Views: 28

Your message may be considered spam for the following reasons:

If you wish to reply despite these issues, check the box below before replying.
Be aware that malicious compliance may result in more severe penalties.
Back
Top