Star Wars The Force Unleashed II - General Rahm Kota WIP

Re: The Force Unleashed II - General Rahm Kota WIP

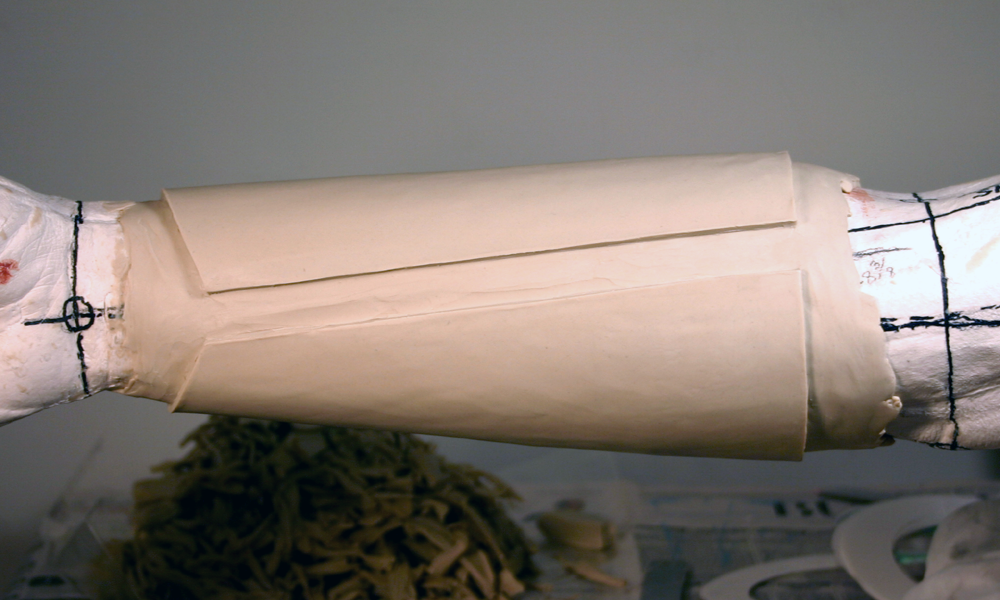
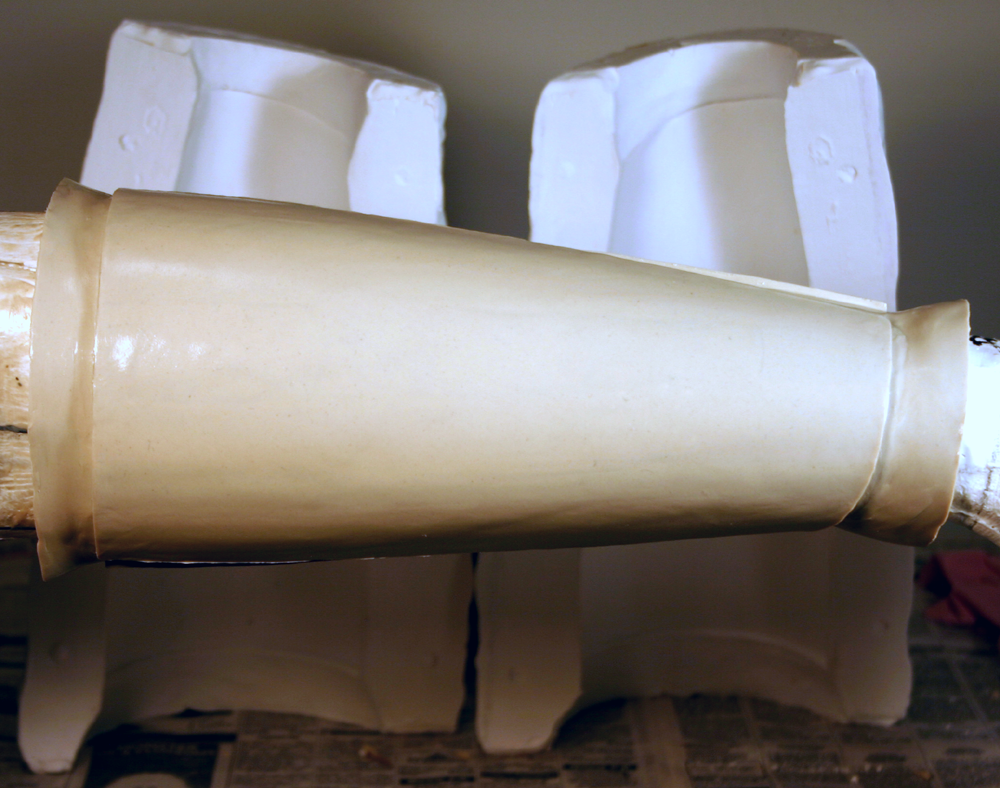
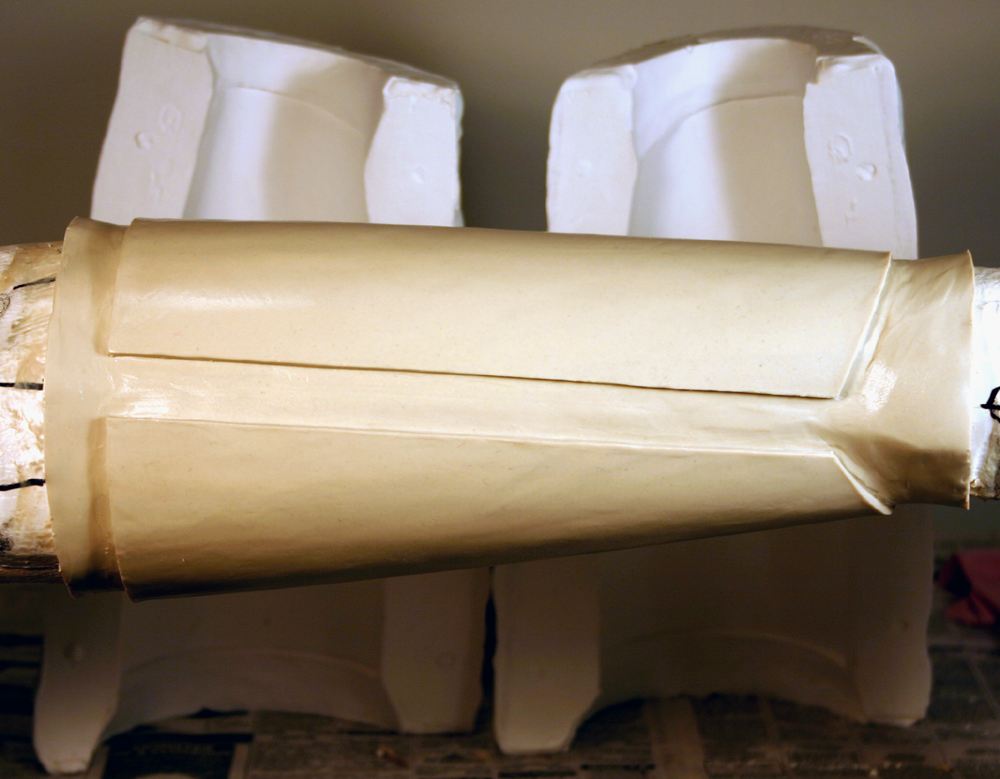
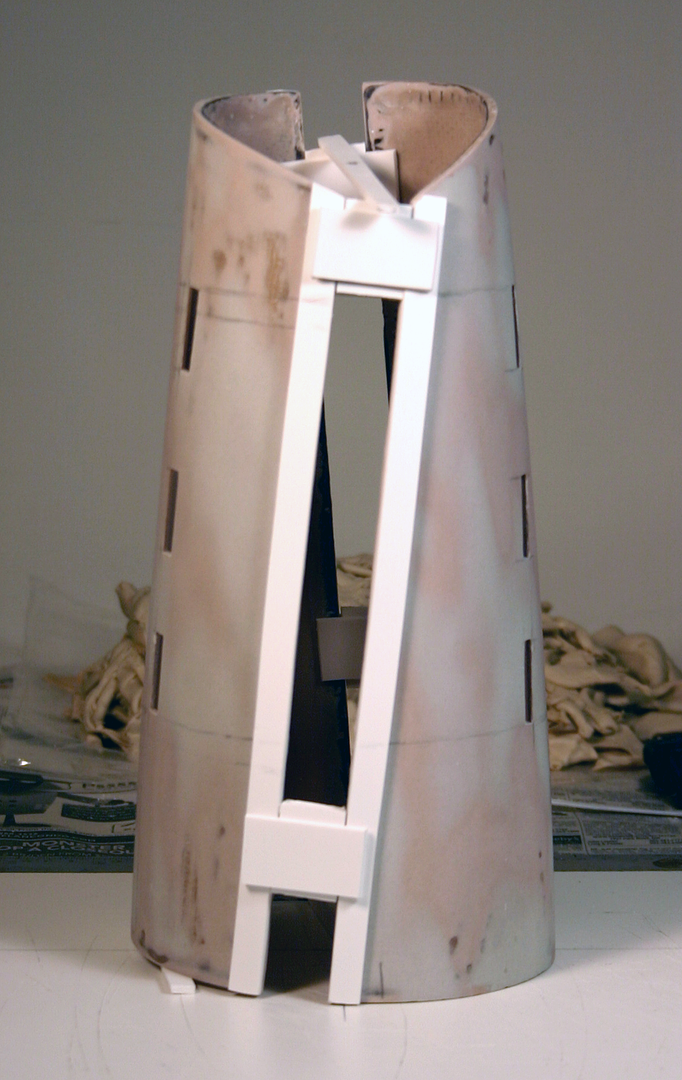
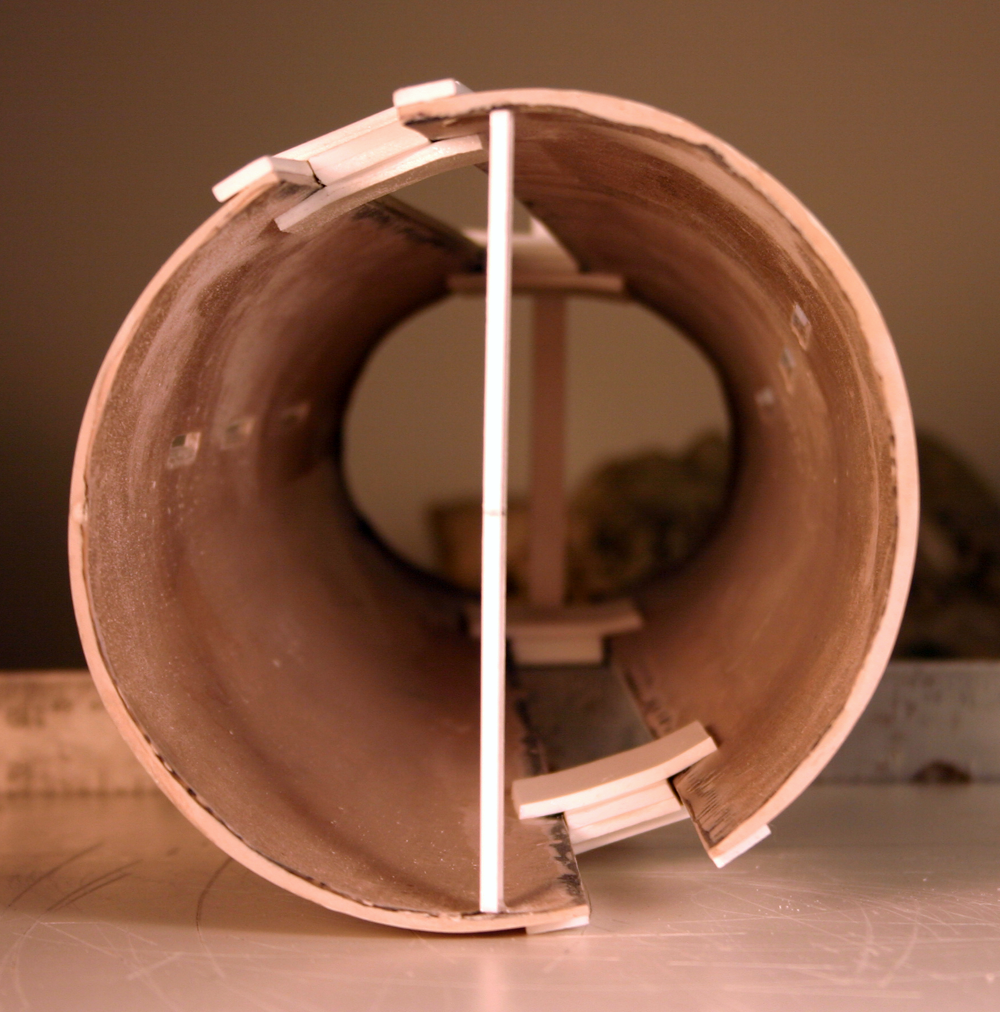
The cross straps need to be rigid since they will be glued in place to hold the bottom of the piece closed and maintain the uniform gap between halves. When worn, it won't be pulled tight to my arm over it's entire length, only at the wrist. There will be a bit of space between my upper forearm and the inside surface of the armor to allow it to rotate as my forearm rotates. Does that make sense?

I could make leather straps look accurate, but they wouldn't be rigid enough to do the job unfortunately.

~ BC

Understood. I'm glad you found info to help with the trouble you were having, BTW everything is coming along awesome..
 
Re: The Force Unleashed II - General Rahm Kota WIP

Wow,

I love the elegantly simple heat form! I'm going to steal that one from you, Koda.

Scott
 
Re: The Force Unleashed II - General Rahm Kota WIP

Weekend update:

A bit of a setback today. I attempted to attach the three cross-straps to the vambrace halves. It seems epoxy is not good at gluing Sintra to fiberglass/bondo. I got the straps in place then popped out the temporary spacers and formed and glued the elbow guard on. The idea was that the straps would flex enough to allow putting the bracer on, but first one then another of the epoxy bonds broke, then the center strap itself broke.

Also the elbow end of the cone is about 3/4" too big in diameter. Even with the shirt on there will be just too much play. At the moment I plan on taking it back to the sculpt and trying again. It will be better if I mark the strap slots on the clay anyway. That way I can cut them much cleaner. I can also take molds of the sintra straps once I get them shaped and fitted, then cast them in the urethane I used for the handguards. Much more durable than foam PVC.

Try and learn. Such is the way of the scratch-build. :unsure

~ Vonnor
 
Re: The Force Unleashed II - General Rahm Kota WIP

So to hear of the setback but it's great to here you have a very strong solution to it. You'll be even happier in the long run.
 
Re: The Force Unleashed II - General Rahm Kota WIP

As a way of a bump-slash-update, I spent the morning attempting to build custom leather gloves with straps around the wrist. This was to approximate the look of the CG model. I had purchased a couple of sheepskin hides but one turned out to be paper fragile and tore almost by just looking at it. I reverse-engineered (seam-ripped) an old gauntlet that was too large for me and used it to cut out patterned pieces, then tried to sew them up with a machine.

Yep, another "fail" post. :p

The second hide turned out to be a "napa" hide. Basically a cheap split-grain with an artificial surfacing applied to it. The seams ripped out as soon as I put my hand into it.

So after a frustrating but educational waste of a precious weekend (my Sundays are all shot), I decided to punt the custom gloves. In the interest of short-cutting the CVI countdown clock I ordered a pair of these. That's the company I bought the TFU1 Kota fingerless gloves from. I'll use some of the cheap hide to make wrist straps for them, sew some velcro to the backs to hold the handplates, and call it a day.

Well, not exactly "call" it yet. I'm heading off now to lay some clay on the ARMature for the vambrace re-dux.

Sculpting is therapeutic by comparison. :D

~ Vonnor
 
Re: The Force Unleashed II - General Rahm Kota WIP

Back on the project again.

Some lessons learned were applied to this re-build. After measuring the first attempt at the arm vambrace halves, I had a good half inch diameter to play with at the elbow. The re-sculpt was completed in about 4 hours. I did that along with the new molds last weekend. Here is the fiberglass lay-up I did today.

Some things I did differently:

  • - Built up the mold-walls around the sculpt so that there was only about 1/8" model thickness around all edges.
    - Split the mold halves along the divide so I could fiberglass each half separately
    - Cut a paper contour template and used that to cut out the FG cloth - Wanted to lay 4 layers of cloth one piece per layer - that really came out much cleaner!
    - Mixed the Rondo gel-coat thinner but hotter (little more resin and hardener than normal) - The cool weather helped a lot, had time to brush on the goop then hit it with a blow-dryer and it kicked real fast.
    - Let the gel-coat set up a bit longer so the first resin brush-in didn't funk up the gel
    - Used MUCH less resin - took a lot of time to dab and stipple the resin into the cloth each layer

I still have to add little break-away tabs between the halves, to hold them together while the surface is sanded, slots are cut, and the cross-straps are added (That's what the registry keys are for).

kota_vambraces74.png


Will be rolling the updates much faster again.

Stay tuned.

~ Vonnor
 
Re: The Force Unleashed II - General Rahm Kota WIP

No, your Honor, I just took a month off to regroup and re-motivate, although I was tempted to scrap the project after piloting the fail-boat for so long. What kept me in the game was my shiny silver shoulder bells that I set on the shoe-rack right by my door. Every day when I'd leave for work they'd whisper, "PLEASE don't orphan us!"

Lessons cost money, and the latter half of trial-and-error can be an expensive tutor.

I guess I was lucky on my last costume build; didn't make too many mistakes. Gotta pay the dues on this one.

~ Vonnor
 
Last edited:
Re: The Force Unleashed II - General Rahm Kota WIP

I've got quite an expensive record as I've never finished anything yet. I lose interest quickly or change my plans so I scrap the idea. I need to buckle down and finish something.
Like I said earlier though, I'm glad you did'nt scrap it. Best of luck..
 
Re: The Force Unleashed II - General Rahm Kota WIP

Here are the rough break-out vambrace halves. At first glance they look pretty good. The contour and taper are much closer to the reference images and they came out feather light.

kota_vambraces75.png

kota_vambraces76.png


But looking at the end view of the aligned pieces, you can see that I accidentally cut one of the skewed split lines wrong on the sculpt. I broke the cardinal rule of all crafting:

  • "Measure twice, cut once."

Look at the difference in the twisted cuts.

kota_vambraces79.png


Not sure how it happened, but the rear half is almost 3/4" bigger around at the elbow than the front half. That caused the "under-bite" misalignment of the two halves seen on the left side of the photo. At the wrist they are both equal. I thought about trying to make it work, but it's going to be quite noticeable near the cross straps so...

I will do one more sculpt/mold/casting. I'll likely go 5 layers of fiberglass this time as 4 was a bit flimsy. Luckily the only significant loss was time. I have plenty of clay, Hydrocal, and resin/bondo.

Third time's a charm, they say. :p

Practice, practice, practice...

~ Vonnor
 
Re: The Force Unleashed II - General Rahm Kota WIP

Speaking of practice, this sculpt went much faster and easier than the last ones. Here it is shaped, scraped, smoothed and walled. I kept the edges very thin this time based on lessons learned from the other two fiberglassing attempts. The edge trim will add the right thickness.

The divider cuts are still a bit off, but I can live with 0.125 diff. Won't be noticeable when worn.

Will take the molds later today or tomorrow then sculpt the left arm - I want to do all the fiberglass castings on the same day.

kota_vambraces80.png

kota_vambraces82.png

kota_vambraces83.png


~ Vonnor
 
Re: The Force Unleashed II - General Rahm Kota WIP

Here is the left vambrace plates sculpt, with tapered mold walls added and right vambrace molds in the BG. Note the major wall taper at the ends of the channel divider cuts. This is so that the skewed edges of each mold half will clear the plaster armature when removed from the model. I broke a mold a couple tries ago and after adding these tapers had no problems the last go-around.

kota_vambraces85.png

kota_vambraces86.png

kota_vambraces87.png


More to come.

~ Vonnor
 
Re: The Force Unleashed II - General Rahm Kota WIP

Thanks, your Honor.

Here are the vambrace plates:

kota_vambraces89.png

kota_vambraces90.png

kota_vambraces91.png


They came out very nice contours and fit. I did get a small bit of damage on one of the edges, but the edge trim and fill will fix that. I also gel-coated the inside surfaces smooth to help facilitate free rotation/pronation over the shirt.

I'll polish the surfaces and add the edge trim at the 501st Garrison Tyranus armor party next weekend. Right now they're still a little tacky so I need to let them dry.

Stay tuned.

~ Vonnor
 
Re: The Force Unleashed II - General Rahm Kota WIP

I was wondering why the surfaces of the plates were still sticky after 3 days. I used about 60/40 mix of Bondo/poly-resin to coat the outsides and insides. The insides really need to be smooth and dry so as not to bind up on the shirt during pronation/rotation.

According to google, the resin you can buy at Home Depot is what they call laminating resin, and contains an air inhibitor that keeps the surface tacky so that subsequent layers of laminate (glass cloth in my case) will adhere more easily. Bondo does not have that property, and normally you'd apply the final spread of full Bondo, like in auto body work. The Bondo keeps air from reaching the resin below, so the resin cures fully. My surfaces are still tacky because I used a resin/Bondo mix.

There was a lot of advice on how to remedy the situation, and the quickest solution was to use an epoxy finish coat. I got some Z-Poxy from a local RC model shop and will see how that works.

More later.

~ Vonnor
 
Re: The Force Unleashed II - General Rahm Kota WIP

I used the Z-Poxy (Zee-Proxy I call it :D) on the insides of the plates, and they cured very hard and shiny. A little 320grit should keep them from sticking to the shirt fabric. I chose not to use the stuff on the outsides, because after I sanded the surfaces with wet220 they lost all the stickiness. They did have a lot of surface ripples though, so I spread a thin rondo (25/75 resin/bondo) correction coat and after it set up I wrapped the somewhat sticky surfaces with plastic wrap. One of the google'ations suggested that. It' keeps the air from getting to the air-inhibited resin and lets it set up completely. We'll see if it works.

I also poured the production hand guards this morning. Here are the rough pulls using the mold bottoms as forms while they fully cure. The plastic-wrapped vambrace plates are in the BG. I'll hit them with the mouse sander at the 501st Garrison Tyranus armor party this Sunday.

kota_vambraces93.png

kota_vambraces92.png


Stay tuned.

~ Vonnor
 
Re: The Force Unleashed II - General Rahm Kota WIP

After sanding down the Bondo correction coat, I added the axial edge stripping. The radial edging will not go on until after the wrist-clip sculpt. I jigged it up with some temporary spacers and center-line markers, then cut the strap slots semi-freehand with a Dremel dental bit. I did use a metal guide that I clamped to the work piece, and just ran the spinning shaft up against the guide as I cut the initial slots. It took a few hours just to widen and angle the slots to receive the straps. The slots still need to be about a millimeter thicker to get 3mm straps into them. Using the cutting guide and taking it slow on the slot widening really came out a lot cleaner than the first attempt. I'm going to sculpt the wrist clip on the left arm, as the symmetry came out much better than the right.

One interesting thing I stumbled upon as I practiced free-hand Dremelling on a previous failed vambrace plate: I might cut the straps out of the junk hard models (The ones from 7 posts back). The contour curve is about perfect and the 4-layer laminate allows a bit of flex. Using the polyester resin to bond them will make a ultra-durable production piece. The only challenge will be insuring uniform strap thickness.

I also noticed after taking the hi-rez close-ups below, that my cut corners were not so sharp. I have since rectified the situation. You super-observant folks will notice how many layers of cloth were used in the laminate.

Next up, straps, elbow guard and forearm plate. The closure design is slicker than the TFU version, and just as hidden. You don't wanna miss that. :cool

kota_vambraces97.png

kota_vambraces94.png

kota_vambraces96.png

kota_vambraces95.png

kota_vambrace_slots01.png

kota_vambrace_slots02.png


~ Vonnor
 
Back
Top