Organic Mechanic
Sr Member
Oh, I do not doubt that you know of what you speak.
What "pleases me" in regard to this project, as I'm sure you've gathered, is getting it a close to indistinguishable from the filming prop as possible. This is why I am fully prepared to change this detail. I just need to be 100% before I make an irreversible change.
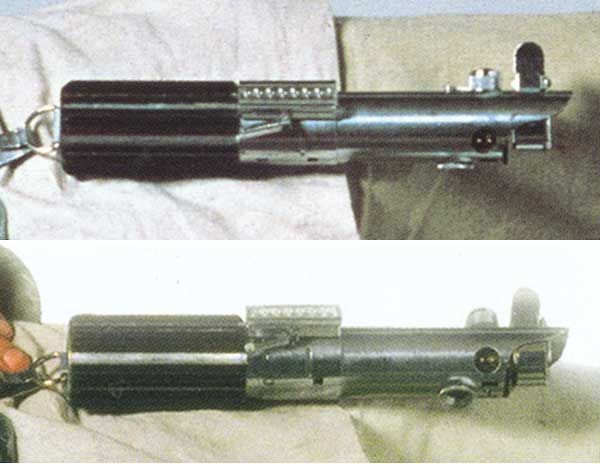
To me, I'm reading "Obvious" as "Assumed & Accepted", two things I'm unwilling to do. It wasn't so long ago that it was "obvious" to the majority of saber smiths and licensed replica manufacturers that the OWK ANH saber consisted of parts like a sink drain and a motorcycle grip. Just like it was assumed that there were only two styles of Exactra 19/20 - T-2000 bubble strips with the only distinction being a bit of frosting. These bubbles are different. They are neither as long, nor as wide as the bubbles the general consensus is based upon. They came out of the calculator almost perfect for placement between the lips and not under it. And as far as I can tell so far, they are the correct style for this saber.
My current set up is based on knowing what I needed it to look like, and a need for the saber to hold together solidly. I intentionally eschewed any assumptions in an attempt to replicate the mindset of the prop maker who produced the original. And in that regard, I succeeded. It was quick, simple, and effective.
Like I said before, the beauty of the current set up is that the door is not yet closed on going the other route. If/when I do change it though, there is no going back.
All that said, I also wish to thank you for your thoughts on the subject. Whether I agree with them or not, or even if I argue them into the ground, I value them highly. Your scrutiny is enhancing my own, and forcing me to rethink things, and think about others I've not considered.
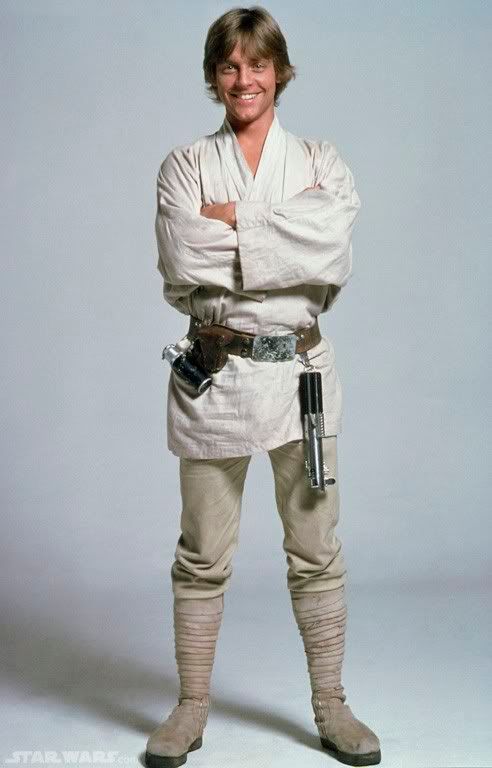
I do still plan on attempting a proper recreation of that promo shot, but it will be a few days as the only room appropriate for such a shoot just got transformed into a sick bay.
I hope to continue the discourse with you, and anybody else, because the group's knowledge got me this far, and I honestly believe that I cannot achieve the perfect reproduction via my own observations and "Genius". :thumbsup
What "pleases me" in regard to this project, as I'm sure you've gathered, is getting it a close to indistinguishable from the filming prop as possible. This is why I am fully prepared to change this detail. I just need to be 100% before I make an irreversible change.
To me, I'm reading "Obvious" as "Assumed & Accepted", two things I'm unwilling to do. It wasn't so long ago that it was "obvious" to the majority of saber smiths and licensed replica manufacturers that the OWK ANH saber consisted of parts like a sink drain and a motorcycle grip. Just like it was assumed that there were only two styles of Exactra 19/20 - T-2000 bubble strips with the only distinction being a bit of frosting. These bubbles are different. They are neither as long, nor as wide as the bubbles the general consensus is based upon. They came out of the calculator almost perfect for placement between the lips and not under it. And as far as I can tell so far, they are the correct style for this saber.
My current set up is based on knowing what I needed it to look like, and a need for the saber to hold together solidly. I intentionally eschewed any assumptions in an attempt to replicate the mindset of the prop maker who produced the original. And in that regard, I succeeded. It was quick, simple, and effective.
Like I said before, the beauty of the current set up is that the door is not yet closed on going the other route. If/when I do change it though, there is no going back.
All that said, I also wish to thank you for your thoughts on the subject. Whether I agree with them or not, or even if I argue them into the ground, I value them highly. Your scrutiny is enhancing my own, and forcing me to rethink things, and think about others I've not considered.
I do still plan on attempting a proper recreation of that promo shot, but it will be a few days as the only room appropriate for such a shoot just got transformed into a sick bay.
I hope to continue the discourse with you, and anybody else, because the group's knowledge got me this far, and I honestly believe that I cannot achieve the perfect reproduction via my own observations and "Genius". :thumbsup