EDIT: 9/22/14 - DOWNLOADS SECTION
For ease and convenience, I've decided to use this section to post the files for things I'm working on.
STAR LORD HELMET MODEL W/ REVISIONS
View attachment 885454
DOWNLOAD: .RAR (Contains all .stl files)
NOTES ON HELMET REVISIONS:
This model is a remix of @
Helagak's
original helmet. All credit should go to him, as without the helmet, I wouldn't have been motivated to even bother doing Star Lord stuff. I spent a few hours resizing, rescaling, and revising parts of the helmet to bring it more in line with the screen version. The biggest changes happened on the front and back of the helmet. The front was flattened out and re-proportioned to eliminate the large amount of curvature on @
Helagak's original helmet's front plate. The back of the helmet was curved outward to leave more room for the wearer's head, and the nape of the neck on the helmet was moved up a substantial amount. This change reduced screen accuracy a bit, but also made the helmet substantially easier to get on and off as a single piece, since the opening in the bottom of the helmet was made a bit bigger.
I also incorporated @
Jonny's revised cheek parts that
removed the pipes on the cheek plates because they were repeatedly not printing very well for me, and I figured I could make something that'd fit in those slots just as easily by hand. They have been proportioned accordingly with the rest of the model. Likewise, I haven't actually printed the hose parts for the mask, but I'm pretty sure they're just as easy to make via other means than 3d printing. Do what you will.
This is designed to print at 100% - no rescaling is required. However, that scale is to fit
my head, which I worked up by 3d scanning my noggin and referencing it against the model. I have a
23.5 inch head circumference and a prominent nose, and the mask fits me snugly - it's a bit of a process to slide on over my ears, but once on, has just enough space on all sides that a bit of padding for comfort makes it perfect.
A last note:
this mask is not perfect by any means. I love Helagak's original model dearly, and I owe him a great debt for making it available in the first place, but there were some substantial problems with parts of the model. By way of example, the way my printer kept trying to slice the piping on the mouthpiece resulted in them repeatedly falling off, or needing filler applied to them from the inside of the mask to hold them in place properly.
You will need to do some sanding/cutting/patching during assembly to get this thing to go together, but it's a very useful base all the same.
STAR LORD ELECTROMAGNET ORB BASE
View attachment 885456
DOWNLOAD: .STL | .OBJ | PRINT AT SHAPEWAYS: PART ONE | PART TWO
NOTES ON THE ELECTROMAGNET ORB BASE:
This base is meant to replicate the look of
the one used in the movie and was made mostly just by eyeballing things. It does hinge closed properly if that's what you want, but its primary function is just to keep your Infinity Orb from rolling off a shelf.
")
The Shapeways parts and the parts available for download above are not identical. For the downloads above, I have sectioned the parts up a bit more than the Shapeways versions to make them easier to print on a home printer. You need 3 of the flap pieces, one of the middle piece, and 3 pins for the sides. The flaps have hinge pins built onto them and should be sandwiched between the top and bottom of the middle piece; the pins then close the holes on the ends.
Due to the size constraints, Shapeways made me post all of the parts in two listings - one for the flaps, and one for the center bit and pins. As a single 'product' it was too big for their automated system. Sorry for any confusion there.
STAR LORD EARPIECE - LED READY
View attachment 885458
DOWNLOAD: .STL | .OBJ | PRINT AT SHAPEWAYS
NOTES ON EARPIECE:
Modeled after the earpiece from the movie as best as I can see from the reference images available! This version has been prepped to work with standardized components in order to allow you to install LEDs and make your own working version! This has been sized to fit even large ears, and has a wedge-shaped design that should allow you to snugly fit it on without spirit gum if you want an easy wearing experience.
The two large cavities inside the main body of the earpiece are designed to house 1.5V cell batteries - specifically, I designed them for the commonly-available LR1130 / AG10 coin cell battery. The hole by the ear lobe is sized to fit a 3mm red LED. There is a square hole cut in the back of the earpiece to fit your standard 9mm slide switch. I also left enough room inside the body of the earpiece to fit a resistor - I used one between 600 and 700 ohms, which is enough to dim the LED down to acceptable levels. Depending on the LED you use, you may or may not require a resistor!
The secondary piece is a back plate that holds the coin cells in place. I trimmed a paperclip and glued it to the back of mine to join contacts across the two batteries so that the 1.5V cells were in series as a 3V source. The back attaches pretty snugly, but I also sized it with two screw holes to accept M2x4mm long screws.
STAR LORD ARM BADGE
View attachment 885460
DOWNLOAD: .STL | .OBJ | PRINT AT SHAPEWAYS
NOTES ON ARM BADGE:
Did the best I could with the reference imagery available to recreate this. I will readily admit I only eyeballed details and scale, but I think it's close enough to screen accurate that you could get away with it. Might be interesting to print this in a flexible filament so that it can move with the jacket sleeve, though I don't know what the best way to attach it to a jacket would be!
STAR LORD BELT RINGS
View attachment 885463
DOWNLOAD: .STL | .OBJ | PRINT AT SHAPEWAYS
NOTES ON BELT RINGS:
These were modeled in a quick and dirty fashion and I will totally admit to having eyeballed the scale. However, I think they're close enough to right that most of you could use 'em! My recommendation would be to print these with a lot of infill so that they're sturdy enough to handle any movement a belt might subject them to.
NERF GUN BARREL REPLACEMENT PARTS
TOP BARREL:
View attachment 885465
DOWNLOAD: .STL |
.OBJ |
PRINT AT SHAPEWAYS
BOTTOM BARREL:
View attachment 885467
DOWNLOAD: .STL |
.OBJ |
PRINT AT SHAPEWAYS
Optionally, you can download the two pieces separately...
Barrel Body:
.STL |
.OBJ
Vent Cap:
.STL |
.OBJ
EDIT: 10/1/2014 - BOTTOM BARRELS HAVE BEEN MODIFIED. I observed that part of the bottom barrel was interfering with the hinge action of the lower barrel shroud which necessitated a change to the model at the bottom where it joins the base Nerf gun. The links above (including the Shapeways one) have been updated accordingly to reflect the image below:
View attachment 885469
NOTES ON BARREL PARTS:
These are designed to replace the orange tips of the Nerf Star Lord Quad Blaster. These barrel tips render the gun
incapable of firing Nerf darts, but also
still allow the gun to open and close because I thought that was a really neat functionality of the base Nerf gun. You can use the exact same screws you removed from the original orange tips to affix these replacements.
Some modifications to the base blaster
are required to fit the top barrel into place. Specifically, you will have to trim some of the inside of the barrel cover (the part that moves) away. I did this with a Dremel, and would recommend you do the same - it makes it a lot easier.
Each barrel is designed with two 5mm holes to accommodate LEDs. How you go about doing that is up to you, but I've discovered the best effects (in my opinion) can be obtained by filling the barrels with clear resin to help diffuse the light fully down the barrel. You could also try lightly sanding some clear acrylic with a high-grit sandpaper and cutting it to shape to fit inside the barrel.
The
bottom barrel is designed to print in two pieces - the main barrel itself, and a front vent piece that caps off an underslung chamber. I separated these into two components to make printing that chamber easier, because the alternative was having supports inside the part that would be a pain to remove.
I sliced my models to print at
100 micron (.1mm) resolution. They fit right onto the nerf guns straight off the print bed. If you slice these at a larger resolution (i.e. .2 or .3mm) you may have to do some sanding to get a proper fit.
ORIGINAL POST FOLLOWS BELOW...
So I have 49 days until New York Comic Con 2014, by my count. Previous years, I have gone as the Rocketeer. This year, I've decided Star Lord was going to be the costume of choice, partly because I loved the daylights out of the Guardians of the Galaxy movie, and partly because the wonderful community at TheRPF has been releasing some great 3d files for me to play around with on my printers.
I'm an attorney by day, so my time to do prop-making is kind of limited. My office is adjacent to an architect that I have befriended. They had a Makerbot Replicator 2 in their office that wasn't working, and one day in March I offered to fix it for them if they'd let me use it periodically. I got it running for them in short order, and they've hardly ever used it since, which has left it free for me to tool around with. After a month or two of having access to it, I also bought a 3d printer for my home, because I was enjoying it so much - a Makergear M2, which is hands-down the nicest 3d printer I have ever, ever used. As such, at any given time, I usually have two printers going making various stuff for me to play around with after my usually-long workdays are over!
I also have serious project ADD, so you'll see me bouncing all over different parts of the build as my whims dictate. Hopefully I will get stuff done in time!
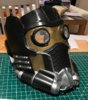
I'll start with the mask, since it's the part I expect most of you have seen a lot of. Most people have been printing these files at 88% scale - I've been printing mine at 90% scale, mostly because I have a bigger head. Before I did that, I used a Kinect and my laptop to 3d scan my head so I had a rough volumetric approximation, and then pieced the parts together in 3d Studio Max to make sure it'd fit:
View attachment 885471
It should be an okay fit. It looks like it has a bit of extra room at the front and back, and might be a little tight on the sides, but I figure I'll get it assembled and if I need to, I will use a heat gun to gently flex the curvature on the sides out a bit more, which should also result in bringing the front and back a bit closer together.
View attachment 885473
View attachment 885475
The files that @
Helagak released have been great, but do require a bit of work to get together. I wouldn't have been able to build this mask without him posting them up, though, so I am eternally grateful. I've been printing these with my Makergear M2 at .1mm resolution, which is reasonably fine, if a bit slow. The material they are made of is PLA, because I find ABS prints to be a bit cagey to work with without warping. If everything goes well, I'm anticipating making a mold and resin cast of the thing down the line for proper wear.
I've been using ApoxieSculpt to join the back seams of the parts after I superglue bits together. Apoxiesculpt is also my go-to touchup putty of choice for work on props, since I find Bondo messy.
View attachment 885476
View attachment 885479
My lovely assistant helping to sand and sculpt one of the seams down. She's much better at sculpting than I am, but I'm wasting her talents on simple stuff like this. Still, it's nice to have company while I work.
View attachment 885480
That'll come along on its own. More interesting might be the blasters. I started with a pair of the Nerf blasters, as many people have. I looked at 'em and considered how I wanted to handle it, since a simple repaint seemed like it wasn't enough. In my past experience at conventions, they frowned on working dart blasters, so right away I decided I could gut the guns and remove the firing mechanisms to buy a bit of space on the insides for me to play around with. To be more screen-accurate, the front and back sections of the outer shells of the gun should be connected, whereas the Nerf gun has a space in between with a bunch of plastic molded wiring detail. I will say I
really liked the physicality of how the blasters opened up when you pulled the secondary trigger - the top and bottom guards on the gun fan out. This is a detail that never, ever happens during the movie, as far as I can tell, but it is really cool, and I liked the explanation in my head that maybe they would open up in such a fashion if they overheated from too much firing.
This was the first change - making it so that the tops and bottoms of the guns would be one piece, while still retaining the ability to open up. The concept:
View attachment 885482
An intact blaster, and the gutted pieces:
View attachment 885485
I've been cutting and shaping a plastic spacer to make the front and back orange sections into a single piece. I will be attaching them together shortly, then bondo'ing the whole thing and doing a lot of sanding to make sure they're strong and smooth.
View attachment 885487
I also cut the front end of the top barrel up so that I could extend a more screen-accurate tip out past the top guard. I'll probably model this tip up and 3d print it down the line.
View attachment 885489
Removing the actual nerf-dart firing pieces bought me a decent amount of space inside the guns, so I decided I wanted to add lights and sound to the blasters. The lights are simple enough - tuck some batteries in, and put an LED on a switch. The sound is a bit more complicated. The solution I've decided to go with are
BigDawgs USB Multipush circuits.
View attachment 885491
They have an eBay account where you can get their product slightly cheaper - I bought three units because I figured I'd use them on
something. They're designed for greeting cards and hobby applications, and they looked small enough that I could probably get away with fitting one inside the guns. The fact that they have the ability to play 5 sounds on 5 different buttons is not lost on me - I'm going to hopefully design these so that pulling the trigger plays blaster audio, and the secondary trigger that fans the gun open will play an 'overheating' sound. I might go for a third, if I can figure out how, that will play when the gun closes back up. Aiming high, I guess. The coin cell batteries are going to have to be replaced with something with a bit more longevity, though!
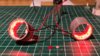
Last bit produced so far is the boot rockets, which are courtesy of @
xMENNENx and the files that he generously released. I printed these on the Makerbot Replicator 2 at the architect's office. Still churning out a couple parts in my spare time, but these print quick and easy.
View attachment 885493
View attachment 885495
View attachment 885497
I had some lego turbines, and just on a lark I've started tucking them into the intake end of the rockets as an extra detail because, well, why not? I'm going to hopefully put some LEDs in the exhaust end of the boot rockets so I can light myself up for the sake of saying I did.
As far as the rest of the costume is concerned, I'm probably going to suck it up and buy the fjackets version of the Star Lord jacket, but in real leather so I can put it to dual use as a regular riding jacket for my motorcycle. The pants I haven't figured out a satisfactory solution for yet, but I might be looking for a seamstress to help me create 'em from scratch so they're close enough to screen accurate not to nag me.
More hopefully tomorrow as I continue assembly with the little time I have.
View attachment 885455
View attachment 885457
View attachment 885459
View attachment 885461
View attachment 885462
View attachment 885464
View attachment 885466
View attachment 885468
View attachment 885470
View attachment 885472
View attachment 885474
View attachment 885477
View attachment 885478
View attachment 885481
View attachment 885483
View attachment 885484
View attachment 885486
View attachment 885488
View attachment 885490
View attachment 885492
View attachment 885494
View attachment 885496