joostin
Well-Known Member
Hey guys,
So, I went and saw Guardians of the Galaxy the other day, and, like a lot of people thought the orb housing the Infinity Stone was pretty damn cool, so I set out to try and make something similar.
Version 1 was pretty damn basic, and was a bit of a general trial. I knew certain paints and chemicals will eat a polystyrene ball like Homer Simpson eats donuts, so I thought "I'll try and strategically drop acetone around the ball to make the dints".
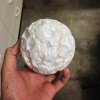
In theory it worked, but it was nowhere near the prop we saw in the film.
A coat of acrylic black paint to fill the dents and also act as a bit of a sealant for the silver/chrome paint I had access to and it started to look a little cooler.
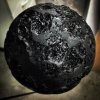
Aaaaaaand then finally, some chrome-y paint on the tops. Applied super scientifically with folded up kitchen paper.
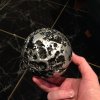
I was pretty satisfied with the initial result, but knew I'd be working on a version 2 that was a bit more like the screen used prop - however, not aiming for anything 100% screen accurate. I'm terrible at doing things like that.
So, I bought some more polystyrene to try and work on the new version. I had to do some stencil burning for a guitar project I'm working on, and thought the pointed tip of the stencil burner might be a really good way of controlling the dings and dents on the orb - and doing some research around had seen this is also how a few people have started attacking their orb projects. It'd be good for small circles or short strokes, as well as holding in place to create some bigger holes in the pattern.
Here I was thinking I was an original genius for a moment!
I grabbed some reference photos and a permanent marker, and started drawing up the pattern.
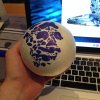
While I tried to make some of it as close as possible to the screen used prop, I also had to fill in a lot of space there aren't detailed pics of. Shapes that made it into the pattern were some things like the Monaco grand prix circuit and the Red Bull Ring track in Europe, as well as little things like angry faces. And accidentally phallic shapes. Oh well.
Once the pattern was drawn up, I started to burn into the ball with the stencil burner. It was surprisingly awesome - but I should probably also practice my precision a little bit. I can't tell which shape was Monaco now. And that makes me a little bit sad. I was proud of sneaking that in as a little personal easter egg.
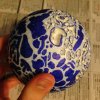
As I went along, it started to take shape and I was pretty keen to see how it would all turn out by the end.
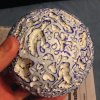
So, once I had done the super tedious task of burning all of the shapes in the pattern, I realised I had run out of black acrylic, so I had to wait until I could buy some more. Which was only until this afternoon – but I'm really impatient and wanted to finish it straight away. Sigh.
Fast forward to this afternoon - a fresh can of black acrylic spray paint, and I'm ready to finish it up!
You've seen how the original looked painted black - this looked a little similar. But also way cooler. So we don't need a picture of that.
After applying the chrome paint in the same way - super high tech folded kitchen paper...
This was the end result!
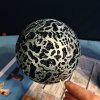
I'm actually pretty damn happy with it. Screen accurate? Not at all. Nifty for a cheap little project if you've got a couple of hours to kill? Definitely.
Contemplating making a second one to then mould and be able to cast a few resin ones for whatever reason. I don't even know.
But hey! Let me know what you think. I felt like I should share something on this site - because I don't do that too often.
So, I went and saw Guardians of the Galaxy the other day, and, like a lot of people thought the orb housing the Infinity Stone was pretty damn cool, so I set out to try and make something similar.
Version 1 was pretty damn basic, and was a bit of a general trial. I knew certain paints and chemicals will eat a polystyrene ball like Homer Simpson eats donuts, so I thought "I'll try and strategically drop acetone around the ball to make the dints".

In theory it worked, but it was nowhere near the prop we saw in the film.
A coat of acrylic black paint to fill the dents and also act as a bit of a sealant for the silver/chrome paint I had access to and it started to look a little cooler.

Aaaaaaand then finally, some chrome-y paint on the tops. Applied super scientifically with folded up kitchen paper.

I was pretty satisfied with the initial result, but knew I'd be working on a version 2 that was a bit more like the screen used prop - however, not aiming for anything 100% screen accurate. I'm terrible at doing things like that.
So, I bought some more polystyrene to try and work on the new version. I had to do some stencil burning for a guitar project I'm working on, and thought the pointed tip of the stencil burner might be a really good way of controlling the dings and dents on the orb - and doing some research around had seen this is also how a few people have started attacking their orb projects. It'd be good for small circles or short strokes, as well as holding in place to create some bigger holes in the pattern.
Here I was thinking I was an original genius for a moment!
I grabbed some reference photos and a permanent marker, and started drawing up the pattern.

While I tried to make some of it as close as possible to the screen used prop, I also had to fill in a lot of space there aren't detailed pics of. Shapes that made it into the pattern were some things like the Monaco grand prix circuit and the Red Bull Ring track in Europe, as well as little things like angry faces. And accidentally phallic shapes. Oh well.
Once the pattern was drawn up, I started to burn into the ball with the stencil burner. It was surprisingly awesome - but I should probably also practice my precision a little bit. I can't tell which shape was Monaco now. And that makes me a little bit sad. I was proud of sneaking that in as a little personal easter egg.

As I went along, it started to take shape and I was pretty keen to see how it would all turn out by the end.

So, once I had done the super tedious task of burning all of the shapes in the pattern, I realised I had run out of black acrylic, so I had to wait until I could buy some more. Which was only until this afternoon – but I'm really impatient and wanted to finish it straight away. Sigh.
Fast forward to this afternoon - a fresh can of black acrylic spray paint, and I'm ready to finish it up!
You've seen how the original looked painted black - this looked a little similar. But also way cooler. So we don't need a picture of that.
After applying the chrome paint in the same way - super high tech folded kitchen paper...
This was the end result!

I'm actually pretty damn happy with it. Screen accurate? Not at all. Nifty for a cheap little project if you've got a couple of hours to kill? Definitely.
Contemplating making a second one to then mould and be able to cast a few resin ones for whatever reason. I don't even know.
But hey! Let me know what you think. I felt like I should share something on this site - because I don't do that too often.


