Snow Wolf Pulse Rifle Accurizing and Repaint

PAULH

Well-Known Member
So around 18 months ago I decided I wanted a pulse rifle in my collection. Obviously there are a number of price points for these ranging from the Nerf version up to the HCG version and beyond. I settled on the Snow Wolf version as it seemed to me a good starting point for a project to make it more screen accurate and/or more representative of the props as they are today. By far the best reference images I could find were those on alienscollection.com. My project would involve stripping it down to aid painting and there is a great YouTube video from Shadow-Floodlight on the disassembly process although I needed to go a bit further then he did. Taking one of these things is straightforward but care is needed.

My aim with this post is to document my project and share with others who may be contemplating a similar thing.

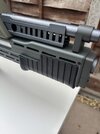
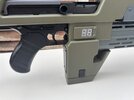
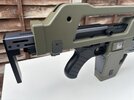
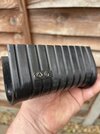
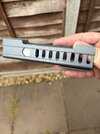
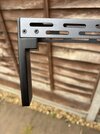
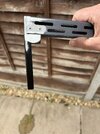
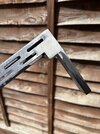
Here’s the starting point:
 

Attachments

  • IMG_4051.jpeg
    IMG_4051.jpeg
    3.5 MB · Views: 25
  • IMG_4050.jpeg
    IMG_4050.jpeg
    1.7 MB · Views: 24
  • IMG_4053.jpeg
    IMG_4053.jpeg
    2.8 MB · Views: 18
  • IMG_4052.jpeg
    IMG_4052.jpeg
    2.9 MB · Views: 27
I decided to start with the grip and get it to an aged wood appearance as would be appropriate for a vintage Thompson. Overall, my process was:
- high build primer all over
- a thick layer on both sides with course emery paper dragged through it before it dried. This was to give the sense of wood grain
- painting it with acrylics (browns with black dry brushing on edges
- using masking fluid to preserve what I wanted to remain brown so I could shoot it with matt black to get a worn black painted finish
- applying some diluted acrylics to dull it down a little more
- a final coat of Tamiya semi-gloss

And here’s that process represented from start to finish:
 

Attachments

  • IMG_4052.jpeg
    IMG_4052.jpeg
    277.1 KB · Views: 22
  • IMG_4130.jpeg
    IMG_4130.jpeg
    2.3 MB · Views: 19
  • IMG_4131.jpeg
    IMG_4131.jpeg
    2.3 MB · Views: 23
  • IMG_4134.jpeg
    IMG_4134.jpeg
    2.2 MB · Views: 23
Next I turned my attention to the small riveted plate on the SPAS pump grip. So I cut a piece of 1mm aluminium (yes I’m in the UK), drilled it and added two rivets, drilled two holes in the grip in the right place and superglued it on. Then some Matt black paint and it was done. To make the grip look more used, I sanded off the few mould seems and “polished” the whole thing with some very fine sanding sticks (7000 grit).
 

Attachments

  • IMG_4129.jpeg
    IMG_4129.jpeg
    4.6 MB · Views: 21
  • IMG_4138.jpeg
    IMG_4138.jpeg
    1.6 MB · Views: 22
My next task was to make the part of the grenade launcher bolt look more realistic. The Snow Wolf part is an aluminium tube with a lightly textured finish. I sanded it flat, drilled a hole, and added a small aluminium piece so it all look more representative of a Remington 870. I then applied Bare-Metal self adhesive foil to better represent a steel part. I’m happy with the result but it’ll look better once I’ve added weathering later in this project. Before and after below. I’ll probably paint the inside black although not much will be visible once there is a dummy round added.
 

Attachments

  • IMG_4125.jpeg
    IMG_4125.jpeg
    4 MB · Views: 12
  • IMG_4140.jpeg
    IMG_4140.jpeg
    1.6 MB · Views: 12
Next up was the barrel shroud. In every reference I could find, the round hole is not punched all the way through. That was easily remedied with a couple of squares of 1mm aluminium bonded on the inside. A little Dremel action action may be needed to ensure they don’t interfere with the barrel when it’s time to reassemble.
 

Attachments

  • IMG_4141.jpeg
    IMG_4141.jpeg
    1.9 MB · Views: 9
Next was a bit of work on the stock. There are some visible joints and some screws that don’t exist on the real prop. So all of that went away courtesy of my Dremel, some filler, and high build primer. I’ve got it to the stage where it’s almost ready for paint.
 

Attachments

  • IMG_4147.jpeg
    IMG_4147.jpeg
    1.5 MB · Views: 15
  • IMG_4142.jpeg
    IMG_4142.jpeg
    1.7 MB · Views: 14
  • IMG_4145.jpeg
    IMG_4145.jpeg
    1.6 MB · Views: 14
  • IMG_4146.jpeg
    IMG_4146.jpeg
    1.9 MB · Views: 13
Back
Top