You are using an out of date browser. It may not display this or other websites correctly.
You should upgrade or use an alternative browser.
You should upgrade or use an alternative browser.
Snatcher - Metal Gear MkII Robot Build
- Thread starter nick daring
- Start date
LeMarchand
Sr Member
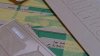
Got the basic lineart done, now to convert those to a 3D model ")
![SNATCHERBLASTER LINEART [Converted].jpg](https://therpf-f28a.kxcdn.com/forums/data/attachments/67/67009-14e4570aae928ec98b26086cb1eafaa8.jpg "SNATCHERBLASTER LINEART [Converted].jpg")
LeMarchand
Sr Member
on a sidenote:
Cool that they have done a proper translation of "SD Snatcher", i remember playing it on an MSX2 in japanese when i was a teen. Only wish they did it as a standalone game so you wouldn't have to mess around with an emulator.
If you have a Sega Megadrive emulator, get the European version of Snatcher, that one wasn't censored. Not too much was censored though
Know what's sad? I bought snatcher new for 15.00 at KB toys towards the end of the sega cd. Mine was actually a bad unit and had to get repaired as it scratched the games and i ended up getting a new copy. I wish i'd had the brains to buy every copy of every sega cd game they had. You know i have a Playstation that doesn't work so well, i could turn it into the PSX version of Mk 2 from the end of the game lol
LeMarchand
Sr Member
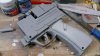
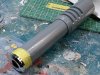
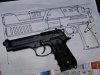
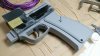
i just scaled my blueprint based on the grip of a Beretta 92 (so i know the grip will fit in my hand properly). This would make the blaster a whoping 330mm long
like i said....huuuuuuuuge
like i said....huuuuuuuuge
LeMarchand
Sr Member
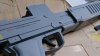
well, it is supposed to be big, but scaling it to the grip of the 92 it becomes rediculous:


LeMarchand
Sr Member
Scaled the topsection down a bit. Still a pretty damn big gun, but more proportionate i think. below is a pic comparing the scaled down one to the unaltered blueprint


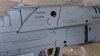
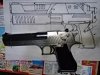
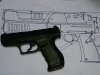
Check this blaster out-
https://mobile.twitter.com/io_takuya/status/431418604144177153

Insanely huge!!!
Yours definitely makes more sense.
More pics from the guys twitter feed-
https://mobile.twitter.com/io_takuya/status/431418604144177153
Insanely huge!!!
Yours definitely makes more sense.
More pics from the guys twitter feed-
Attachments
-
 Bfk5yedCQAATDAE.jpg large.jpg70.8 KB · Views: 164
 -
 Bfy7an8CMAA9PED.jpg large.jpg69.9 KB · Views: 170
 -
 BfzQY42CQAAd5Co.jpg large.jpg102.3 KB · Views: 174
 -
 BfIMfmtCAAA7QqI.jpg large.jpg20.3 KB · Views: 166
 -
 BeVHADKCUAAuTs3.jpg large.jpg36.3 KB · Views: 153
 -
 BeUqZitCYAAcL5s.jpg large.jpg60.9 KB · Views: 157
 -
 BeUIG4pCAAAuH1f.jpg large.jpg56.8 KB · Views: 158
 -
 BeJRBrMCIAAC1LH.jpg large.jpg69.3 KB · Views: 178
 -
 BdYHhlICIAA3Cik.jpg large.jpg54.6 KB · Views: 166
 -
 BdXOiH2CEAA0o4L.jpg large.jpg55.2 KB · Views: 162
 -
 BfII3QRCIAAYvMI.jpg69 KB · Views: 145
 -
 BeK6SabCMAACXPT.jpg49 KB · Views: 153
 -
 BdW0TJgCUAAG_Nt.jpg45.5 KB · Views: 155
 -
 BdU8P1vCcAAewv-.jpg40.6 KB · Views: 167
 -
 BfhFIP-CAAEKJ2-.jpg63.7 KB · Views: 149
 -
 BfiI-bOCQAEumdA.jpg85.4 KB · Views: 213
Last edited:
I was just about to get some work done on this project again. Too many projects, so little time.
My Christmas present this year was giving myself some time to work on my Metal Gear MKII!
First step was to get some of my half finished leg and foot parts finished up.
I apologize for the lack of photos.


A layer of Apoxy Sculpt to create the bevel to the inner acrylic circle

I had a bunch of random circle pieces left over from the laser cut eye pieces and they have proven to be very useful for many other parts I hadn't planned for!
The leg pieces are close to finished now but I still have to figure out exactly I want to connect the poieces to one another. I had hoped to keep the hinges movable so I could pose the legs but I think I'll just pin and glue it all together in a standing pose and call it a day. No reason to add even more layers of complexity at this point.
Next up was the main body.
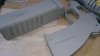
The body at this stage was pretty fragile. It consisted of a foam and MDF inner structure that had been coated with a layer of body filler and sanded to the perfect shape. The main problem was that the layer of filler had gotten so thing that I was unable to work on it much further without damaging the thin skin.
This called for a resin copy to be made before I could proceed. I basically followed the steps outlined by Ozymandius here- http://www.therpf.com/f9/g-force-gatchaman-swan-jun-helmet-196086/


The resulting resin duplicate was about a quarter inch thick and very sturdy. I had a little bit of wobble from the thin silicone mold and from my master deteriorating in thelong period time from finishing it to finally making my waste mold so repairs need to be made before adding details.


There was also a hole left from where the master sat on the table when I brushed on the silicone. This area was also a bit thin from rotocasting by hand. This had to be closed up and reinforced, so I simply poured in some more resin, laid a piece of blue masking tape across the hole, and let it cure. Came out perfect! I love when that happens.
I sanded the thing into the perfect form and hit it with a final layer of primer.
First step was to get some of my half finished leg and foot parts finished up.
I apologize for the lack of photos.
A layer of Apoxy Sculpt to create the bevel to the inner acrylic circle
I had a bunch of random circle pieces left over from the laser cut eye pieces and they have proven to be very useful for many other parts I hadn't planned for!
The leg pieces are close to finished now but I still have to figure out exactly I want to connect the poieces to one another. I had hoped to keep the hinges movable so I could pose the legs but I think I'll just pin and glue it all together in a standing pose and call it a day. No reason to add even more layers of complexity at this point.
Next up was the main body.
The body at this stage was pretty fragile. It consisted of a foam and MDF inner structure that had been coated with a layer of body filler and sanded to the perfect shape. The main problem was that the layer of filler had gotten so thing that I was unable to work on it much further without damaging the thin skin.
This called for a resin copy to be made before I could proceed. I basically followed the steps outlined by Ozymandius here- http://www.therpf.com/f9/g-force-gatchaman-swan-jun-helmet-196086/
The resulting resin duplicate was about a quarter inch thick and very sturdy. I had a little bit of wobble from the thin silicone mold and from my master deteriorating in thelong period time from finishing it to finally making my waste mold so repairs need to be made before adding details.
There was also a hole left from where the master sat on the table when I brushed on the silicone. This area was also a bit thin from rotocasting by hand. This had to be closed up and reinforced, so I simply poured in some more resin, laid a piece of blue masking tape across the hole, and let it cure. Came out perfect! I love when that happens.
I sanded the thing into the perfect form and hit it with a final layer of primer.
Next up was adding the arm hatch and seam lines for the front hood.

The arm hatch is proving pretty tricky. Placing a domed circle onto a curved oraginic shape is kinda wonky work.
The best solutiojn I had was the cut a circular piece off a plastic Christmas ornament and bend it across the surface of the body to get a good shapped that also fits snuggly and evenly.


I then pressed a thin layer of Apoxy Sculpt into the back of the domed hatch piece taped onto the body and let it cure overnight. When the part was removed it had taken the curvature of the body permanently.

I then made an inner wall with another piece of ornament and another thin layer of Apoxy.


I then moved on to figuring out the front access hood. I want to eventually make it possible open the hood but I decided to first scratch in the seam lines and deal with separating it from the body later.


I was really nervous about this step but it came out pretty well. Only a few minor stray scratches and screw ups. Pretty clean and slick looking overall.
The arm hatch is proving pretty tricky. Placing a domed circle onto a curved oraginic shape is kinda wonky work.
The best solutiojn I had was the cut a circular piece off a plastic Christmas ornament and bend it across the surface of the body to get a good shapped that also fits snuggly and evenly.
I then pressed a thin layer of Apoxy Sculpt into the back of the domed hatch piece taped onto the body and let it cure overnight. When the part was removed it had taken the curvature of the body permanently.
I then made an inner wall with another piece of ornament and another thin layer of Apoxy.
I then moved on to figuring out the front access hood. I want to eventually make it possible open the hood but I decided to first scratch in the seam lines and deal with separating it from the body later.
I was really nervous about this step but it came out pretty well. Only a few minor stray scratches and screw ups. Pretty clean and slick looking overall.
Too cool, Nick. Too cool.
Really inspires me to get to work on my Junker gun...but not that much.:lol
Really inspires me to get to work on my Junker gun...but not that much.:lol
Next step was to create a hole in the body where the Arm Hatch would go.
In the concept art we see how the arm would extend from this hatch.


However, in the actual game Metal Gear mkII only uses the arm once to disarm a bomb early in the game and in piece of artwork only in the early Japanese MSX version of the game.


Despite it barely existing in the game, I want to go to the trouble of recreating this feature.
Sigh.
Here we go.
I outlined where the Hatch should meet the edge of the body and them proceeded to cut it out with a rotary tool and cutting wheel.


After all cutting and sanding was finished I was ultimately unhappy with how it fit in the hole. I t was a close fit, but not perfect. The top an bottom of the hatch dipped down below the opening a couple milimeters below where I wanted them , so I started over with a new approach to the hatch.


The front end of the body has a long red glowing area that will eventually be lit by an led, so I drew out the shape and cut it out.
Cutting wheel, large flat file, and then cleaned up with needle files.


I also was able to work on the rear section of the body a bit.
Instead of carving in the panel lines to define the backside panels of body I decided to cut out some pieces of styrene and glue them the body to give a raised surface feel to the area. It will hopefully add a touch of sculpturally variety.

I also centered and glued together the waste pieces.

I was however getting really close to having all the masters for the parts finished.
Group shot!


Next up- Perfect Hatch!
In the concept art we see how the arm would extend from this hatch.
However, in the actual game Metal Gear mkII only uses the arm once to disarm a bomb early in the game and in piece of artwork only in the early Japanese MSX version of the game.
Despite it barely existing in the game, I want to go to the trouble of recreating this feature.
Sigh.
Here we go.
I outlined where the Hatch should meet the edge of the body and them proceeded to cut it out with a rotary tool and cutting wheel.
After all cutting and sanding was finished I was ultimately unhappy with how it fit in the hole. I t was a close fit, but not perfect. The top an bottom of the hatch dipped down below the opening a couple milimeters below where I wanted them , so I started over with a new approach to the hatch.
The front end of the body has a long red glowing area that will eventually be lit by an led, so I drew out the shape and cut it out.
Cutting wheel, large flat file, and then cleaned up with needle files.
I also was able to work on the rear section of the body a bit.
Instead of carving in the panel lines to define the backside panels of body I decided to cut out some pieces of styrene and glue them the body to give a raised surface feel to the area. It will hopefully add a touch of sculpturally variety.
I also centered and glued together the waste pieces.
I was however getting really close to having all the masters for the parts finished.
Group shot!
Next up- Perfect Hatch!
Last edited:
Similar threads
- Replies
- 2
- Views
- 478
- Replies
- 6
- Views
- 373
- Replies
- 35
- Views
- 2,951