Skyrim - Building a pair of Khajiit (M'aiq the Liar & J'zargo the mage follower)

Talaaya

Well-Known Member
After completing my Samus costume I wanted to take a step back and do a more relaxing, non-heart attack inducing project which would also have the added bonus of actually being comfortable to wear to a con. My sister Nanya and I have had the idea of doing characters from Skyrim for a long time now and we finally settled on our favorite characters of our favorite race: the cat-like Khajiit. I'll be doing M'aiq the Liar, a quirky guy who runs around the game and tells you random, often fourth wall-breaking, humorous quips. He's been in every game in the series since Morrowind.
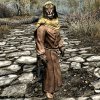
600px-SR-npc-M'aiq_the_Liar.jpg

Nanya chose J'zargo, a member of the College of Winterhold, who can become your follower buddy if you do a quest for him. He's a mage who's very full of himself and dead set on becoming archmage before the player, and even has you test what turn out to be backfiring fire spells. Cheeky bugger.
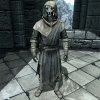
SR-npc-J'zargo.jpg

Nanya will be posting in this thread with me as we will be helping each other on this project together. For now I'll just share what I have so far and she'll make a post about hers soon.

A nice benefit of these characters is the only fur they're showing is on their faces and tails, which makes crafting everything way easier. They do actually have bare hands in the game but we opted to wear gloves with our costumes because it would be near impossible to make furred hands look realistic enough for our liking, and it makes sense that they might be wearing gloves in the game. We chose gloves which were as close to the color of their hands as we could get so it wasn't distracting to the overall look of the costume. Here are my gloves:
IMG_0038.JPG

If you've read this far I'm sure you're wondering how we're going to do their faces. We didn't have any interest in doing prosthetic makeup or anything like that and since I'm already proficient at 3d printing it seemed like a good solution. For Samus I had used my friend's professional 3d printer. I figured it wouldn't be around forever since he was likely to sell it so I decided now was a good time to get a printer of my own. Obviously I couldn't get one of those ridiculously expensive (and giant) professional models so I found a high end consumer desktop printer: the Ultimaker 2:
IMG_0043.JPG

So far I'm really loving it! Each printer I've had has its pros and cons: the old one could print more complex shapes in larger pieces and had faster, higher quality prints, but they were heavy and very expensive. This new one uses a different printing method so it can be a bit harder to get shapes oriented to print well, but the material is super cheap and light. With the old printer there's no way I could have printed a mask and worn it. It'd have been much too heavy so I would have had to mold and cast it, adding a ton to the cost. With my new one I can just use what I print! Yay!

So far I've only printed my mask but I'm just about ready to print my sister's. To make the model I extracted M'aiq's actual model from the Skyrim Creation Kit (official game editing software) which was a huge pain in the ass because the game doesn't save characters in a single file; they use a compositing system to add a bunch of pieces together to make the whole character. So I couldn't just grab M'aiq's file; I had to get the software to show his model all together and then rip the model with video rendering capture software (essentially print-screening a 3d model). The game model is pretty low poly and I didn't want to just use that. I wanted rounded shapes and more detail, especially in the nose area, which isn't actually 3d in the game - it's just a texture. To do this I opened up the model in Zbrush and used the normal map as a displacement map to create actual geometry where there were previously only false details. I then cleaned it up and fixed various shapes, along with adding an actual sculpted nose. We'll be putting fur on the masks, so to allow for that extra volume I reduced the surface of the mask which is why the nose looks like it's sticking so far off the mask.
IMG_0022.JPGIMG_0023.JPGIMG_0029.JPGIMG_0026.JPG
You can see in the second image how I divided up the mask into smaller pieces. While the entire mask would fit within the printer bed's dimensions, I decided to cut the model apart so it would be easier to print. I didn't take any special care to make sure the seams were flush since it'll just have fur over it anyway, plus I'm still learning how to do this type of printing. There are also some rough parts near his eyes which were caused by the extra support material the printer can create to help hold up the print as it's being made. If I cared about the finish I could sand those out and make it look nice. Also some parts were done on higher quality settings than others, although I'm not sure you can tell from the images. It's faster to print at lower quality.

You can see the quality difference a bit better in these pics, which are from a secondary secret costume I'm working on when I have nothing else to do. ;D
IMG_0034.JPG
They go from lowest to highest quality from left to right.

The mask's jaw is detached currently but it will be on a hinge which will move when I move my own jaw. It will also be complete with a silicone tongue and full set of teeth.

So far I haven't done any work on M'aiq's outfit but after a ton of searching I finally found the cloth I'll be using for both the hood and the robe:
IMG_0010.JPG

I've made progress on the other parts of the costume as well but that'll have to be for another post in the near future.
 
Last edited:
I've been working on a few different things simultaneously so the different aspects of the outfit are all in varying stages of completion since I hop around a lot but I've got everything all planned out and materials have been gathered :)

I started out patterning the robe/tunic and pants first out of pattern cloth and then muslin. I don't have pictures of these though since I unpinned all of the pieces off of the creepy duct tape mannequin from Talaaya's Samus build before remembering to do so. I actually built them on her mannequin since we're the same size and the clothing has a loose fit, but as it turns out when I put on the muslin for fit checks I had to make a few alterations since her torso is actually quite a bit longer than mine and I have bigger hips.

Here is the cloth I'm using for the pants, robe/tunic, and trim, respectively:
IMG_0057.JPGIMG_0059.JPGIMG_0058.JPG

I also got this crinkly cloth for the forearms and calves, which I will dirty up extensively and get even more wrinkled for the best effect.
IMG_0039.JPG

I began to work on the leather cowl/hood too. I bought a side of leather (half a cow) to use for the leather parts of the costume: the cowl, belts, and bag (not the shoes, I'll get into that in a second). It was a little stiffer than I was expecting, but it softens up pretty nicely once oiled with some vaseline and worked by hand. The vaseline also darkens it slightly and softening it gives it a lovely creased texture that I like. I decided that I was going to make the cowl in a few different sections: the hood, the cowl chest part, and the neck guard. I patterned the hood out of muslin to get a rough fit and started to make the hood out of leather, which you can see here:
IMG_0102.JPGIMG_0103.JPG

Unfortunately the leather was still a little too stiff to behave as nicely as I wanted; I should have known better. But this is the first time I've really done anything extensive with leather, so it was a good learning experience. But it's okay, because it's still perfect for the belts and bag, and I'm sure I'll use it for some other project in the future. And it's nice having around, it smells so good...

Anyway, I instead bought some deerskin to use for the cowl, which arrived earlier this week and is a wonderful color and is so supple it behaves like cloth. The piece I ordered has an unfortunate placement of clustered holes shaped like a spooky face in the middle, but it's big enough that I should still be able to get everything I need from it.
IMG_0048.JPG

Oh and here are my gloves I'm using:
IMG_0037.JPG

I've also been working on his leather moccasins. For these I'm using a beige suede rather than the other cow leather. I chose this to match the softness the wrinkles in his shoes convey, and deerskin wouldn't hold up as nicely on the soles since it's quite a bit thinner. The suede also has surprisingly nice traction even on the slick kitchen floor. I bought a pair of flats with a nice rounded toe to use as a structural interior to the shoes to make it easier for me to construct, and also so there's a sole between my foot and the ground. I actually ended up really liking the flats so I've made it so that they're removable rather than permanently attached, which will also make it easier if I need to replace the suede soles or something eventually. I patterned the shapes with pattern cloth and then taped the leather sections together on the shoe and each other to double check they worked, and then slipped them off in one piece and sewed them together with faux suede lace. I'm going to go back in with a bit of barge cement here and there and glue areas together better; I replicated the stitching of his shoes exactly so there's a few places where the pieces aren't tightly sewn together. Here are some pictures of progress and one shoe completed except for the toggle closure and some fine tuning:
IMG_0014.JPGIMG_0017 (2).JPGIMG_0035.JPG

I'm also currently working on his leather bag. I used the leather from the botched hood attempt for most of it, so it didn't go to waste. It's most of the way done but there's still a few things to do on it. It's barge cemented together and I will add decorative stitching soon, as well as a back panel to the flap that will be slightly stuffed to give it the fullness his has. Here's progress so far:
IMG_0046.JPGIMG_0062.JPGIMG_0079.JPG

I'm also going to paint it with acrylic paint and sand some areas to give it a worn appearance, so here's a test piece of leather where I was experimenting with tooling, thicknesses of paint, color, and sanding with 80 and 220 grit:
IMG_0084.JPG
I'll have an update on that soon, I should be finishing it in the next couple of days I think.

And finally, this little fun bit:
Part of the reason that I love J'zargo so much (apart from his great dialogue and appearance) is because of the hilarious series by Sips (a Let's Player who is part of the Yogscast group on YouTube) where he plays Skyrim. Here's when he first meets J'zargo, which also gives you a pretty good idea of J'zargo himself:
[video]https://youtu.be/k4BwNQeTXJQ?t=1123[/video]

Later, he has J'zargo join him as a follower and dubs his new group "The Guyforce," a name based off of his earlier group "The Triforce." Often when the Guyforce enters combat Sips' logo for the Guyforce pops up on screen, and in the middle of it, is a picture that jokes about how J'zargo wants to be Archmage, seen here:
[video]https://youtu.be/_JsM9XiWcuE?list=PLYqfXQ-ztmZKaJd7k8WMbnSUF4bhA07mK&t=424[/video]

So I decided to have a bunch of buttons of this made to hand out as a joke. Even if no one gets the obscure reference, it's still pretty funny and in line with his character, and people at PAX love their swag. The sides of the buttons also include my cosplay contact info as an added bonus.
IMG_0060.JPG

So there we go! Progress so far on mine. Talaaya should be posting an update on her stuff soon, too :)
 
When I started on M'aiq's boots I tried to find a pair which wouldn't take much modding to look right but eventually realized I had a pair of old black boots which were exactly the right shape. I figured it wouldn't be too hard to just cover them with the right color of cloth and make them look like leather. I later found some thin cloth which had a crackly, mottled finish like leather. To cover the boots I settled on dividing the shape up into four sections: top and bottom on either side. M'aiq's boots have a convenient layered seam down the center on the front and back which allowed for this. The top and bottom sections are simply layered over one another but you can hardly tell. People won't really be able to see past my ankles anyway since M'aiq has a long robe, which is also why I haven't bothered covering the very top of the boot. After figuring out the pattern I cut out the pieces and hot glued them on around the border. Only doing the border allows the cloth to move freely so it looks nicer, versus spray gluing the entire thing or something. This also allowed me to hide some of the overly wrinkly areas of the original boot. The pattern allowed for some overhang so after it was all glued on I trimmed the edges.
IMG_0004.JPGIMG_0005.JPGIMG_0070.JPG

For the center seam I cut a strip of the cloth and folded it over on both edges to give it a nice edge and make it a bit thicker. When gluing the cloth to the boot I scored the surface of the original boot so the glue would adhere better.
IMG_0076.JPGIMG_0075.JPGIMG_0064.JPG

Finally, I glued on some tiny strips of leather lacing to make it look like the boot was sewn together moccasin-style.
IMG_0086.JPG

The tails for both Khajiit will be articulated. This will be accomplished by having an internal, segmented structure around which foam will be attached in the shape of the tail. On top of that will be a layer of fur. I'm almost done constructing the first internal structure:
IMG_0013.JPG
The red and green parts are 3mm sintra which have been sandwiched around segments of 2 inch nylon webbing, held together with hot glue. I'm not confident that hot glue will hold forever so I'm riveting the pieces together. It'd be horrible for the tail to come apart after the foam and fur is on it! Unfortunately I couldn't find the right size rivets so they stick out a bit but it shouldn't be a problem since foam is going over it.
IMG_0093.JPG
You can see the size of the nylon webbing at the base of the tail on the right side of the picture. I left off half the sandwich there so I could attach the tail to the mount which will sit against my body.
 
I am loving all the details on this build so far! I'm very excited to see how the tails turn out - please post a video of the movment at some point!
 
Sorry for the lack of updates! I wish I had more time to post but the project and a few other things have been taking up all of our time. We've been doing our best to take pics though so probably after PAX we'll do a recap of what's been going on. We think we're on schedule to finish though! I'm super excited!
 
A quick update from me too: the project is going slower than expected for me and life things have gotten in the way a bit (isn't that always the way? We really need to get a sewing machine so sewing is faster than a snail's pace). Because of this, we've come to the conclusion that for now, I'll just forgo the mask and tail and go as a Nord mage instead and finish up the mask and tail soon. Talaaya is further along than me and has good progress on her mask and tail so the plan is still for her to go as M'aiq, so no worries, you guys will see updates on that as soon as possible!
 
We're at PAX and I completed my costume! Unfortunately Nanya didn't have the time to finish because she landed an awesome job at a game company! I've been wearing mine though and it's been so awesome! So many people recognize me as M'aiq, even if I don't have the mask and hood on! Much to Nanya's chagrin however, they also keep mistaking me as J'zargo. Haha!
We're still super busy though so I don't have time right now to post pics or explain my process yet, but soon! We will both make posts about our past work and Nanya will also keep updating this thread as she finishes up the last bits.

If you're at PAX I'll be hanging around the lobby and the showroom floor from 10 to noon and 2:30 to 6. Come say hi!
 
Last edited:
Yay! Update time! Now I can finally show what happened during my build. Here we go, prepare your butts for tons of pics!

Part 1: The Tail

I added a support rig to the base of the tail so I could wear it. Initially I only made it with the two smaller pieces attached to the tail (seen in the right picture) but soon discovered that those weren't enough to support it properly, so the Butt Plate™ was born. Formed to gently caress my particular behind, it keeps the tail exactly where it needs to be while still allowing me to sit. Conveniently, adding this extra plate created a slot for the belt to slide through those black straps, sitting flush with the new plate.
dVU1Ktm.jpg 8GR44EN.jpg

Then came the time to fill out the shape of the tail. I used upholstery foam which, after tracing the tail skeleton's silhouette onto it, I shaped by chopping it with scissors and an xacto knife. Seen on top is the initial shape, and on the bottom the final rounded shape.
U3unHiZ.jpg

When I added it to the skeleton the tail was nowhere near as flexible as I thought it would be. Each part on its own is very flexible, but together they restricted one another. To help alleviate this I hollowed out some of the foam to allow it to deform more.
CveW2NB.jpg

Once I had that sorted out I hot glued the foam to the skeleton and tried it on!

Next step was to get the fur on it. I chose 4 inch pile white faux fur. This would allow the end of the tail and the sides of the mask to be nice and long, but that also meant I would have to do a lot of trimming for the rest of it! I opted for plain white instead of trying to get a color because a good portion of him is white and it would have been too hard to make the seams between colors disappear properly. I had never worked with fur before but I had done a lot of research beforehand.

I needed a pattern so the fur would fit it perfectly so I went with the good ol' duct tape method. I covered the newly foamed tail with saran wrap then a layer of duct tape. Duct tape Samus had a fancy new tail to match!
GNJrERv.jpg
I then had to decide where to put the seam. I figured it'd be easiest to manage to have it go right down the middle, matching the skeleton which could still be felt underneath the duct tape, which gave me a nice straight line to work with (to both draw the cut line and also realign the fur back on it). The down side would be that the seam may be visible but that was a risk I was willing to take.
Once I got the duct tape off I laid it on the back side of the fur, careful to align it properly with the direction of the fur. I almost did it backwards! Luckily I caught it just before I started cutting. I also cut a dart in the tip of the tail on the pattern to make the pattern lay flatter and the fur wrap easier around the foam tail.
bK5OIW3.jpg
Then it was just a matter of carefully hot gluing the fur to the rig. Unfortunately I never took a picture of how ridiculously fluffy the fur looked before I combed it down, but here it is before I trimmed it:
rwvHTZ2.jpg

Trimming fur is...messy. Very messy. I had to put on goggles and a dust mask so I didn't constantly get it in all of my orifices. It also gets EVERYWHERE. It was all over anything nearby, including the tv (yay, static!) and was near impossible to brush off my skin and clothes. It wasn't long before I moved the project to the tub in the bathroom. But once I was done the tail looked much better! Way slimmer. I kept the fur long near the end of the tail.
The painting process went pretty fast. I used watered down acrylics and a large brush, making sure to paint the fur backwards to really get the color deep down so white wouldn't ever show. I laid down a light tan as a base color, then proceeded to add the darker patterning. It ended up drying a bit lighter than it looked while wet (it's wet in these pictures). As I painted it I used a tiny comb (a beard/mustache comb I believe) to move the fur around and help blend the colors.
TRmcoQk.jpg W0ROHXY.jpg

And finally, the completed tail!

I had hoped the end of it would flick a bit more and overall just move more, but I'm pretty happy with the results.

Stay tuned for part 2 when I talk about the robe and accessories!
 
Last edited by a moderator:
Interesting tail skeleton idea. Totally different from mine, which is probably why I love it! Interesting using white fur and painting it, I'm so used to just using pieced coloured fur and only accenting with airbrush or drybrush work. Nice effect in any case.
 
Part 2: The Robe and Hood

I started with the hood since it was the smallest piece and would be the easiest to rework the pattern and, worst case, redo. I had never worked with cloth before, nor had I ever sewn anything. Luckily it was easier than I thought and I had the pattern whipped out in about an hour! The hood is kind of a complicated shape but I quickly figured out an easy way to make it. I took a mannequin head and bulked it up with small towels and washcloths so it roughly resembled the shape of the hood, duct taping them together where needed. Then I laid muslin over half of it and sketched the pattern. After a little refinement I had half a hood which I could flip over and create the other half with. The hood is divided into 5 sections: 2 on either side and the front edge. I cut out the pattern twice so I could make a nice lining for the hood too. I then spent quite a long time hand sewing the entire thing.
48GJ8qA.jpg0fdX7M1.jpg
UL81zSx.jpg

The robe was also patterned from scratch and hand sewn. I used almost the same shape for the front and back but cut the back part in half down the middle and made specially shaped edges for the front. The exposed front flap has a separate trim sewn to its border, which continues down around the bottom and all the way around. The sleeves were a bit of a headache due to the dropped seam on the shoulder, but once I figured out the pattern, attaching them was straightforward. The wrists of the sleeves have elastic sewn into them with bias tape to create a puffy sleeve look (no early pics of this, just in the final completed costume pics). The front is held closed with 3 pieces of velcro.
D3elih2.jpgDHP9O90.jpg
In these pictures I hadn't done the wrist elastic yet.

For the ropes around the waist and wrists I found some perfect decorative rope, and hot glued the pieces together. There are hidden clips in all 3 pieces. They're partially visible in the wrist ropes, but for the waist rope you'd never know it was there! It looks like one big piece. If you squeeze the fattest part, the pressure undoes a clip inside which detaches one side of the waist rope.
IinLrPR.jpgN32NpPU.jpg
nPMoI76.jpgVlo3mwO.jpg

The shawl took me a while to figure out how to do. I wanted to make it look like the cloth was just draped around the shoulders but not have to worry about it coming undone. So I tried doing just that: draping cloth; but it wasn't turning out how I wanted.
XF9gm8n.jpgmL5vVqp.jpg
Nowhere close to the shapes of the wrinkles M'aiq's actually has. I had to rethink this. Try number two turned out much, much better:
q0uENoy.jpgebk2aVn.jpg

To keep all the wrinkles in their place I sewed anywhere and everywhere in a sort of sloppy fashion with giant stitches, basically just to tack stuff together. I did my best to hide the thread in the crevices of wrinkles. The bottom side looks like a complete mess but it looks so neat from the outside! Here's what it looks like from the bottom:
q34W4Do.jpg
There's a ton of cloth there so it's one of the biggest contributors to how hot it is to wear this costume. Some of it was so thick I could barely get a needle through it!

The ring on the shoulder is Apoxie Sculpt around a thinner metal ring for structure, which also helped guide me in keeping it circular as I added the Apoxie around it. After it was cured I painted it an ivory color with a bit of brown for accents.
hVliDkR.jpg

The gloves had this annoying wrinkly edge on them which made tucking them in really annoying so I cut them off.
uc1gDLt.jpg


Double bonus! I have time to write about the mask too! (This is going to be a really long post.)

Part 3: The Mask

After getting all the pieces together I started figuring out how I was going to wear it. The jaw hinge was the first step. I needed to attach the chin piece to two long arms which would serve as the jaw bone, jutting back toward the back of the mask, approximately like how a real jaw works. I mocked it up with cardboard and duct tape and once I was happy with it I went about cutting some small pieces of wood and rounding out the edges so they wouldn't grind into my cheeks. I hot glued them to the inside of the chin. Attaching the other ends to the back of the mask was challenging. They came in at an angle which made nuts and bolts hard to work with. My solution was creating a buffer zone with a ton of washers. This kept the connection tight and unable to rattle around. I used lock nuts so they'd stay in place.
yZXzBlx.jpg

To keep the jaw closed by default I added on an elastic strap on either side, close to the pivot.
4tPmPdR.jpg

I added a few small pieces of upholstery foam for padding in the jaw and one for the forehead. I also added some straps. They're hot glued on to the mask and sewn together at the back. This harness fits under my ponytail which keeps the mask from sliding down/forward. There's also a small elastic strap that goes around the back of my neck from about where each jaw hinge is, which keeps the jaw pressed against my chin and allows me to move it.
iW95RWY.jpg

Next I needed to smooth out the parts of the mask which would be exposed after the fur was on. I applied a coat of Bondo spot putty and then sanded it smooth. I also added the teeth and gums. The teeth are Friendly Plastic, which comes as small beads of white plastic which you put in hot water until they become malleable and transparent and then you can shape the blob by hand. When they cool they turn white again. In the right picture some of the teeth are still cooling so they look a bit transparent.
icNwbHN.jpg0QE4Tj9.jpg

To prep the mask for being furred I painted the exposed areas black and painted the nose realistically.
2oKLpFS.jpg

Furring it would require doing it in a few pieces. To make a pattern I covered the mask in clear packing tape and drew lines on it where the seams would go, noting the direction the fur would need to go with arrows. I divided it up into 7 pieces: forehead/nose, left/right cheeks, left/right muzzle, front of the chin, and the bottom of the chin/neck cover. Here's the first piece going on:
xxRfKlp.jpg
If you think this looks ridiculous now, just wait.

I seem to have reached the limit for attached files, so new post it is!
 
McRgDb9.jpgbrI5d5b.jpg

Mmmhmm. Yep.
You can imagine I was a bit concerned at this point about how this was going to turn out. But fear not! It gets better. I promise.

eEG44rX.jpg
See? Getting better already! But not done yet!

MIKdQMj.jpgaP111Rg.jpg

Even better! But still not quiiiiiite done. Finished trimming though. Ready for paint!

Like the tail, I started with a base color of tans and light browns, careful not to paint any areas that should remain white. I used a regular paint brush, no airbrush. I combed out the fur as I painted to style it, keep it neat, and help blend the colors.
D1rPI7z.jpg

Warmer colors and starting to add spots and details!
BoJISZd.jpg

Before I show the next paint progress picture I want to take a moment to talk about the eyes. I bought a pair of resin hemisphere blanks, called follow-me eyes, which have a magnifying effect, causing the pupil on the flat back side to appear to always look at the viewer. You can paint directly on the resin but I chose the alternate method which is painting eyes on a piece of heavy paper and gluing them to the resin with e6000 glue. It's important to make a clean, solid connection with the resin or the following effect won't work. Also, because there's magnification, you have to make the eye painting quite a bit smaller than the diameter of the resin eye. It took a few practice drawings before I had something I was happy with. I then used metallic paints for the iris and then cleaned it up with black paint around the edge and on the pupil.
(The left picture doesn't show the final painting. I never took a picture of it on its own.)
qCcgsVY.jpgs9JpVZp.jpg

Okay! Now for the finished painted fur!
OddR2Tt.jpg

I had to grind out the inside of the eye holes so the resin eyes would fit more snugly and further forward. I'm sooo happy with how the eyes turned out!
In the previous picture I have one of the mustaches glued in. To make them I looped brown thread a bunch of times until I had a small bundle, then I trimmed one side off and tied the other end. I made several of these and glued a few in on each side by just pulling a bit of the fur away and hot gluing them.
bSZQfhu.jpgf1yvcDF.jpg

Here's the completed mask! So pretty... ༼ つ ◕_◕ ༽つ
bT539r1.jpgHadoRtE.jpgszetaVh.jpg

And here are some close ups of the eyes which also show the following effect a little bit:
gfAgSq0.jpg

Some shots of the inside of the completed mask:
OcKu2uG.jpg

To give you an idea of the visibility (as best I can with a camera):
kEtLEQ4.jpg
I have a small circle of visibility directly in the center (the two holes become one) and one smaller circle on either side for a tiny amount of peripheral vision. This is caused by each eye looking through the opposite hole. I can't see much out the nostrils; they're mostly for ventilation. I can open the mouth to see down but it's still not super great.

Completed Costume!

694Ww8B.jpg
RibnlhZ.jpgkhQMn3m.jpg8IynTXe.jpg

It gets pretty hot so I'll be installing a fan in the mask when I get a chance but other than that it's quite a comfortable costume to wear! Well, also there's the visibility issue, but I've gotten pretty used to it at this point so it's not so bad. I have a few other improvements in mind for it that I originally wanted to do but didn't have the time for, including grunging up the cloth with dirt and whatnot, and adding leather lacing stitching on the hood and robe.
I'm so proud of it though!

Video of the jaw moving!
 
Last edited by a moderator:
That turned out so good! I love how the mask looks; you did such a phenomenal job with the fur and the painting. And the eyes are amazing, wow!
 
This thread is more than 4 years old.

Your message may be considered spam for the following reasons:

  1. This thread hasn't been active in some time. A new post in this thread might not contribute constructively to this discussion after so long.
If you wish to reply despite these issues, check the box below before replying.
Be aware that malicious compliance may result in more severe penalties.
Back
Top