New hole layout is perfect!
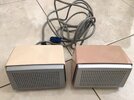
It's an Elegoo Saturn 2 8K. The face was printed nearly flat to the build plate, with a small angle to prevent suction. I love that workhorse!
View attachment 1874973
Maybe, but that's possibly an artifact of the photography and the FDM printing of the original. Hard to say, but not a bad idea.
I wouldn't worry about feet. We see nothing in the show, and having the freedom to stick our own feet on it (or not) is probably best. Besides, they interfere with sanding.
")
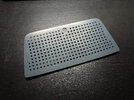
I wouldn't overthink it. If you look closely, you can see FDM layer lines in the speaker. It's not even the best FDM you could get! No, the roundness is construction, IMO. I can always add a little roundness when I sand anyway.
Agreed, don't do the rounding; I don't think it was intended. There's a "retro-70s" feel to the speaker that wouldn't have such fine design.
BUT...the slots should extend through the front; I should see the five slots when facing the the front. But no rounding of edges
View attachment 1874955
EDIT: I took a look at your latest STLs, and I honestly think they are perfect! Printing will tell for sure, so please stand by!
View attachment 1874970