Scream (1996) voice changer build

DudeManGuy1019

New Member
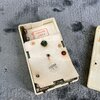
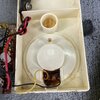
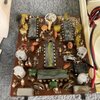
So recently, the fantastic Drowned Boy Productions has unearthed the only example of the voice changer used in the original Scream. Until now, the closest we’ve come are the more modern clones that appeared in the more recent Screams. He showed this off here (he also has a great video on the ones used in the rest of the series.)
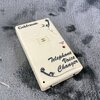
I’ve already reproduced the art (h/t to Reddit for helping me find the font)
IMG_5295.png

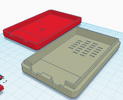
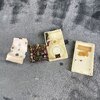
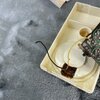
Then I got started on modeling the device itself. It’s pretty basic but I’m not that skilled so it took me a while. So far I have printed a very rough version that’s all one piece (painted an extremely rough white since I only have black filament on hand). As we speak, I’m test printing a two-piece version with space for physical switches and an LED bulb.
IMG_5318.jpeg
IMG_5319.jpeg

Once I have everything dialed in, I’ll blast it with filler primer, paint it white, and somehow apply the logos (I’m thinking about silkscreening it but I’m open to easier suggestions.)
 
Update: I'm a few iterations into a proper clamshell design, I'm hoping this most recent one will be The One. I'm very much an amateur when it comes to modeling, and I'm using Tinkercad, so it's slow going. It's printing as we speak and, assuming I got tolerances right and it fits together as it should, I'll be post-processing and painting it tomorrow! Here's a preview:
 

Attachments

  • voicebox pic.PNG
    voicebox pic.PNG
    219.4 KB · Views: 28
I was also able to find some really nice detail shots from the original eBay listing, confirming my suspicion that the original pops open without any screws/fasteners, and the battery pack is inside.
 

Attachments

  • s-l1600 (8).jpg
    s-l1600 (8).jpg
    466.6 KB · Views: 52
  • s-l1600 (7).jpg
    s-l1600 (7).jpg
    349.6 KB · Views: 50
  • s-l1600 (6).jpg
    s-l1600 (6).jpg
    403.7 KB · Views: 40
  • s-l1600 (5).jpg
    s-l1600 (5).jpg
    761.5 KB · Views: 38
  • s-l1600 (4).jpg
    s-l1600 (4).jpg
    297.7 KB · Views: 49
  • s-l1600 (3).jpg
    s-l1600 (3).jpg
    436.1 KB · Views: 80
The print was a success! The bottom half was at least, then I lost adhesion and the whole thing went awry. Thankfully I was able to test the various tolerances and it all seems good!
I have a new build surface coming tomorrow and hopefully I can have it finished this week!
 
“Honey, why does it smell like an auto body shop in here?”
IMG_5411.jpeg

I have no idea, none at all.

So printing money worked out nicely, now I’m just doing coats of filler primer and then sanding it, before I hit it with some basic white paint. I could’ve printed at a finer resolution and made my life easier but what fun is that?

I originally planned on doing a run once I finished the prototype, but it looks like someone already beat me to it on Etsy, so I think this will just be for me.
 
I’ve been out of commission with a bad back but here is a paintjob that didn’t work out (too white!) sanded down for a new paintjob. So now you know what it would look like in the Star Wars universe.
IMG_5489.jpeg
 
Here’s my final prototype! I say prototype because while I’m really happy with some things (the paint, the logos, the foam, and the switches) there are still some fixes to make. It’s a bit mushy from the filler primer, and one of the pieces needs to be mirrored. Once I have a final FINAL piece I’ll throw in a working LED.
IMG_5495.jpeg
IMG_5494.jpeg
IMG_5499.jpeg
 
It’s been slow going thanks to a hectic week but Mark Whatever is due for a paint job later today. I’ve found a new technique for smoothing prints, by using filler primer and buffing most of it off with iso alcohol on a rag once it’s dry to the touch, to get it very smooth without adding a lot of bulk/mushiness like I had on the last version. Has anyone else tried this? It’s easier and gets better results than sanding or resin, and it makes me want to try more complex props soon. Pictured is the first layer of filler primer:
IMG_5543.jpeg

And the second:
IMG_5544.jpeg

Considering this is out of a standard Ender 3 Pro and .02 layers, I’m pretty stoked with the results and the speed of it.
 
IMG_5562.jpeg
IMG_5564.jpeg
It has officially reached “good enough” status! I skipped the fine print, let a few mushy spots and paint imperfections slip, but went ahead and wired up one of the switches to the LED, which works fairly well. Quite proud of my work, I’m fairly certain this is the one of the only replicas around of this very obscure prop.
 

Your message may be considered spam for the following reasons:

If you wish to reply despite these issues, check the box below before replying.
Be aware that malicious compliance may result in more severe penalties.
Back
Top