ajsmusicmadness
New Member
Started this end of July 2016, Seeing as how it'd almost done I thought I'd start up a build thread to chronicle my wip
Redhood has always been one of my favorite batman arcs. after being wishy washy with how to start it for a year I finally joined a DC group going to Anime weekend Atlanta, now that I had a deadline I could really work on it. I picked a version mostly based on the animated movie "Under the red hood" however I wanted the red symbol from "Redhood and the outlaws"

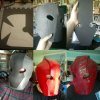
1. Got my head measurements then drafted a pattern for Eva foam. I used Harbor freight floor mats which were $20 for four 24in x 24in mats
2. Then I heat molded the foam to get the helmet curve, I used hotglue but THIS WAS A MISTAKE the glue took 6 mins to set and when released it fell apart. in the future I will be using contact cement on a project with this much surface area
3. following this I cut the face place from 5mm craft foam and
4. glued it to the from of the helm. This design was chosen to cover the main front seam of the helmet.
4.5 a major step that I didnt photograph was taking Magic Sculpt epoxy and filling holes. I covered the two seams on top of the helmet from the bends, as well as filling in the ridge ontop. once sculpted I let cure for a day then sanded.
5. after much sanding I gave it 3 coats of primer and 3 coats of Plastidip and two coats primer-paint red gloss outdoor rustolium.
6. then I gave it a wash in black, a light wash in brown, and added black detailing, then added battle damage with just skill and acrylic paint, no actual cut into the foam.


Second ever helmet build and first time using epoxy, sculpting, plaltidip but I love the heavy battle worn helmet.
## the only thing missing is the eyes which are coming in the mail this week ##
next step, armor.
Redhood has always been one of my favorite batman arcs. after being wishy washy with how to start it for a year I finally joined a DC group going to Anime weekend Atlanta, now that I had a deadline I could really work on it. I picked a version mostly based on the animated movie "Under the red hood" however I wanted the red symbol from "Redhood and the outlaws"

1. Got my head measurements then drafted a pattern for Eva foam. I used Harbor freight floor mats which were $20 for four 24in x 24in mats
2. Then I heat molded the foam to get the helmet curve, I used hotglue but THIS WAS A MISTAKE the glue took 6 mins to set and when released it fell apart. in the future I will be using contact cement on a project with this much surface area
3. following this I cut the face place from 5mm craft foam and
4. glued it to the from of the helm. This design was chosen to cover the main front seam of the helmet.
4.5 a major step that I didnt photograph was taking Magic Sculpt epoxy and filling holes. I covered the two seams on top of the helmet from the bends, as well as filling in the ridge ontop. once sculpted I let cure for a day then sanded.
5. after much sanding I gave it 3 coats of primer and 3 coats of Plastidip and two coats primer-paint red gloss outdoor rustolium.
6. then I gave it a wash in black, a light wash in brown, and added black detailing, then added battle damage with just skill and acrylic paint, no actual cut into the foam.


Second ever helmet build and first time using epoxy, sculpting, plaltidip but I love the heavy battle worn helmet.
## the only thing missing is the eyes which are coming in the mail this week ##
next step, armor.
