Vrogy
Well-Known Member
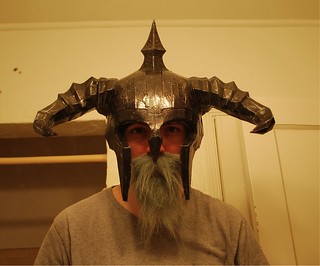
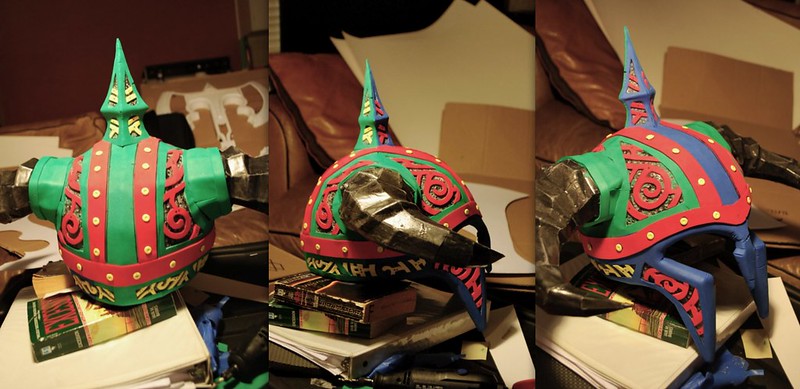
Trying to crank out a new costume for DragonCon this year, went through the game's armor and weapons and tried to come up with something relatively easy to fabricate, and interesting. If you're on the Wolf Pack Elite boards, you may be seeing this twice.
vrogt by vrogy, on Flickr
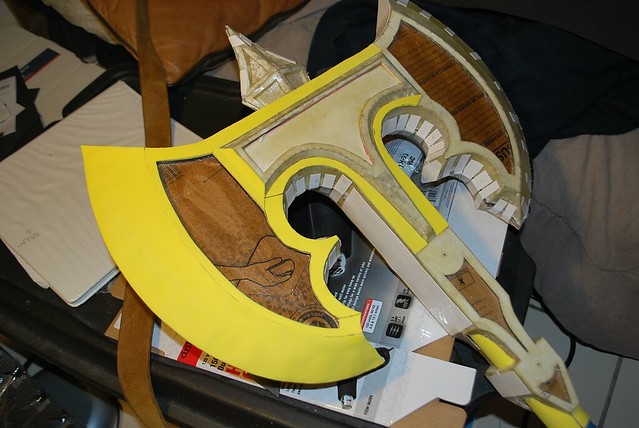
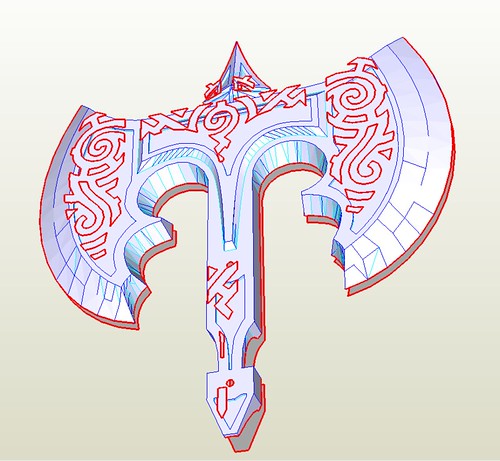
-steel battleaxe
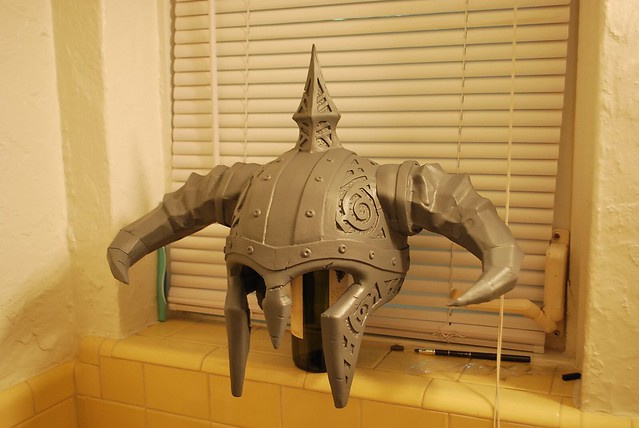
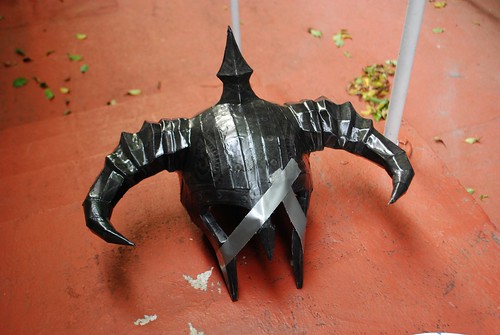
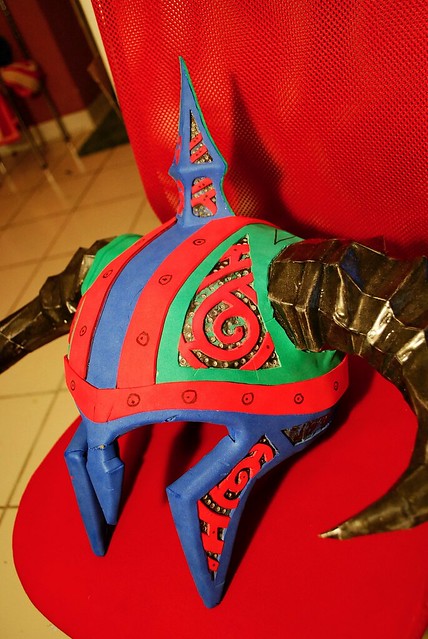
-horned helmet
-engraved steel gauntlets
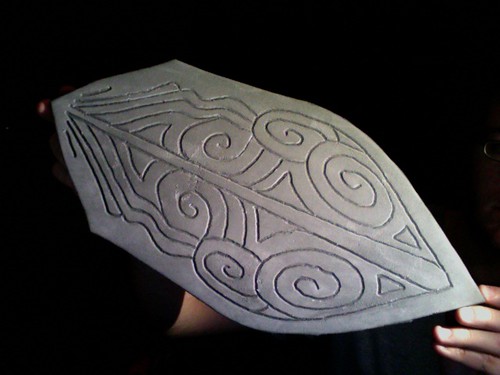
-engraved steel greaves
-quilted gambeson
-beard
-eyesocket makeup, white-out contacts(not pictured)
Here's the fabrication plans for everything:
-Battleaxe
Machined into aluminum, two fixtures for the head, either side, 4 for the head base, to capture side engraving, and one lathed piece for the pommel, maybe some 4-axis engraving if I have time. Basically, real metal, so I'll have to recast it in plastic. Bolted to a hardwood haft, simple tacked-on leather wrap.
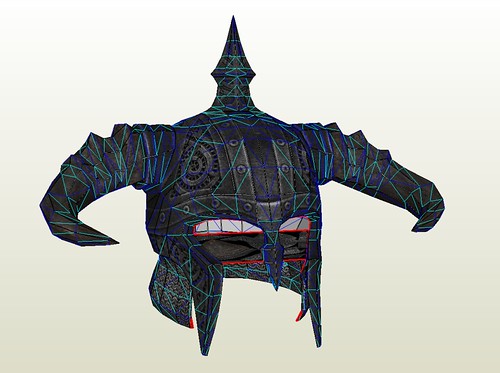
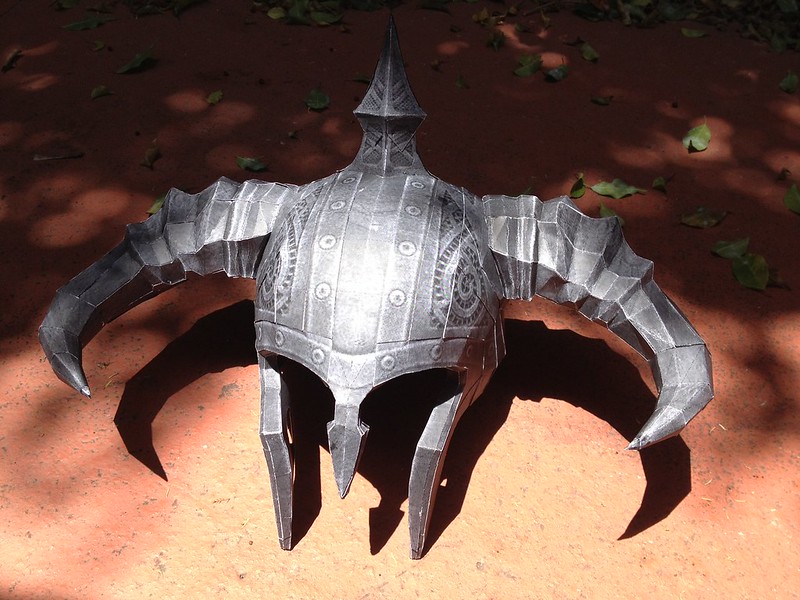
-horned helmet
EVA and craft foam details over a hard plastic base, construction or baseball helmet. Some galvanized maille suspended from a row of holes in ABS sheet behind EVA for trim, possibly sculpted horns, or some real ones if I can find something with that severe curve in a matching set.
-engraved steel gauntlets and gloves
Engraved EVA foam attached to thin leather or black cloth gloves. Perhaps flat-vacformed and shaped, if a friend will do me a favor. I'd have to make patterns that fit myself, then digitize the shapes and extrude features once scale was established inside CAD.
-quilted gambeson
Not much for it, scratch-patterned and sewn. Possibly hidden buttons to establish a set overlap, I have a suitable 1300s-style belt. Colors will be red and black, for the parade. Black outer, red inner clothes and trim. Some areas of detailed appliqued fabric on the exposed chest of the shirt, collar.
-beard
Ordered several colors of facial prosthetics this morning, thinking grey or white will be best.
Lacey Beard and Mustache Set AB1613 Costume Beard • Lacey Wigs & Lacey Beard and Mustache Set AB982 Costume Beard • Lacey Wigs as well as some spirit gum and remover.


-eyesocket makeup
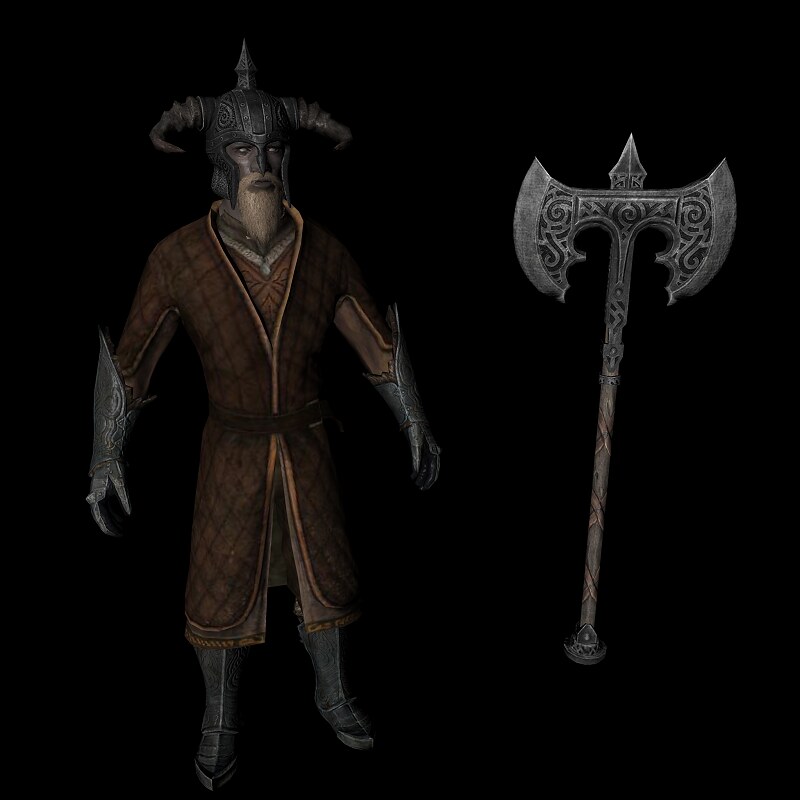
Simple black, grey, white makeup, face and neck very pale, deep black eyesockets streaking outwards as seen on Vilkas & Farkas File:Vilkas HQ.jpg - The Elder Scrolls Wiki & File:FarkasHQ.jpg - The Elder Scrolls Wiki .
-white-out contacts
Not sure on these, I'll have to see if I can wear contacts at all first, then if I can get prescription contacts in the color I need- white covering the iris, pupil left black.
Big thanks to www.youtube.com/user/rroobboo999 for ripping/packaging/uploading loads and loads of Skyrim armor, weapons, etc.
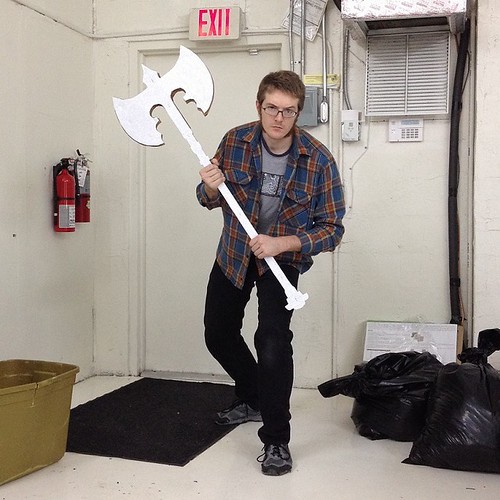
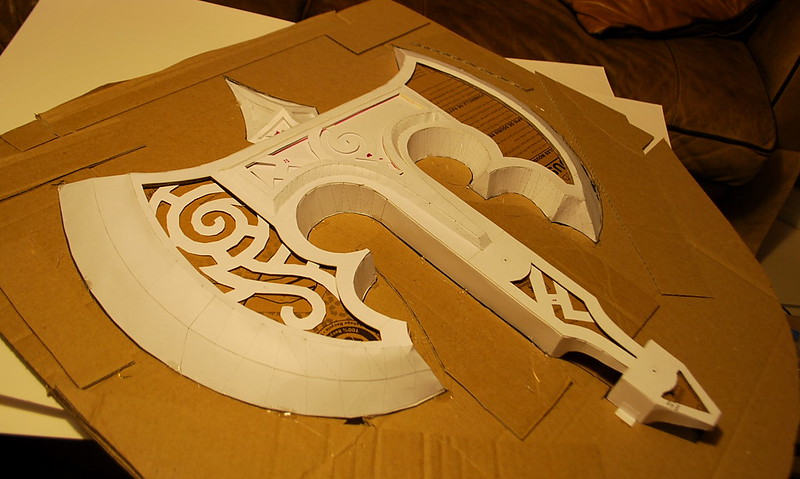
Really started by printing out a big f'n axe to figure out a scale. It's too small here.
IMG_1559 by vrogy, on Flickr
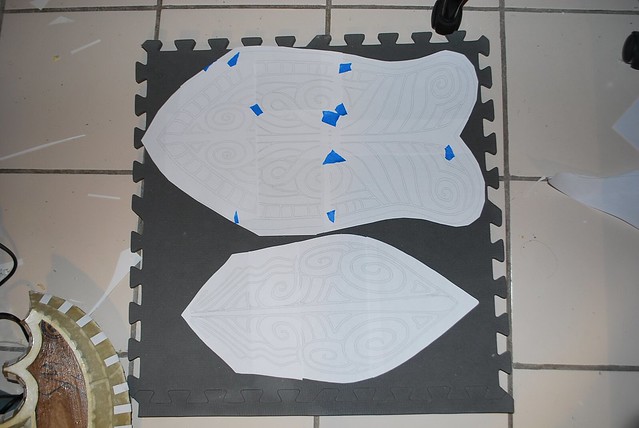
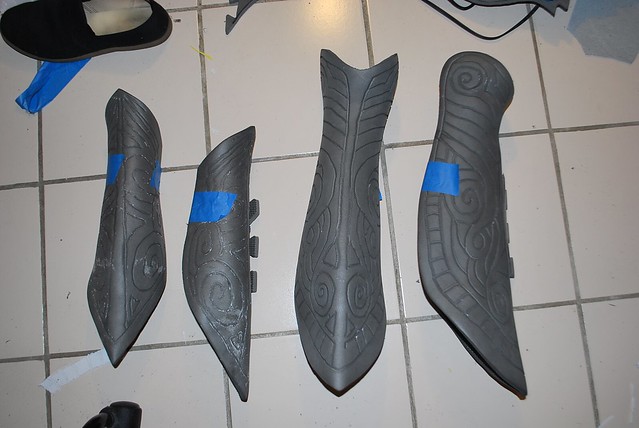
Started by making some basic posterboard patterns for the forearms, gauntlets, and greaves to my size- then traced the texture images in cinema4d to get relief geometry, and used scaled photos of the patterns to manipulate them into size for properly scaled and shaped mold assets. These are being sent to a friend with a CNC router and a vacformer- I'll just trim, roll, and strap parts when they arrive.
arms_by_relief.c4d * by vrogy, on Flickr
arms_by_relief.c4d * by vrogy, on Flickr
etc- still have to do the hands and greaves-
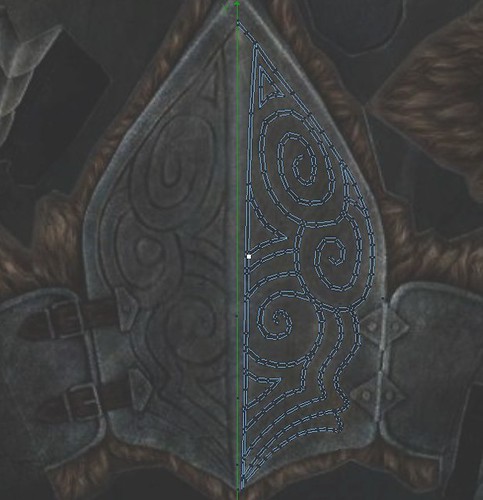
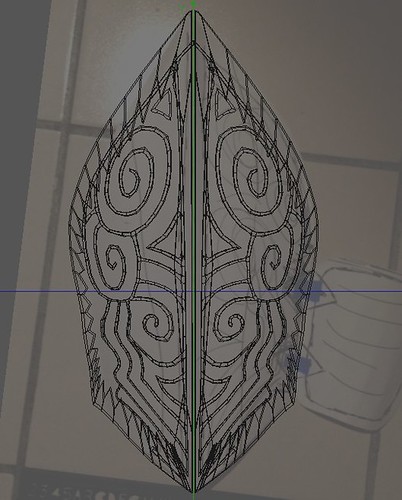
Then I scaled the helmet, on the third try it was correct, so we went to the higher-res model
steelnordhelm_tex by vrogy, on Flickr
steelnordhelm_hires_builded2 by vrogy, on Flickr
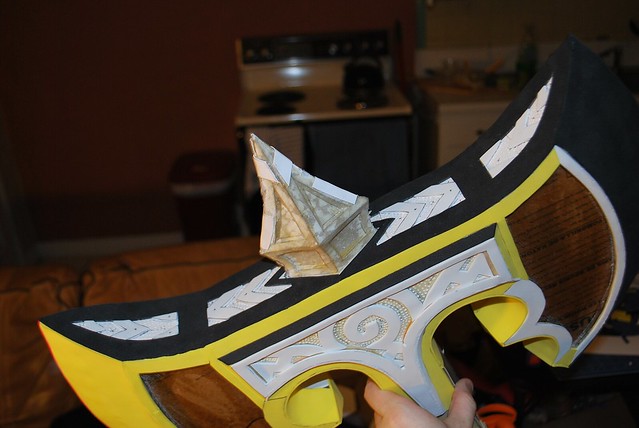
I'll be resining and fiberglassing this soon. It'll get craft foam-skinned, like Kol Badar's space marine project Obscurus Crusade -> My pep adventure. Raised and recessed details will be in craft foam, as well.
We're also working on the BATTLEAXE.
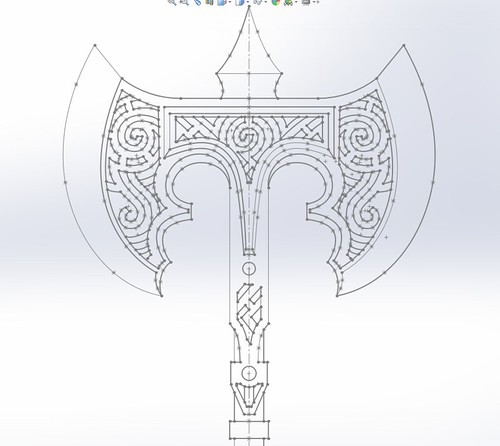
steelbattleaxe_vectors_head by vrogy, on Flickr
Drawing in Solidworks, I about have all the head geometry I can get done for this convention ready. Perhaps later I'll return and put some of the top and handle-side engraving in. We'll see about the pommel later- I may stick with a simple lathed version for now, but there's engraved detail on it, as well. It'd be best as a live tooling or 4-axis milling part.

steelbattleaxe_solid_mostdetails by vrogy, on Flickr
Fabric and fur for armor trim has all been selected and purchased, as well- for under-tunic as well as the gambeson.

skyrimcostume_joannrun by vrogy, on Flickr
Yeah, back to work now. 4 weeks.
vrogt by vrogy, on Flickr
-steel battleaxe
-horned helmet
-engraved steel gauntlets
-engraved steel greaves
-quilted gambeson
-beard
-eyesocket makeup, white-out contacts(not pictured)
Here's the fabrication plans for everything:
-Battleaxe
Machined into aluminum, two fixtures for the head, either side, 4 for the head base, to capture side engraving, and one lathed piece for the pommel, maybe some 4-axis engraving if I have time. Basically, real metal, so I'll have to recast it in plastic. Bolted to a hardwood haft, simple tacked-on leather wrap.
-horned helmet
EVA and craft foam details over a hard plastic base, construction or baseball helmet. Some galvanized maille suspended from a row of holes in ABS sheet behind EVA for trim, possibly sculpted horns, or some real ones if I can find something with that severe curve in a matching set.
-engraved steel gauntlets and gloves
Engraved EVA foam attached to thin leather or black cloth gloves. Perhaps flat-vacformed and shaped, if a friend will do me a favor. I'd have to make patterns that fit myself, then digitize the shapes and extrude features once scale was established inside CAD.
-quilted gambeson
Not much for it, scratch-patterned and sewn. Possibly hidden buttons to establish a set overlap, I have a suitable 1300s-style belt. Colors will be red and black, for the parade. Black outer, red inner clothes and trim. Some areas of detailed appliqued fabric on the exposed chest of the shirt, collar.
-beard
Ordered several colors of facial prosthetics this morning, thinking grey or white will be best.
Lacey Beard and Mustache Set AB1613 Costume Beard • Lacey Wigs & Lacey Beard and Mustache Set AB982 Costume Beard • Lacey Wigs as well as some spirit gum and remover.
-eyesocket makeup
Simple black, grey, white makeup, face and neck very pale, deep black eyesockets streaking outwards as seen on Vilkas & Farkas File:Vilkas HQ.jpg - The Elder Scrolls Wiki & File:FarkasHQ.jpg - The Elder Scrolls Wiki .
-white-out contacts
Not sure on these, I'll have to see if I can wear contacts at all first, then if I can get prescription contacts in the color I need- white covering the iris, pupil left black.
Big thanks to www.youtube.com/user/rroobboo999 for ripping/packaging/uploading loads and loads of Skyrim armor, weapons, etc.
Really started by printing out a big f'n axe to figure out a scale. It's too small here.
IMG_1559 by vrogy, on Flickr
Started by making some basic posterboard patterns for the forearms, gauntlets, and greaves to my size- then traced the texture images in cinema4d to get relief geometry, and used scaled photos of the patterns to manipulate them into size for properly scaled and shaped mold assets. These are being sent to a friend with a CNC router and a vacformer- I'll just trim, roll, and strap parts when they arrive.
arms_by_relief.c4d * by vrogy, on Flickr
arms_by_relief.c4d * by vrogy, on Flickr
etc- still have to do the hands and greaves-
Then I scaled the helmet, on the third try it was correct, so we went to the higher-res model
steelnordhelm_tex by vrogy, on Flickr
steelnordhelm_hires_builded2 by vrogy, on Flickr
I'll be resining and fiberglassing this soon. It'll get craft foam-skinned, like Kol Badar's space marine project Obscurus Crusade -> My pep adventure. Raised and recessed details will be in craft foam, as well.
We're also working on the BATTLEAXE.
steelbattleaxe_vectors_head by vrogy, on Flickr
Drawing in Solidworks, I about have all the head geometry I can get done for this convention ready. Perhaps later I'll return and put some of the top and handle-side engraving in. We'll see about the pommel later- I may stick with a simple lathed version for now, but there's engraved detail on it, as well. It'd be best as a live tooling or 4-axis milling part.
steelbattleaxe_solid_mostdetails by vrogy, on Flickr
Fabric and fur for armor trim has all been selected and purchased, as well- for under-tunic as well as the gambeson.
skyrimcostume_joannrun by vrogy, on Flickr
Yeah, back to work now. 4 weeks.
Last edited:


")