So apologies on the delayed response. Work has been crazy and time got away from me. But I am making my grand return to RPF and with it, my build process for the Gambol Shroud.
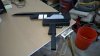
One of the first steps was determine scale. I started with a Mac10 airsoft gun and traced it on paper and then worked from there. Using reference from the show, I laid out the gun, the base, and the blade, setting each to an appropriate scale. I also went about cleaning up the Mac10. Cut and filed off the front and rear gun sights and also filled in all of the screw holes. Final touch was to paint the gun and magazine a nice flat black.

Very early on I decided that I wanted the blade to be able to collapse, but that meant determining how. With cardboard, I started to play around with different hinge and slide concepts until I had a fairly good idea.


With my cardboard templates, I then moved to ½” MDF. I then cut my blade shape out with a bandsaw. One thing I did not initially factor for, however, was the overlapping round hinge that needed to be on both halves. After cutting a second lower blade section, I routed half of the round hinge on each blade section (approximately ¼” depth). Using a binding post as the pivot, I also took a 5/16” drill bit and drilled 4 holes on the inside of the joint and glued in 4 neodymium (rare earth) magnets* that I had picked up from Home Depot for a few bucks. This would allow the blade to hinge smoothly with almost no visible hinge and also snap together while in its “Blade Mode”.
*Side Note: Remember to pay attention to polarities. Would hate to get the magnets glued in and realize they are actually repelling each other.


Using a belt sander, I put the edges to the blade and subsequently reduced the blade weight pretty significantly. This helped the magnets keep the blade from moving around when I didn't want it to. For painting, I wanted to do something a little more unique. Opted for flat black base coat and then masked off and painted the edges a gloss black. After the first coat, I noticed the grain to the MDF in the blade’s edge and took spackle and filled in all of the gaps. Once dry, I sprayed it again and was much happier with the result (smoother and shinier). The last bit was masking off and painting the white strips on the lower section of the blade. I literally just eye balled this based on some of the reference images I had and went with it. Opted for a gloss white for this part.*
*Side note: The pictures won’t show the white until later as I actually completely forgot about that detail until I was almost done.


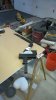
The initial base piece was cut out on the bandsaw from a chunk of 2x4. This allowed me to figure out general shape and how I wanted to blade pieces to move internally. Once I had the base pivot point determined, I was able to map out the slide path for the blade and exactly how much material I needed to clear out in the center of the base.

With the complex path that I was left with, it was pretty clear that routing was out of the picture. So instead of trying to carve out the 2x4 base, I used it as a template for 3 pieces of 1/2” MDF. I milled the sides to about 7/16” to account for the width of the Mac10 but left the center at 1/2” for the blade. Taking my ½” center piece, I cut out my slide path on the bandsaw and sandwiched it all together. One of the other additions I made to the center piece was three magnets which would help secure the blade while vertical in “Blade Mode”.


For the actual slide pivot point, I went pretty simple. Taking two finish nails, I drove them from the center outwards, using the nail head as the pivot. I also opted to add two more magnet on the back of the blade, right near the top, so when it collapsed, it would snap to one at the bottom and would help hold the blade closed while in “Gun-a-rang Mode”. Now with the slide pivot done, all of my magnets placed, and the slide motion tested thoroughly; I drilled two holes through the base and used binding posts to secure and this would allow me to sandwich the three pieces together with the blade in position.


Before I locked the blade in, I needed to get some paint on the base. Continuing with the flat black used on the blade, I sprayed the entire base piece, and then using a semi-gloss mid gray, masked off and sprayed the back section.


Once everything was painted, it was a simple matter of assembly. Blade placed in the center of the base and the three pieces sandwiched together with the binding posts. From there, a nice bead of liquid nails was applied to the bottom of the base and to the top of the Mac10 and the two halves where squeeze clamped for the night to dry.


")