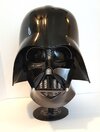
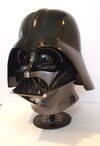
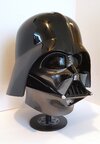
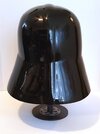
Rubie's Supreme Vader restoration - (here we go!)

jhfagan

Active Member
Gone but not forgotten.
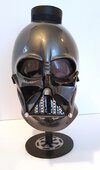
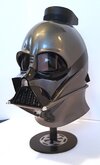
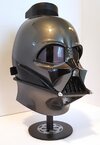
Against my better judgement, I've decided to attempt the dreaded, and according to some, pointless Rubies Supreme Vader restoration.
I say, why not! :)
Some pics to start.
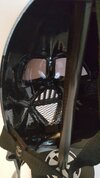
Already removed the eyes, and the grill.
Dremelled out the eyes , and the lengths of the grill.
Bondo'd in the notches in the eye sockets, added the remaining lengths to the backs of the grill slots, and filled in the 4th nose slot, and the front of the nose cap.
Also filled in the nip on the top of the dome (not shown).
Installed a temporary sized insert to correct dome placement. A permanent plastic one will be hot glued in here soon, and after painting, will be applying industrial strength Velcro to the insert, and on top of the horseshoe on the mask.
Will be correcting the neck flange, and then finishing final sanding everything smooth, to be ready for the auto body shop to paint.
Waiting on the complete Vader insert and parts kit from Fenixprops.
More to come.
Sorry if the pics aren't in correct order.
Resized_20200909_162533.jpeg20200927_164401.jpgResized_20200913_143031.jpeg20200927_165247.jpg20200927_165203.jpg20200916_111804aa.thumb.jpg.e8926886d16c25dd669c29ba8424aeb6.jpgResized_20200911_122101.jpeg20200927_164344.jpg20200916_111722aaa.thumb.jpg.449bcfe86e4801a63e65a7b7e4bb50f8.jpg20200927_165226.jpg20200927_180643.jpg
 
Last edited:
Against my better judgement, I've decided to attempt the dreaded, and according to some, pointless Rubies Supreme Vader restoration.
I say, why not! :)
Some pics to start.
Already removed the eyes, and the grill.
Dremelled out the eyes , and the lengths of the grill.
Bondo'd in the notches in the eye sockets, added the remaining lengths to the backs of the grill slots, and filled in the 4th nose slot, and the front of the nose cap.
Also filled in the nip on the top of the dome (not shown).
Installed a temporary sized insert to correct dome placement. A permanent plastic one will be hot glued in here soon, and after painting, will be applying industrial strength Velcro to the insert, and on top of the horseshoe on the mask.
Will be correcting the neck flange, and then finishing final sanding everything smooth, to be ready for the auto body shop to paint.
Waiting on the complete Vader insert and parts kit from Fenixprops.
More to come.
Sorry if the pics aren't in correct order.
View attachment 1353192View attachment 1353193View attachment 1353194View attachment 1353195View attachment 1353196View attachment 1353197View attachment 1353198View attachment 1353199View attachment 1353200View attachment 1353201
The supreme vader helmet is ugly, but for some reason I kinda have a soft spot for it. (don't judge!). And I really love these conversions!

Can't wait to see more!
 
yeah, and I am looking forward to my results, but I know there are things that are just outside of my capability, room, time, etc, so I am going to try to bring it as close as I can with what I have to work with.
My Hasbro Black Series Vader facelift turned out pretty good, so I'm somewhat confident in tackling the Rubies. : )
 
OOOOK.....
All is done.
Enjoy!

Here is the whole thing done, after the paint job I had done at local auto body shop.
Standard gloss black, and an Audi gunmetal ( i forget the actual paint code right now...lol )
I had to tape out the face where the gunmetal had to be sprayed over the black.
Lenses from OLEProps in Germany and metal tusks from Fenix Props in Argentina.
The lenses took some careful dremelling, as they come WAY over sized ,but the actual bubble to them is perfect, and see through them clearly, but they don't reveal you inside.
Mouth grill from a regular STP auto air filter, and cut the mesh out to fit.
Top grill mesh painted black. and bottom half left original metal.
Hot glued them in place and placed a black plastic window screen mesh over both of them and glued in place.
Added a new small strip of the hook velcro to the horseshoe on top of the face, and another hook piece inside the cup of the dome.
Didn't want TOO much attachment.
It made it WAY too hard to get the thing positioned, or off, for that matter.
The two hooks create just enough friction and close the space enough, without too much problem.
Reattached the original head band, but used leather spacers with better pop rivets to hold in place.
Custom stand by me. : )

This was given by me to my brother in law for a Christmas present, so I no longer own it. FYI
20201224_115123.jpg20201224_115145.jpg20201224_115221.jpg20201224_115600.jpg20201224_115737.jpg20201224_115755.jpg20201224_115813.jpg20201224_111113.jpg
 
Last edited:
This thread is more than 3 years old.

Your message may be considered spam for the following reasons:

  1. This thread hasn't been active in some time. A new post in this thread might not contribute constructively to this discussion after so long.
If you wish to reply despite these issues, check the box below before replying.
Be aware that malicious compliance may result in more severe penalties.
Back
Top