Rocket Raccoon - costume build plus prop question

Implausibility

Jr Member
Greetings to all RPFers, from here in Wiltshire, UK

I’ve only just joined this site as until now I haven’t attempted a complex prop, and I figured from the Replica Prop Forum name that was all you were about.

But now I’m here I see that you also are interested in costume builds, so I thought you might like to see some WIP photos (and finished photos too) of my Rocket Raccoon.

My next step is his gun – hence coming aboard here as I figured this would be the go to place for tips on that!

So yes brace yourself for lots of photos, I’ll spread them over a few posts and over a few days so there’s not too many at once

Sarah
 
Last edited:
Re: My Rocket Raccoon build - costume and (coming up) props

Starting right at the beginning, the first thing I did was buy some cheap plimsolls to use as the base for the feet, and I made some claws from Plastimake/Thermomorph pellets:

001_claws1andshoes.jpg

A full set of toe and finger claws. They look creepy all disembodied like this! The colour was added using alcohol inks in 2 shades of brown, plus black:

000_claws2.jpg

Starting to put the feet together, do you think my legs need a shave?? :D

003_rocketfeet1.jpg

Patterning up the feet ready for furring:

004_rocketfeet2.jpg

Completed foot and lower leg:

005_rocketfeet3.jpg

Light for the back pack - it's just one of those push lights they sell for use in sheds and garages, painted with transparent blue spray paint:

002_light.jpg

Next step - the paws, I started with some super cheap brown leather gloves (only £5 on ebay, I was tempted to buy another pair for everyday use as they were lovely and soft), and hotglued my plastimake claws on to them:

006_hand1.jpg

With fur added:

007_hand2.jpg

the palm side: (I did clear up all that messy hot glue on the underside of the claws eventually)

008_hand3.jpg

I think that's enough for one day, tomorrow, the tail and trousers.....
 
Re: My Rocket Raccoon build - costume and (coming up) props

Next stage, the tail (I deliberately started with the easier bits of this costume before working up to the tricky bits, as I'd never made anything remotely like it before, never worked with fur or sewed much of anything....)

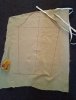
Rough pattern - made via the very scientific method of me lying down on my side on top of a large sheet of paper, and my other half drawing a tail behind me with sharpie....

009_tailpattern.jpg

Next step - lighten up / add a bit of visual interest to the black fur I had bought for the stripes on the tail - it was too dark, so I very lightly sprayed it with some reddish brown and copper spray paints, and brushed it through while still wet so as not to affect the feel of the fur when it dried:

010_sprayingtailfur.jpg

(you can't really see it all that well in the photo but it really did improve the look of the fur)

Next I cut up the pattern into blocks and cut the black and brown fur parts out, remembering to add a seam allowance. All the fur was cut from the back with a razor blade, as that way you don't end up trimming the fur itself just the backing fabric:

011_cuttingtailsections.jpg

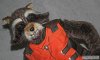
And here's the finished tail. There's a thick but lightweight swimming-pool noodle running through the middle of it to keep its shape (as the noodle is made of foam I was able to heat form it into the curve I wanted before inserting it into the tail) - and the remainder is stuffed with scraps of lightweight quilting batting that I was lucky enough to pick up for free from my local Scrapstore. As you can see it's a monster- it near enough reaches the floor when I wear the full costume - but it's really comfortable to wear, not too heavy, I forget it's there!

012_tail.jpg

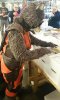
I was feeling brave enough by this point to start on Rocket's actual clothing. I've never sewed any kind of garment from scratch before, and wasn't all that confident to use a commercial pattern as they seem all manner of complicated, so instead I dissected some old clothes to see how they work.

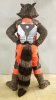
I decided to do Rocket's orange jumpsuit from the GOTG movie as a two piece, for ease of getting it on and off and to make going to the toilet while at a convention at least theoretically possible without an army of helpers :) 
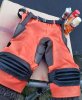
So I started on the trousers first. These needed to be a little larger than my everyday clothing so I dug out an old pair of jeans from when I used to be a couple of dress sizes bigger than I am nowadays, and unpicked those to make a pattern:

013_trousers1.jpg

I wasn't confident to go straight from there to the final orange fabric, so I first made up a dummy pair of the trousers using some (slightly hideous) spare fabric I found up in the loft, and tried them on for size with the furry legs:

014_trousers2.jpg 015_trousers3.jpg

I marked adjustments straight onto the mockup, and also the location of the future tail hole:

016_trousers4.jpg

I also sketched on the location of the quilted detail on the mockup trousers, and used this to make a pattern on tissue paper to use when sewing the quilt batting onto the inside of the real deal (you can easily rip the tissue paper away after sewing):

017_trousers5.jpg 018_trousers6.jpg

The quilted design all done:

019_trousers7.jpg

...and the rear of the trousers complete with "tail tunnel" (made from worbla and covered with the trouser fabric, then sewed securely onto the trousers):

020_trousers8.jpg

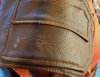
Next step was, for want of a better phrase, the leather "crotch patch" - I made up a pattern first from some scrap fabric:

021_crotchpatch1.jpg

then machined sewed it together off-garment and hemmed it with some decorative top stitch thread:

022_crotchpatch2.jpg

and then I hand-sewed it onto the trousers themselves with invisible thread, this gives the illusion that it has been machine sewn straight onto the garment despite it being in an inaccessible spot for my machine:

023_crotchpatch3.jpg

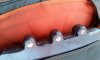
And finally for today at least, the knee pads. I couldn't find any commercially available ones that had the same ridged look that Rocket's have in the movie, so I made them from scratch, using some handy foam tubes I found in the gardening section of my local bargain shop (they had wire inside but I took the wire out):

024_kneepads1.jpg 025_kneepads2.jpg

Covered with black pleather :

026_kneepads3.jpg 027_kneepads4.jpg

Not sewn on yet at this point, but just to give an idea of how they'll look against the trousers:

028_kneepads5.jpg

That'll do for today
 
Last edited:
Re: My Rocket Raccoon build - costume and (coming up) props

Next up, the holsters, I patterned them up on paper using paper fasteners at the joints so I could move them around when trying them on for fit until they were in the right place:

029_holsterpattern.jpg

Cutting out and sewing - from black and brown pleather:

030_holsterbitscutting.jpg 031_holsterbitssewn.jpg

(I made the upper part on both sides into a functional pocket and made sure it was big enough to fit my mobile phone etc.)

Tried on for size (it's all just pinned together at this point):

032_holsterfittest.jpg

And with faux rivets added (I used the little paper fasteners that they sell in the scrapbooking department in the local craft store):

033_addrivetstoholsters.jpg

With the bottom half of the costume near enough done, it was time to move on to the top half. This is a little more complex than the bottom, so rather than just pretty much wing it as I go along like I had so far, I thought I'd better make some plans at this point (NB I'm no draughtsman!):

033b_sketchesfortop.jpg

I cut up an old t-shirt to make a basic pattern for the top, and then started figuring out how all the details would fit together :

034_startpatterningtopfromoldtshirt.jpg 035_morepatterningtop.jpg

Cutting out from the same orange waterproof canvas fabric that I use for the trousers (it is sold for boat upholstery, and was the closest I could find to the look of Rocket's jumpsuit in the film) .... I made some amends to the pattern on the fly, mainly around the neckline:

036_cuttingfabricfortopamendingpatternonthefly.jpg

Starting to put together the front strap details - the foam bits over on the left will become the buckles once they have been painted up:

037_assemblingfrontdetailsfortop.jpg

A try on for size complete with bonus derp face and Rocket's favourite stripy socks:

038_pinnedtogetherfittest.jpg

"Buckles" sprayed up and in place (I ended up replacing that one in the middle left where the spray paint went a bit lumpy):

039_foambuckles.jpg

A pattern for the backpack made of card and tried on for size:

040_tryingbackpackpatternforsize.jpg

Assembled from 2 layers of EVA foam mats, with a hole cut to size to fit the light:

041_basicbackpackinfoam.jpg

Sealed with 6 layers of watered down mod podge and heat formed to shape:

042_sealbackpackwithmodpodge.jpg 043_sealedandheatformedbackpack.jpg

Pleather detail cut, sewn and faux rivets added:

044_brownpleatherdetailcutoutforbackpack.jpg 045_hemmedandpaperfastenerrivetsadded.jpg 046_alldoneandcheckitfitsthelightjustright.jpg

Spray painted a couple of different shades of metallic pewter (which shows up the brush strokes from my brushed-on primer something chronic, I live and learn!):

047_mainpaintdonedarkpewtermaskingofftopaintstripesalightershadeofpewter.jpg 048_paintprettymuchdone.jpg

Washing machine hose cut up and spray painted to use as air hoses on the backpack:

055_airhoseforbackpack.jpg

I carved little glue channels with my dremel and stuck the hoses into position, also added three metal studs at the top - so this is the finished backpack before weathering:

056_dremelgluechannels.jpg 057_airhoseinplaceandsilverstudsaddedattop.jpg

That feels like a good point to stop for today, more progress pics tomorrow
 
Re: My Rocket Raccoon build - costume and (coming up) props

I'm impressed! You make this look easy. I'm looking forward to seeing this complete.
 
Re: My Rocket Raccoon build - costume and (coming up) props

Thanks Cadger. Trust me it wasn't easy, I didn't have a clue what I was doing and there was a lot of cursing at times :D But by some miracle it turned out pretty well in the end. Here's hoping that by posting these detailed progress pics I can help someone attempting something similar down the line.
 
Last edited:
Re: My Rocket Raccoon build - costume and (coming up) props

Soooo...where was I?

Still working on the top half of Rocket's jumpsuit - the next stage is patterning out the leather (or in my case because I'm a cheapskate, pleather) waistcoat-type thing that he wears - I just played around with brown paper patterns until something worked:

**photo from this bit is on the next post as I accidentally deleted it and it won't let me put it back in!**

Base cut out of black pleather and hemmed and checked for fit:

050_cuttingoutwaistcoat.jpg 051_waistocathemmedandtryingitonforsize.jpg

Then I patterned out the brown patches:

052_patterningandpositioningthebrownpleatherdetails.jpg

Cut, sewn and assembled:

053_assemblingwaistcoat.jpg 054_waistcoatalldone.jpg

Next up a boring photo, representing a boring but necessary part of any garment construction - because the fabric I was using for this costume is quite heavy and doesn't drape as well as the t-shirt material of the garment I made the pattern from - I had to make a couple of adjustments at this point, darts etc, to improve the fit:

058_fitadjustmentstothetopincldartsandfinishedoffexposededgeswithbiasbinding.jpg

I also covered all the exposed edges with bias binding at this stage, but I don't have a dull photo of that :)

Next the quilted semi circle thing on Rocket's back:

058_quiltedbitthatsticksoutabovebackpack.jpg

I didn't have any proper quilting batting handy so I just sewed it over a thin sheet of craft foam, it did the job just as well. And there is more bias binding around the top to finish it off.

A little reminder at this point of the end result I was aiming for:

072_refpictop.jpg

I made the metal buckle thingummies from craft foam, painted silver, and small paper fasteners for the rivets:

073_bucklethingsmadefrompaintedcraftfoamandsmallpaperfasteners.jpg 074_strapsnowsecuredintoplace.jpg

Next up I used thermoplastic pellets to make the "toggle" he has at the front of his outfit - pressing the plastic while it was still warm over the cord I was going to use, to ensure it was a perfect fit:

076_togglethingmadefromthermoplastic.jpg

The cord was the wrong colour so I dyed it with some ink and added a little silver rub n buff over the top:

075_colouredcordblackinkandsilverhighlightsaddedwithrubnbuff.jpg 077_completedtogglecontraption.jpg

(and the toggle was coloured with pewter and silver acrylic paints)

Now sewn on to the front of the top and final orange panels made and pinned into place:

079_pinningontoppanels.jpg

The end is in sight now! Just the shoulder strap/epaulettes and the collar to do....

Shoulder pieces patterned, cut and assembled:

080_patterningshoulderpieces.jpg 081_shoulderssewing.jpg

Just pinned on at this point - checking the fit with the backpack:

082_fixingshoulderpiecestobackpackandjacket.jpg

and sewn in place properly now, the view from the front:

083_shouldersfromthefront.jpg

I needed to find something to use for the little things that look like cable ports on Rocket's collar - and I found this old SATA cable up in the loft which looked like it would do the job nicely:

084_cableforcollarbit.jpg

Collar assembled off garment from brown pleather, I hand-sewed it in after:

085_collaroffgarment.jpg

and that's NEARLY the end!!

photo of the full garment front and back, before weathering:

086_topandbottomfinishedfront.jpg 087_topandbottomfinishedback.jpg

Ooops I've hit the limit for photos in one post, will continue on a separate one....
 

Attachments

  • 088_weathering.jpg
    088_weathering.jpg
    91 KB · Views: 85
  • 089_weathering2.jpg
    089_weathering2.jpg
    71.3 KB · Views: 74
Re: My Rocket Raccoon build - costume and (coming up) props

I really upset the last post somehow :)

Anyway, so here is the missing first photo from the previous post - the waistcoat patterning stage:

View attachment 497203

Then the next step was a bit of weathering/ageing and scuffing up, with spray paints, dry brushed acrylics and a cheese grater (!), to stop everything looking quite so shiny and new and in your face ORANGE :

View attachment 497204 View attachment 497205 View attachment 497206

Last step - the furry sleeves (I held these back until after the weathering stage, which I should have done with the legs too really if I had thought it through):

View attachment 497207

I winged the pattern for the sleeve based on a couple of measurements taken at my wrist and upper arm, and the vague memory of what a sleeve looks like unpicked, and thankfully it worked

and here's the top with the sleeves in place:

View attachment 497208

Now all this raccoon needs is a head! That can wait until tomorrow though.


(edited to ask - can anyone see the photos on this bit? they aren't showing up for me unless I go back in to edit the post and then there they are....I think I broke the RPF! I've added them in as attachments too in case that helps....)
 

Attachments

  • 052_patterningandpositioningthebrownpleatherdetails.jpg
    052_patterningandpositioningthebrownpleatherdetails.jpg
    54.6 KB · Views: 57
  • 092_armsinplace.jpg
    092_armsinplace.jpg
    97.3 KB · Views: 79
  • 091_sleevepattern.jpg
    091_sleevepattern.jpg
    121.2 KB · Views: 75
  • 090_weathering3.jpg
    090_weathering3.jpg
    95.2 KB · Views: 82
  • 089_weathering2.jpg
    089_weathering2.jpg
    71.3 KB · Views: 73
  • 088_weathering.jpg
    088_weathering.jpg
    91 KB · Views: 90
Last edited:
Re: My Rocket Raccoon build - costume and (coming up) props

On to the home stretch now - building the head.... Here's hoping the photos work properly in this post unlike yesterday's:

To build Rocket's head I started with a basic cap structure made from plastic canvas sized to fit my crown:

059_startedonheadmadelittlecap.jpg

Added flaps at the side and the start of a muzzle (as you can see the polystyrene head is a lot smaller than my actual head, the nose is in the right place on me but it hangs down by the wig-head's chin!)

060_addedcheekflapsandthebeginningofamuzzle.jpg 061_trieditonforsize.jpg

Muzzle taking shape, still needs a lower jaw:

062_comingtogetherstillneedslowerjaw.jpg

Lower jaw in place, and finalising placement of the mechanism that allows articulated jaw movement (ie I can open and shut the mouth):

063_figuringouttheplacementofthelowerjaw.jpg 066_lowerjawpositionedjustneedssewinginproperly.jpg

Sculpting the teeth and gums out of polymer clay, which were then baked in the oven:

064_sculptingteethandgumsfromfimoclay.jpg 065_freshlybakedraccoonteeth.jpg

Teeth painted and glossed and tongue added (made from craft foam, painted and glossed):

067_jawandtongue.jpg

Upper jaw glued into place (I think he looks adorably goofy at this point!):

068_upperjawgluedin_adorablygoofy.jpg

Head skeleton complete with jaw mechanism all in place:

069_jawsinplaceandarticulatedjawworkingwell.jpg

Next I took some photos and sketched the general outline of Rocket's head over the top so that I could see where padding needed to go:

070_sketchingupthepaddingneededtogetfaceshaperight.jpg

Starting to add padding - at this stage the mask is total nightmare fuel! :D

071_thestuffthatnightmaresaremadeof.jpg

I'm going to stop at this point so as not to break things like I did yesterday, as I think that was down to trying to load too many photos in one go. Will do another post later on with the rest of the work on the head and then we're done.
 
Last edited:
Re: My Rocket Raccoon build - costume and (coming up) props

Eye sockets next - I don't use a lot of Worbla but it worked well for these as I needed them to be a particular concave shape (for which I found my sugar skull pepper-pot was the perfect shape to mould from):

093_worblaeyesockets.jpg 094_shapedoveraconvenientlyshapedpepperpot.jpg 095_primedwithmodpodgethenpaintedblack.jpg

(the actual eyes are taxidermy eyes for deer, bought fairly cheaply from ebay)

Ears made from heat formed craft foam, and covered with suede and fur:

096_earscraftfoamcoveredwithsuedeandfur.jpg

Ears finished off with bits of wispy white fur to the front, and airbrushed a little at the edges with a beige Copic pen using the Copic portable airbrush attachment (the airbrushing, although fairly subtle, really makes a difference, I should have done a before and after pic) :

097_earsfinishedoffwithwisplywhitefurandcopicairbrushing.jpg

Continuing to layer up the padding with upholstery foam until the head's basic shape is correct:

098_layeringupfoampadding.jpg

First eye in place - there's black chiffon in the tear duct area, which is the part I will see through:

099_firsteyeinplacewithblackchiffonintearduct.jpg

Added eyelids made from folded black pleather:

100_addeyelidsfromblackpleather.jpg

Finally it's time to start furring the head! First I smothered the poor fella in tin foil, and then over the tin foil I covered him in duct tape, onto which I marked the areas of different colour fur, and also the direction in which the fur needs to lie, as it's important to get that right if you want your animal head to look as natural as possible:

101_readytofur_smotheredintinfoil.jpg 102_layerofducttapeoverthefoilmarkedup.jpg

Pattern all cut up and ready to transfer to fur (with seam allowances added) for cutting and sewing:

103_furringpattern.jpg

The ears go on first, then the main part of the fur covering (sewn together first on the sewing machine, then slipped over like a hood):

104_earsgoonfirst.jpg 105_mainparttsoffuroverlapsewnandstartingtogoon.jpg

Muzzle fur on - he looks adorable and cuddly at this stage, but not much like a raccoon!

106_lookingsuperfluffyandcuteatthispointbutnotmuchlikearaccoon.jpg

With the eyebrows on (and various other bits of "white" fur drybrushed on with white acrylic paint) we're getting a bit more raccoon like, but he still needs a muzzle trim:

107_thewhiteeyebrowshelp.jpg 108_muzzletrim.jpg

Shading and muzzle detail added with the Copic airbrush:

109_addingshadingandmuzzledetailwithcopicairbrush.jpg

Whiskers made from nylon guitar strings (they each needed to be ironed flat - or at least flattish - before I glued them in):

110_guitarstringwhiskers.jpg 111_half way whiskered.jpg

Whiskers all finished, patterning up the neck and collarbone area:

112_patterningupneckandcollarbonearea.jpg

Furry neck sewn in and we're DONE, people - that's 4 months hard slog in one thread, hope you found it useful :)

113_necksewninandweredone.jpg

I'll add some pics of the completed costume in the next post
 
Re: My Rocket Raccoon build - costume and (coming up) props

The finished costume, out in its natural environment:
 

Attachments

  • 121_finished8.jpg
    121_finished8.jpg
    82.5 KB · Views: 109
  • 120_finished7.jpg
    120_finished7.jpg
    76.9 KB · Views: 113
  • 119_finished6.jpg
    119_finished6.jpg
    38 KB · Views: 96
  • 118_finished5.jpg
    118_finished5.jpg
    274.2 KB · Views: 105
  • 117_finished4.jpg
    117_finished4.jpg
    62.6 KB · Views: 91
  • 116_finished3.jpg
    116_finished3.jpg
    83.7 KB · Views: 100
  • 115_finished2.jpg
    115_finished2.jpg
    66.3 KB · Views: 104
  • 114_finished1.jpg
    114_finished1.jpg
    147.3 KB · Views: 125
Re: My Rocket Raccoon build - costume and (coming up) props

Now that the costume is complete, and has had a test run at a small convention - the next thing Rocket needs is a prop or two in time for his next run out (to a larger convention in November - I'm not going to wear him to any summer cons as it gets a bit warm under all that fur!!)

I have made a start on a baby Groot to carry around (no photos yet as so far he is literally just a stick in a plant pot :) ), but my pal Glyn decided that Rocket is no proper Guardian of the Galaxy without a gun, so he has rustled me up the shell of the movie gun from cardboard and foam, for me to finish off and paint - what a star :)

Here are his work in progress piccies:

gun01.jpg gun02.jpg gun03.jpg

gun04.jpg gun05.jpg

gun06.jpg gun07.jpg

And here's me trying it out for size in Glyn's back garden last weekend - he's the Iron Man, any excuse to get dressed up :)

11692800_436162296566577_5116423050333386960_n.jpg 11707665_436162309899909_1499759722310430118_n.jpg

So - now a question for you good people - I've never worked with a cardboard base before, so what would you recommend would be the best way to make this a little bit more sturdy before painting - I was thinking maybe a few layers of paper mache?

I'd appreciate some tips from the prop experts!
 
This thread is more than 8 years old.

Your message may be considered spam for the following reasons:

  1. This thread hasn't been active in some time. A new post in this thread might not contribute constructively to this discussion after so long.
If you wish to reply despite these issues, check the box below before replying.
Be aware that malicious compliance may result in more severe penalties.
Back
Top