lord erebus
New Member
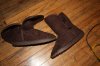
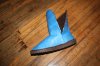
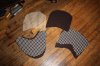
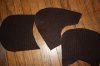
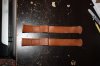
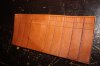
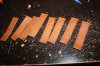
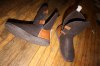
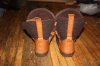
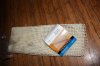
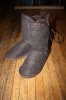
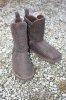
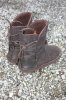
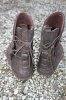
Over the past few weeks I have been working on a Rey costume for my sister. Our first goal was to get a costume together quickly and cost effectively (the total amount spent was maybe around $75 for the whole costume). From there we plan to upgrade it piece by piece to higher quality and more accurate materials. Id like to share here the boots that I modified to make them look as close to resources as possible. We started with a pair of UGG-like boots that I believe were around $10, a much cheaper option than the real Pozu boots at about $180. Although it is much cheaper they are no where close to accurate so here is where we get creative with it! The first thing I did was remove the elastic and "tooth" buttons from the one side and split the seem open on the other side. The goal was to come up with a way to simulate the texture and design of the real boots. My first thought was that felt fabric would be a good starting point but it was lacking that deep textured look that the real boots have in its weave of the fabric used. I was thinking of a way to work that into the felt and my first idea was to use a large spaced and thick netting but while we were out shopping for it we couldn't find it but instead we found a non-skid rug pad which had a nice sized netted look and it looked like it would work out nicely as an underlay to the felt. When I got home I did a few tests trying to find out what was the best way to combine them. while the rug pad was pretty puffy I wanted to take it down a bit so I put wax paper over it and ran an iron over it a few times quickly. It was enough tone it down but not flatten it out. I tested one with and one without ironing the pad down, I preferred the ironed version better. Once I had a plan for the fabric next was to make a pattern to use to cover the boots, to do this I covered the boots in painters tape, marked off the areas, then remove it and stick it to some paper to clean up the patterns. Once the fabric and rug pad were cut out I used a spray glue to glue then together. There was only two pieces that need to be sewn together the top of the foot and front of the shin. Then it was just a matter of putting it all together. I used hot glue to attach it all together, between the felt and the fuzzy texture of the boots the hot glue bonded it all together nicely. As for the leather part we found a large pleather purse at a thrift store that we used for the leather bits throughout the costume. Again the pleather was attached with hot glue. With the pleather being a light tan I painted it was dark brown and black acrylic paint and dry brushed some of that paint onto the felt as well. I also then dry brushed on a light grey to the felt to try to make it match that of the Pozu boots. With the flash on my camera the grey dry brushing really shows up and almost looks like its too much but in natural sunlight it doesnt look as overpowered.
I hope this will be helpful to those working on making/modding their own Rey boots!
I hope this will be helpful to those working on making/modding their own Rey boots!
Attachments
-
 IMG_4189.JPG4 MB · Views: 496
 -
 IMG_4191.JPG4.3 MB · Views: 487
 -
 IMG_4194.JPG5.9 MB · Views: 498
 -
 IMG_4207.JPG4.2 MB · Views: 523
 -
 IMG_4208.JPG4 MB · Views: 497
 -
 IMG_4216.JPG4.9 MB · Views: 446
 -
 IMG_4220.JPG4.8 MB · Views: 389
 -
 IMG_4224.JPG5.1 MB · Views: 379
 -
 IMG_4227.JPG5.6 MB · Views: 458
 -
 IMG_4228.JPG4.2 MB · Views: 392
 -
 IMG_4305.JPG5 MB · Views: 721
 -
 IMG_4241.JPG5.2 MB · Views: 561
 -
 IMG_4256.JPG4.4 MB · Views: 491
 -
 IMG_4275.JPG5.5 MB · Views: 470
 -
 IMG_4276.JPG5.6 MB · Views: 636
 -
 IMG_4277.JPG5.1 MB · Views: 511
