Revell Venator Class Star Destroyer

Lupano

New Member
Hi everyone,

I am new to this forum and excited to meet you all.
I took up model building after a two decades long break, a short time before Corona started. It was fun and I wanted to continue.
I'm a huge Star Trek and Star Wars nerd and mainly build stuff from both franchises.

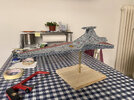
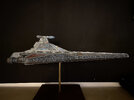
Here I present to you my Venator Class Star Destroyer.
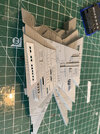
It's the Revell Set from 2003, that I modified to make it a bit more screen accurate. There were just a few inaccuracies, which frankly bugged me a lot. Like the launching doors at the very front.
Also my first try to light a model, but since I don't know the first thing about electronics or how to solder, I had a huge problem. My wife suggested using fairy lights one day, and that was easy enough for me. I love you, darling! ^^
I plan to learn how to do proper lighting, though. Anyone got any tips for beginners, YouTube videos, threads here and so on, it would be much appreciated.
The paint job was a lot of fun, too. Although, figuring it out was quite the task. I took inspiration from "Plasmo models" on YouTube and the member "Madhatter" here. Absolutely amazed by Madhatters works!

Anyhow, tell me what you think. I would love some feedback.
Please be kind, though. As mentioned, I am still a bloody beginner. ^^

Foto 22.04.23, 11 43 11.jpg
Foto 22.04.23, 11 43 45.jpg
Foto 22.04.23, 11 49 49.jpg
Foto 22.04.23, 11 44 57.jpg
Foto 22.04.23, 11 48 02.jpg
Foto 22.04.23, 11 48 44.jpg
Foto 22.04.23, 11 44 27.jpg
Foto 22.04.23, 11 53 15.jpg
Foto 22.04.23, 11 54 08.jpg
Foto 24.04.23, 20 42 41.jpg
Foto 23.04.23, 22 06 50.jpg
Foto 24.04.23, 20 44 50.jpg
 

Attachments

  • Foto 23.04.23, 22 04 08.jpg
    Foto 23.04.23, 22 04 08.jpg
    1.8 MB · Views: 226
  • Foto 22.04.23, 11 53 15.jpg
    Foto 22.04.23, 11 53 15.jpg
    2.3 MB · Views: 214
That is fantastic!! Amazing paint job and as far as the lighting is concerned, I think the fairy lights worked perfectly- I’ve used them myself on a couple of projects They’re cheap and simple, and they work!
 
Welcome to the forums! :) That is some fantastic paint work! The lighting is great too - not too bright. Really nicely built Venator - I'd happily have that sitting on my shelf. Looking forward to seeing what your next project (y)
I can't believe that after 10+ years mine is still doing the rounds on the Internet. I thought it would have faded into obscurity by now :D Thank you all the same though for the kind mention
 
Nice work. Did you take any progress photos?
And, did you drill out the windows, or were they provided?
Thank you.
I had to drill out every single window and build new ones for the command tower and bridges, since those are noticeable triangular in shape. Drilling by hand, because my cheap Dremel was to crappy and made the windows to large.
I indeed have progress photos. I'll post them later, right now they are unavailable. XD
 
Welcome to the forums! :) That is some fantastic paint work! The lighting is great too - not too bright. Really nicely built Venator - I'd happily have that sitting on my shelf. Looking forward to seeing what your next project (y)
I can't believe that after 10+ years mine is still doing the rounds on the Internet. I thought it would have faded into obscurity by now :D Thank you all the same though for the kind mention
Thank you for your kind words.
I didn't want it to simply be grey with a few darker panels. I love intricate detail, so that you could look at it for hours and always discover something new. And, well, a few inaccuracies just really were not acceptable to me.
Next project will be the small Reliant kit by Round 2, without lights.

Furthermore, I simply love your work. I will never rech that level of finesse, because I simply lack the patience. XD I discovered your Venator on Pinterest while looking for reference. Looked at it so many times since then. ^^
 
Okay, a request for progess pictures popped up, so here goes.
This will be a longer post.


Let's start with the main hull in its original appearance.

Foto 29.05.22, 14 16 10.jpg
Foto 29.05.22, 16 55 27.jpg


First modifications.
In the movie you can clearly see a few indentations at the "wings" on the back and a few raised large panels.
First I thought of cutting out the surface of the wings and rebuilding them, but in the end I considered it too risky for my beginner skills. Didn't wanna ruin the model. So I decided to cut pieces of styrene and simply glue them to the surface where needed.

Foto 29.05.22, 14 16 41.jpg
Foto 29.05.22, 16 33 26.jpg


Same with the ventral hull.
Here you can see both pieces with all the raised detail. I removed those wires again, since they messed up the scale. And would always fall off. XD
I kept the little dots, though. Made der surface more interesting and ist more or less screen accurate.

Foto 08.06.22, 20 11 53.jpg


Then I startet detailing the frightingly bare walls of that trench on the back of the ventral hull.
Also, I heavily modified the hangar bay. Hole drilling for lights, lots of scatch build structures. The original part was far to flat and boring.
I completely rebuild the launching doors at the front of the vessel, because those looked nothing like in the movie. That shield generator sphere was especially tricky.
And a bit more finesse for the Hyperdrive at the back.

Foto 21.09.22, 22 00 12.jpg
Foto 24.07.22, 22 05 03.jpg
Foto 27.07.22, 22 13 00.jpg
Foto 27.07.22, 22 15 16.jpg
Foto 31.07.22, 12 19 36.jpg
Foto 31.07.22, 12 21 07.jpg
Foto 17.08.22, 21 51 36.jpg


I filed out the original stabilizer beams running along the engines and replaced them with new ones, which create the negative space visible in the movie.
The Turbo Laser turrets were also much too stubby, so I cut those off and build new ones out of styrene rods, thin metal bars and wire for those recoil springs. Original on the left, Mod on the right.

Foto 08.06.22, 21 20 11.jpg
Foto 05.06.22, 12 03 55.jpg


Detailing up the trenches at the sides for two reasons: First, to make it more interesting and give them a little more depth, spacewise, and secondly, to hide seams and blank spaces. LEGO pieces were a great source for extra detail, too. ^^

Foto 03.10.22, 17 25 56.jpg
Foto 03.10.22, 17 26 00.jpg


And lastly, the command tower and bridges.
Those received special attention, since the lights would be most promintent here. Drilling and filing out the windows was pretty hard, because of all the weird angles. And coming up with new ones was even harder. I tried some netting from a hardware store first, but didn't like the look of it at all. In the end I decided rebuilding them in styrene was the only realistic option to get the shapes I wanted. Lots of fiddly work on wax paper. The glue pretty much melted the whole window frames, which rehardened into the final pieces.

Foto 26.06.22, 15 10 02.jpg
Foto 26.06.22, 16 28 48.jpg
Foto 26.06.22, 21 00 19.jpg
Foto 16.07.22, 22 20 20.jpg
Foto 17.08.22, 21 52 08.jpg


Whew.
Done with the cutting and the glueing and the screaming in frustration, when things don't work out or break off. XD
Next up was the painting. I started with a black primer, atop of that pale blue grey by Vallejo as the base color. Spotty application for that worn look. Then lots more of hard/soft lines to break up the large paneling.

Foto 08.01.23, 17 54 00.jpg
Foto 15.01.23, 17 45 22.jpg


The I added even more large and small panels in various shades to enhance the scaling and make the surface even more interesting.
I used simple stencils cut from cardboard for this. No masking.

Foto 21.01.23, 18 01 16.jpg
Foto 25.01.23, 22 41 35.jpg


Masking of the red colored sections and employing the same technique like for the rest of the hull, just in red this time.
I wanted the paneling to show through the republic markings and the movie shows lots of color variants in those sections, too.

Foto 12.02.23, 18 05 46.jpg
Foto 12.02.23, 18 05 49.jpg
Foto 12.02.23, 18 05 58.jpg
Foto 12.02.23, 18 15 44.jpg


And finished.
Lastly, I coated it with a steel color, heavily thinned down, to get a very subtle metallic effect.
Next came a wash in black, which in retrospect is too heavy I think, but couldn't change at that stage.

Without black wash
Foto 18.02.23, 13 08 14.jpg


With the black wash.
Foto 20.02.23, 19 09 37.jpg


But it was not yet detailed enuff for my tastes, so after a bit of research I found out about the pecil line technique, which I applied to the whole ship. Took forever.

Foto 08.03.23, 21 24 45.jpg
Foto 08.03.23, 22 43 28.jpg


Engines painted in a dark grey with a gunmetal wash applied and a few panel lines, which, unfortunately, remain too subtle.
Bit of drybrushing to bring out the details and dark grey painted into corners for a worn look.

Foto 07.04.23, 11 35 27.jpg


Last but not least, the lighting. Fairy lights to the rescue of eletric noobs. ^^
Unfortunately, I didn't take any pictures of wiring up the engines or command tower.

Foto 09.04.23, 13 06 55.jpg


Installing the lights into the hangar bay was surprisingly easy.
I attached reflective metal tape to the back of those platforms covering up the lights to reflect it into the whole bay. Worked fantastic.
All in all, the hangar bay turned out the best of the whole light job.

Foto 08.04.23, 16 34 41.jpg
Foto 08.04.23, 16 39 27.jpg


Finishing touches to the hangar bay.
I took a stapler pin and bnded it into shape for the grasping hooks of the crane.
As rails I glued down two of those thin metal bars I used in the rebuild of the turbo laser barrels. Then i fixed the stapler pin between two styrene squares and voila.
Crane thingy done. ^^

Foto 16.04.23, 16 02 27.jpg
Foto 16.04.23, 21 01 51.jpg


After some experimenting, I found a good solution for the engines. I created lenses out of hot glue and attached them to the inside of the nozzles. Works just fine. ^^

Foto 13.04.23, 21 22 33.jpg
Foto 13.04.23, 21 22 37.jpg


Larger windows filled in with Micro Crystal Klear (white in this picture).
Unfortunately, it didn't have the light catching effect I hoped for.

Foto 15.04.23, 10 13 10.jpg


And then it was finished.
Sadly.
The whole project took me about a year, working on and off on it, on weekends. It was very, very much fun. ^^

Foto 22.04.23, 11 49 49.jpg
 

Attachments

  • Foto 19.03.23, 13 49 45.jpg
    Foto 19.03.23, 13 49 45.jpg
    380.5 KB · Views: 147
  • Foto 31.07.22, 12 19 36.jpg
    Foto 31.07.22, 12 19 36.jpg
    210.7 KB · Views: 121
  • Foto 27.07.22, 22 13 00.jpg
    Foto 27.07.22, 22 13 00.jpg
    240.6 KB · Views: 105
  • Foto 26.06.22, 16 29 13.jpg
    Foto 26.06.22, 16 29 13.jpg
    346.8 KB · Views: 112
Last edited:
That looks really good. Adding pencil marks always can add more detail, but yeah, so time consuming. Spent a lot of times doing that to my death star, which is my spinning avatar now.
 
That looks really good. Adding pencil marks always can add more detail, but yeah, so time consuming. Spent a lot of times doing that to my death star, which is my spinning avatar now.
I wasn't sure if it would work out or if I would regret ut in the end. Since this build combines a lot of first tries. Luckily, I did like it.
How did you manage staight lines on a curved surface like the Death Star?
I did struggle with awkward angles and places, curves would finish me I believe,.


Great paintjob. Want to do mine? :lol:

TazMan2000
Wellll ... how much you got?
And is it a house call? XD
And thanks. I am very proud of it. ^^
 
I wasn't sure if it would work out or if I would regret ut in the end. Since this build combines a lot of first tries. Luckily, I did like it.
How did you manage staight lines on a curved surface like the Death Star?
I did struggle with awkward angles and places, curves would finish me I believe,.
I used a clear floppy ruler I found at the store, which I cannot find right now for the life of me. House is a mess because the kitchen is being redone.
Heres an old pic I found with it in the background I cropped. Its super bendy and clear with lines, which helped a whole lot.
clearruler.jpg

I also wasn't using the normal number 2 pencil, but this artist pencil with darker color, and no eraser.
Pencil.jpg


Since I can't find it now, this piece of thin styrene will be the ruler stand it. But basically I would just bend it as needed, somethings really having to curve it to get the line just right. Not holding a phone/camera helps.
Once totally done, I also sprayed it with Mr. Super Clear flat spray, which helps, but it still reflects light more than I wanted, but manly, it helps protect the pencil lines, as they won't rub off at all now.
drawinglines.jpg
 
B
I used a clear floppy ruler I found at the store, which I cannot find right now for the life of me. House is a mess because the kitchen is being redone.
Heres an old pic I found with it in the background I cropped. Its super bendy and clear with lines, which helped a whole lot.
View attachment 1701098
I also wasn't using the normal number 2 pencil, but this artist pencil with darker color, and no eraser.
View attachment 1701099

Since I can't find it now, this piece of thin styrene will be the ruler stand it. But basically I would just bend it as needed, somethings really having to curve it to get the line just right. Not holding a phone/camera helps.
Once totally done, I also sprayed it with Mr. Super Clear flat spray, which helps, but it still reflects light more than I wanted, but manly, it helps protect the pencil lines, as they won't rub off at all now.
View attachment 1701100
Beautiful work. A clear ruler is definitely an advantage.
I also used an artists pencil, HB hardness, since I didn‘t want the lines to be to dark and prominent.
HB worked great. Contrast was just fine after a clear coat.
 
Last edited:
B

Beautiful work. A clear rule is definitely an advantage.
I also used an artists pencil, HB hardness, since I didn‘t want the lines to be to dark and prominent.
HB worked great. Contrast was just fine after a clear coat.
Its been 8 years since I finished the death star, so totally don't remember what pencil number I used. I was actually starting research late 2013 for death star details and its how I found this group in the first place. So this November 1st will be 10 years here....its just crazy how fast that goes by.
 
Its been 8 years since I finished the death star, so totally don't remember what pencil number I used. I was actually starting research late 2013 for death star details and its how I found this group in the first place. So this November 1st will be 10 years here....its just crazy how fast that goes by.
Congratulations are in order, I guess. XD
 

Your message may be considered spam for the following reasons:

If you wish to reply despite these issues, check the box below before replying.
Be aware that malicious compliance may result in more severe penalties.
Back
Top