Steelgohst
Active Member
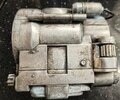
Just finished repainting mine, thought I'd give a bit of info on my method for anyone interested, also I thought this would be a good place for others to post their repaints..
So with mine I used baby blue acrylic spray paint, black and burnt sienna acrylic paints, Citadel Colour's 'nuln oil' paint, Autosol metal polish, a spray bottle of water, a kitchen sponge with a soft scouring pad side, and an old towelling sock.


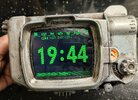
So, first thing was to mostly clean off the factory 'weathering' , which came off fairly easily with a slightly damp cloth. , then I masked off the screen and little dial screens. Because of the nature of the paint job there's no need to be fussy about this, you just need to stop the spray paint getting onto the screen.


I gave the whole thing a light spritz with water using the spray bottle , followed by a light dusting with the baby blue spray paint then immediately wiped it off. The spray paint was almost instantaneously dry, so the only paint that came away was the paint on the water, creating an interesting weathered effect.. at this point you could give it another light spray of paint here and there if you wish.


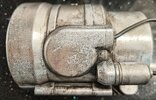
The next step was to remove some of this paint in the places which would naturally wear. I didn't want to damage the finish of the pip boy, especially the plastic sections, so I used metal polish cream and the soft scourer of a kitchen sponge, this gently but effectively removed the paint without scratching the pip boys original silver finish.


Next up I mixed black and burnt sienna acrylics together with a tiny amount of water. I've yet to find something that gives a better 'natural dirt' base.

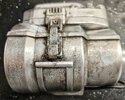
This is applied generously to all the nooks and crannies , then largely removed using the old sock tweaking it as you see fit. then I used the 'Nuln oil' paint on places which you'd oil, so a bit around the hinge, clasp, knobs etc.


finally I went over it again with the metal polish and sponge, and thats it! (for now - there's a good chance I'll go in again for some more passes at some point!)
So with mine I used baby blue acrylic spray paint, black and burnt sienna acrylic paints, Citadel Colour's 'nuln oil' paint, Autosol metal polish, a spray bottle of water, a kitchen sponge with a soft scouring pad side, and an old towelling sock.
So, first thing was to mostly clean off the factory 'weathering' , which came off fairly easily with a slightly damp cloth. , then I masked off the screen and little dial screens. Because of the nature of the paint job there's no need to be fussy about this, you just need to stop the spray paint getting onto the screen.
I gave the whole thing a light spritz with water using the spray bottle , followed by a light dusting with the baby blue spray paint then immediately wiped it off. The spray paint was almost instantaneously dry, so the only paint that came away was the paint on the water, creating an interesting weathered effect.. at this point you could give it another light spray of paint here and there if you wish.
The next step was to remove some of this paint in the places which would naturally wear. I didn't want to damage the finish of the pip boy, especially the plastic sections, so I used metal polish cream and the soft scourer of a kitchen sponge, this gently but effectively removed the paint without scratching the pip boys original silver finish.
Next up I mixed black and burnt sienna acrylics together with a tiny amount of water. I've yet to find something that gives a better 'natural dirt' base.
This is applied generously to all the nooks and crannies , then largely removed using the old sock tweaking it as you see fit. then I used the 'Nuln oil' paint on places which you'd oil, so a bit around the hinge, clasp, knobs etc.
finally I went over it again with the metal polish and sponge, and thats it! (for now - there's a good chance I'll go in again for some more passes at some point!)
Attachments
Last edited: