Relby K-23

Ryan Clinton

Sr Member
RPF PREMIUM MEMBER
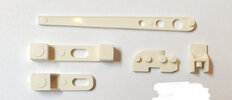
This is my first Relby K-23, Its finally finished! A big shout out to eethan for his amazing barrel kit! All the greeblies I used were cast by my wife Julie and I. The missile greeblie, the rear end cap, the motor coil greeblie, the Gillette gpa4 calculator button, and 2 side fin greeblies were all cast from original pieces from the Revell visible V8 and the Revell F-4E phantom ii model kits. The remaining (unidentified) parts were made by my wife and I. I'll continue looking for the original parts regardless. I did a rough paint job like the original. It still looks way to clean to me. I'll probably weather it some more but I'll definitely work on some other projects before come back to it. I did notice on the original that there's a pretty reasonable gap between the upper and lower reciever. The greeblie with the four raised dots on it clearly, IMO goes in-between the top and bottom receiver. It would have been too thin to cast so I cut a thin small piece of stainless steel and glued it to the top of the bottom receiver which held it in place and gave me the proper gap I was looking for. I then glued the greeblie right next to it so it would line up and appear to be a solid piece. The four raised dots I noticed are not all the same height. The first two are, the third is slightly higher and the fourth the highest. The cast I made is the same. I filled all or most of the seems with bondo and the holes with milliput to give it sort of a resin cast look. I filed the top flat to attach the rear sight greeblie, I believe thats that they did.The hex screw hole on the right side of the blaster just in front of the missile greeblie I noticed they just filled it with some kind of putty. You can actually see part of the hex shape on the blaster. I really tried to match the greeblies as close as I could based on the refrence images. Thank you everyone for all your help I'm very pleased to have this thing basically finished.
20220313_165537.jpg
20220417_000436.jpg
20220625_222458.jpg
20221007_113016.jpg
20221128_143459.jpg
20230108_154601.jpg
20230409_155625.jpg
20230409_220022.jpg
 
Last edited:
Do you mind sharing what primer and base coat paint you used? Any issue with paint adherence to the barrel? Thanks!

Also, any chance you are offering these parts for sale?
 

Attachments

  • IMG_0135.jpeg
    IMG_0135.jpeg
    738.8 KB · Views: 36
Do you mind sharing what primer and base coat paint you used? Any issue with paint adherence to the barrel? Thanks!

Also, any chance you are offering these parts for sale?
No problem, I didn't have any issues with it adhering to the machine cut parts. I used a fine sanding sponge first so the paint had something to grip to. I used the grey tamiya primer next. I didn't use the "FINE" primer because it doesn't have the same strength. Its great for showing details though. After letting that dry for a full day because I'm paranoid I did a few coats of Tamiya flat aluminum XF-16. All the paint jobs I've seen on the screen used were pretty sloppy. They probably knocked these out pretty fast. They're in a very short scene and you can't see much detail at all from screencaps so they probably weren't concerned about it. However I love all the imperfections so I did a somewhat sloppy paint job on this one. I think I'll cast this one so I can add all the chips and scuffs exposing the resin under the paint. This one is a little too clean looking in my opinion. I'll get around to weathering it a bit more later.
s-l1600 (10).jpg
cce45a31662bed97b9d48b73494a96bd.jpg
 
Oh I sealed it with Tamiya flat clear. Not sure if these were gloss, semi gloss, satin or whatever on the originals. Im wondering myself if I should have used semi gloss. I'll do some tests.
 
That razor blade by the way is incredible. I use it pretty much daily. I did very very light scratches and picking with the razor knife. Not all scuffs and scratches are going to go through paint and primer so a lot of scratches just expose the primer underneath. Did most of the weathering with the razor knife. The chipping that happened on the barrel I used the unbleached titanium on the exposed metal and it looks like resin. The tamiya weathering kit I used in corners and crevices to add a little grit. I used the "mud" color
 

Your message may be considered spam for the following reasons:

If you wish to reply despite these issues, check the box below before replying.
Be aware that malicious compliance may result in more severe penalties.
Back
Top