Regult Battle Pod, Bandai 1/72

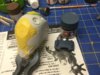
The more difficult masking job is the egg-shaped rear turret. Masking the frontal profile isn't too bad with thin tape, but when you get to the rear it's gotta be perfectly concentric with the turret (or at least the compulsive obsessive in me says so). I figured a slim steel washer might do the trick but after searching my hardware and junk stash for an hour I'm taking a rest.

I measured the diameter and will stop at a hardware store this weekend to find something darn close. Stay tuned.

IMG_20191130_113059.jpg
IMG_20191130_113118.jpg
 
Masking is my least favorite part next to lighting. It's usually the one thing that will keep me from painting something for a while after building it
 
I use about 50-60 % paint to thinner ratio. The choice of thinner is the secret sauce however. Well, not so secret: I use high concentration ISO alcohol (like 97%) with Liquitex Flow Aid as an additive. You can get this at craft stores like Michaels and Hobby Lobby. This will lay down the paint smoother and help keep it from drying on your airbrush tips and needles.

I should also mention that in some of the photos I have brushed on a protective gloss coat of Future floor wax (Pledge with a Future shine), this acts as a protective barrier over the paint prior to masking for other colors and perfect smooth gloss surface for applying decals.

Thanks for the thinning tips, and a nice WIP build! I've been wanting a Scout Regult for awhile but they're difficult to find.

PS: Did you thin the Future or spray it straight out of the bottle?
 
Thanks for the thinning tips, and a nice WIP build! I've been wanting a Scout Regult for awhile but they're difficult to find.

PS: Did you thin the Future or spray it straight out of the bottle?

G’day Guns , HobbySearch Japan ( 1999 co.jp ) have some in stock if you’re still after one , last time I looked .

Ged
 
Paint! Layers down a smooth coat of Tamiya XF-18 Medium Blue. It’s really a blue-grey and shows up a bit more grayish in photos than in person. I did a test piece on the rear hatch where I dry brushed some lighter blue and really like the subtle results. it creates a slightly weathered almost cast-iron look.

IMG_0215.jpg
 
Painting, decalling and assembly complete. Need to put the clear lenses/lights on yet. I'll be doing some weathering first with washes and dry brushing.

These red lenses have me a little confounded as there are half sphere lenses for the ones on the feet and center eye, but the ones on the head are decals (rear) and there's nothing provided for the larger ones behind the main cannons...

I'm trying to play with some options, see the red reflective material. I think I'll definitely use this behind the eye. Not sold yet on the other locations.

IMG_20191208_091751_1.jpg
 
This thread is more than 4 years old.

Your message may be considered spam for the following reasons:

  1. This thread hasn't been active in some time. A new post in this thread might not contribute constructively to this discussion after so long.
If you wish to reply despite these issues, check the box below before replying.
Be aware that malicious compliance may result in more severe penalties.
Back
Top