Rawktrooper
Well-Known Member
well good update!
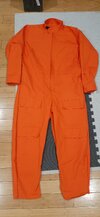
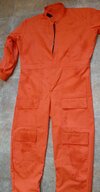
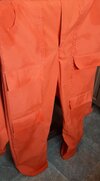
I was able to get my top and bottom together and the zipper added as well!
It took an extra evening for me to make sure the fit was acceptable and re-adjust the pinning on both the halves and the zipper placement, but it all went pretty smoothly. i think.
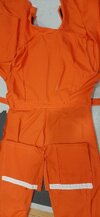
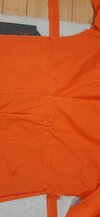
First was just the pinning of the top to the bottom and checking the fit.. I pinned the top and bottom about 1/2" more than the previous fit to make it sit a bit more snug from shoulder to crotch. This is because the RedKap is an overall or coverall, and meant to go over existing clothes, so i have noticed the legs, especially the butt area, are a bit more loose than a flight suit would be. I still may need to adjust the seam in the butt to tighten that up after the whole thing is sewn shut, but i think i could just remove the crotch stitching and take it in a bit and it should be fine.
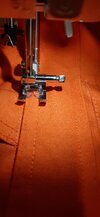
Once the pinning was in the place i wanted the halves to sit, i went ahead and sewed the whole thing together giving an extra bit of overstiching at the edges. I did leave the waist band loose at this point because its one continuous piece and i want to maintain that when its all finished.
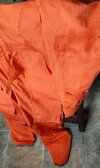
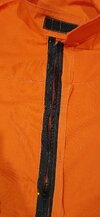
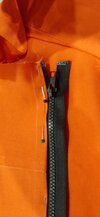
The zipper placement was fairly straight forward. Since i had the original placement still visible on the lower half, i decided to use that first to check the alignment to the top of the collar. It looked good, but i noticed the end of my revised collar was slightly too short for the original placement of the zipper so i moved the zipper about a half inch toward the collar alignment all the way down, meaning i had to adjust the original placement and fold the fabric an extra half inch to the right (as you would wear the suit). This aligned the collar well and i was able to begin pinning the zipper from the top down leaving about 1/4" from the zipper teeth to the edge of the flightsuit fabric all the way down.
If i had to do this part over again, i would start the Zipper higher on the neck area so it better matched the other flightsuits i have, but i think having a slight gap there is not an issue.
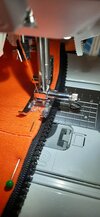
When i was satisfied with my pinning and double checked my alignment, i went ahead and put it to the machine. I used full right needle on my sewing foot so it was as close to the teeth and at the closest part of the edge of the fabric as possible, then with zipper closed, sewed it to the waist.
I am leaving a slight gap in the waist seam for that belt portion when i close up the sides.
Then moving the zipper pulls to the top, i finish the lower portion sewing as low as i can get. I will seal the lower end of the 2 way zipper after its all done so it doesnt lose the pull on the lower side, just in case.
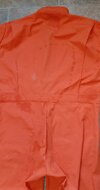
After the right side is done sewing, i move the zipper to the full closed configuration, and close up the front how i want it to look when its closed, fix the folds on the front flap so its straight all the way down, making sure to line up the chest seam, and i pin it closed from collar to crotch so it doesnt move when i flip it inside out.
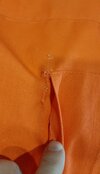
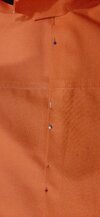
After its inside out, i fix the interior folds around the zipper and pin it in place for sewing. Having moved the placement slightly earlier when working the front, at this point i realize that my front zipper flap is not going to get any thread to hold those folds in place, so i will need to address that later. When the left Zipper side is all pinned up nice on the inside, i remove the outside flap pins and move to the machine to close up the collar and sew from top down, skipping the belt area, and making sure to add some overstitching in a couple areas for stress of pulling the zipper.
It works better than i expected, and i am pretty happy that when i zip it closed, it works and there are no wrinkles or weird alignments.
Zipper finished!
At this point i decide i have had enough for the weekend and go spend some family time. i will tackle the front flap later. No big deal. I can add a couple seams and call it good.
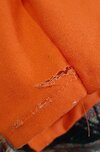
The next step is to inside out the whole suit, pin for the lower leg hems and sew, then pin for the side seams while taking in about 1 inch all around and 3 inches at the ankles. Then we check fit and adjust for final fitting.
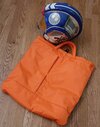
enjoy the photos.
I was able to get my top and bottom together and the zipper added as well!
It took an extra evening for me to make sure the fit was acceptable and re-adjust the pinning on both the halves and the zipper placement, but it all went pretty smoothly. i think.
First was just the pinning of the top to the bottom and checking the fit.. I pinned the top and bottom about 1/2" more than the previous fit to make it sit a bit more snug from shoulder to crotch. This is because the RedKap is an overall or coverall, and meant to go over existing clothes, so i have noticed the legs, especially the butt area, are a bit more loose than a flight suit would be. I still may need to adjust the seam in the butt to tighten that up after the whole thing is sewn shut, but i think i could just remove the crotch stitching and take it in a bit and it should be fine.
Once the pinning was in the place i wanted the halves to sit, i went ahead and sewed the whole thing together giving an extra bit of overstiching at the edges. I did leave the waist band loose at this point because its one continuous piece and i want to maintain that when its all finished.
The zipper placement was fairly straight forward. Since i had the original placement still visible on the lower half, i decided to use that first to check the alignment to the top of the collar. It looked good, but i noticed the end of my revised collar was slightly too short for the original placement of the zipper so i moved the zipper about a half inch toward the collar alignment all the way down, meaning i had to adjust the original placement and fold the fabric an extra half inch to the right (as you would wear the suit). This aligned the collar well and i was able to begin pinning the zipper from the top down leaving about 1/4" from the zipper teeth to the edge of the flightsuit fabric all the way down.
If i had to do this part over again, i would start the Zipper higher on the neck area so it better matched the other flightsuits i have, but i think having a slight gap there is not an issue.
When i was satisfied with my pinning and double checked my alignment, i went ahead and put it to the machine. I used full right needle on my sewing foot so it was as close to the teeth and at the closest part of the edge of the fabric as possible, then with zipper closed, sewed it to the waist.
I am leaving a slight gap in the waist seam for that belt portion when i close up the sides.
Then moving the zipper pulls to the top, i finish the lower portion sewing as low as i can get. I will seal the lower end of the 2 way zipper after its all done so it doesnt lose the pull on the lower side, just in case.
After the right side is done sewing, i move the zipper to the full closed configuration, and close up the front how i want it to look when its closed, fix the folds on the front flap so its straight all the way down, making sure to line up the chest seam, and i pin it closed from collar to crotch so it doesnt move when i flip it inside out.
After its inside out, i fix the interior folds around the zipper and pin it in place for sewing. Having moved the placement slightly earlier when working the front, at this point i realize that my front zipper flap is not going to get any thread to hold those folds in place, so i will need to address that later. When the left Zipper side is all pinned up nice on the inside, i remove the outside flap pins and move to the machine to close up the collar and sew from top down, skipping the belt area, and making sure to add some overstitching in a couple areas for stress of pulling the zipper.
It works better than i expected, and i am pretty happy that when i zip it closed, it works and there are no wrinkles or weird alignments.
Zipper finished!
At this point i decide i have had enough for the weekend and go spend some family time. i will tackle the front flap later. No big deal. I can add a couple seams and call it good.
The next step is to inside out the whole suit, pin for the lower leg hems and sew, then pin for the side seams while taking in about 1 inch all around and 3 inches at the ankles. Then we check fit and adjust for final fitting.
enjoy the photos.
Attachments
-
 20230303_192429.jpg826.7 KB · Views: 147
 -
 20230305_205134.jpg1.2 MB · Views: 143
 -
 20230305_205104.jpg866.3 KB · Views: 154
 -
 20230305_203105.jpg1.3 MB · Views: 151
 -
 20230305_201703.jpg687.6 KB · Views: 135
 -
 20230305_201528.jpg1.3 MB · Views: 138
 -
 20230305_201519.jpg768.2 KB · Views: 143
 -
 20230305_194924.jpg946.7 KB · Views: 144
 -
 20230305_191817.jpg1.1 MB · Views: 142
 -
 20230305_191804.jpg1 MB · Views: 128
 -
 20230305_191753.jpg931.9 KB · Views: 142
 -
 20230303_195920.jpg894.9 KB · Views: 150