You are using an out of date browser. It may not display this or other websites correctly.
You should upgrade or use an alternative browser.
You should upgrade or use an alternative browser.
Rebel Transport, correct dimensions, no for reals. LOL
- Thread starter moffeaton
- Start date

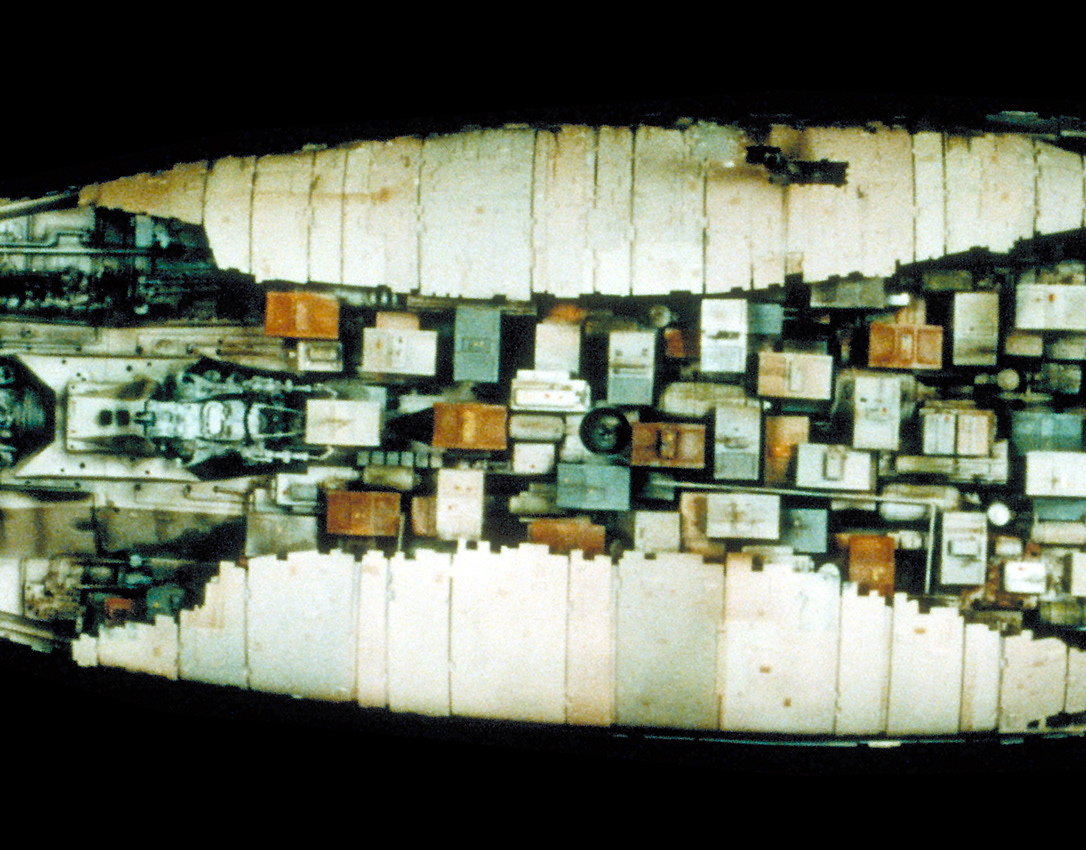
Jason, regarding the upcoming cast shells, will there be any inner structure as such incorporated to the underside main hull, in the way of ribs or support structure to determine the correct heights for the kit parts & the correct sit of the container positions?. You provided a pic of the topside, but just wondering what the underside will ultimately look like.
yes. Like the Ion cannon, there's about 20% you can't suss out, as it's frankly sealed or completely blocked from view. So, some of this will be for some incredibly uncomfortably up to interpretation. BUT... there will be files I will offer for the three "slabs" that sit on the underside that everything sits on, kit/casting-wise, as well as bracing that literally holds the two lower side armor plates in the proper position. So, you can make up crap in those unseen areas, but still fall asleep at night knowing the side fellas are floating in the right spots.


I need to unfortunately basically build these parts first, to see if they are indeed right, before I can offer the files for hand or laser cutting by the modeler. Also honestly I think I'm going to use black gas pipe for the armature. It's not exact but who knows exactly what is. The thing that counts is that the mount points will convey.
The plan is that I am going to just start in on this thing, and y'all can follow along as I go. I will call out kits you need to buy, but again - until I get going, I'm not about to post info that might change. This isn't a kit, it is more like "leg up on parts, and a group build".
Positions for all the containers - that will happen as the build progresses. Also understand there are AT LEAST three "versions" of this thing - as being built, as filmed/modded maybe, and how it is now. Boxes change position, sub structures disappear or get reglued in different places - it's probably a nightmare for the three or four hardasses that want accuracy. You can't. You just can't.
The guide will be here when I start. I need to get some castings in hand first.
Jason Eaton Studio - Build Guides
Artist that specializes in studio scale replicas, filming miniatures, ILM research, restorations, and original work. Primary working in the Star Wars genre.
roboterkampf.myportfolio.com
oh! Yeah to answer the rest, I'll cut some bulkheads that the pipes pass through. So the shell rides on the bulkheads that ride on the armature, and the cool crap hangs off the plates that are locked to the center pole and welded to the shell. Another reason why it's not going to be castings for most of the donors - I think I need to make sure the styrene is welded to each other for structural strength.
I can see you're doing as much as possible for folks to build out the underside, which is great to see, but totally agree, there's so much that can't be seen, so best guess is best here. What you're doing/envisioning for the underside buildup is a massive step up to realise this miniature for folks.Also on the underside are "cuts" in the surface to align those plates so they seat where they need to, the plates have the mount hole located for fool proof centering, as well as guides for the plastruct T strips.
I'm surprised at the kit part count gone into this, I'm seeing more & more as I revisit ref.
She'll be a hefty model for sure with all this load carried underneath!.
Perfectly applicable movie quote. I can literally hear the “cheer” the team made in the control room when reading your comment.The first transport is away!
And a more sincere one than from those unconvincing extras!Perfectly applicable movie quote. I can literally hear the “cheer” the team made in the control room when reading your comment.
The armature is now nailed down, everything "jives" so far with test fitting - I am using off the shelf gas pipes as they will be mostly hidden and are very inexpensive. Things will kick into gear in earnest soon, as I carefully check and re-check stuff before I'm confident there are no more revisions. Mike Salzo has started casting containers (contact him) and the shells will follow soon!


Similar threads
- Replies
- 11
- Views
- 1,245
- Sale
- Replies
- 0
- Views
- 162