A work colleague is Predator mad so I said I would make him a mask.
This gave me the opportunity to make my first mold and do some casting.
This is inspired by the Predator P1 Bio mask and took me roughly 1 month to do.


The mask was put together using card stock from a pepakura file.

I then applied E-poxy resin inside and out to harden the shell followed by fibreglass matt on the inside.


I pushed in the lower cheeks with some weights as the mask had spread a little when the e-poxy cured.
Then began the long process of applying U-Pol filler and sanding.


More detail added and sanded down. The mask had to be corrected in places, I found looking at the mask in a mirror would show me where I needed to add filler to make the mask symmetrical.


Applied 3M Glazing putty then sanded to smooth and even out areas. I drilled out the temple area and made the detail using some e-poxy putty and the lid of a locktite superglue bottle.


The laser on the side was bought off ebay, I used e-poxy resin to this and the other temple detail to fix them in.


Sprayed with filler primer.


Sanded the filler and filled grey areas with more U-Pol filler and 3M Glazing putty, sanded until smooth and even.


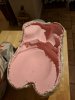
Applied silicone making sure all the detail was picked up. Then added a thickening agent for last 2 layers. 5 layers in total.
I put some silicone in an ice tray to make some square pieces which I used as registration points for the master mold.
More to follow.
This gave me the opportunity to make my first mold and do some casting.
This is inspired by the Predator P1 Bio mask and took me roughly 1 month to do.
The mask was put together using card stock from a pepakura file.
I then applied E-poxy resin inside and out to harden the shell followed by fibreglass matt on the inside.
I pushed in the lower cheeks with some weights as the mask had spread a little when the e-poxy cured.
Then began the long process of applying U-Pol filler and sanding.
More detail added and sanded down. The mask had to be corrected in places, I found looking at the mask in a mirror would show me where I needed to add filler to make the mask symmetrical.
Applied 3M Glazing putty then sanded to smooth and even out areas. I drilled out the temple area and made the detail using some e-poxy putty and the lid of a locktite superglue bottle.
The laser on the side was bought off ebay, I used e-poxy resin to this and the other temple detail to fix them in.
Sprayed with filler primer.
Sanded the filler and filled grey areas with more U-Pol filler and 3M Glazing putty, sanded until smooth and even.
Applied silicone making sure all the detail was picked up. Then added a thickening agent for last 2 layers. 5 layers in total.
I put some silicone in an ice tray to make some square pieces which I used as registration points for the master mold.
More to follow.