Polar lights 1/350 enterprise NEW build up

white mask on, and painted
IMG_0526.jpg

IMG_0527.jpg

IMG_0528.jpg

IMG_0529.jpg

IMG_0530.jpg


blue mask
IMG_0531.jpg

IMG_0532.jpg

IMG_0533.jpg


copper also painted on (mask pic ommitted)
IMG_0534.jpg

IMG_0535.jpg

IMG_0536.jpg


pearl coat is highlighted
IMG_0539.jpg

IMG_0540.jpg


daylight image
IMG_0544.jpg

IMG_0545.jpg


minor detailing
IMG_0546.jpg

IMG_0547.jpg

IMG_0548.jpg

IMG_0549.jpg

IMG_0550.jpg

IMG_0551.jpg

IMG_0552.jpg

IMG_0554.jpg

IMG_0555.jpg

IMG_0556.jpg

IMG_0558.jpg

IMG_0559.jpg

IMG_0561.jpg


this is what i had to redraw into illustrator - masks for each colour and seperate them all by hand via the mouse and the pointer - ball ache
IMG_0565.jpg


the desired effect i needed
IMG_0566.jpg


the white mask on
IMG_0570.jpg


after blue, copper and pearl mask this was the result of the illustrator ball ache method - still at least now a cuttable eps file for these masks exists :)
IMG_0573.jpg

IMG_0574.jpg

IMG_0575.jpg
 
Just read through this and I have to say I'm impressed. The skill and craftsmanship you display are prodigious. Excellent!
 
Very, very nice. The detail is great.

A shame you've glued the saucer together. The impulse crystal was always yellow/orange in the movies, not blue.
 
blue detailing
IMG_0580.jpg

IMG_0581.jpg

IMG_0583.jpg


and the biggest redraw pain - the body - 4 colours - 4 sets of masks for each panel
IMG_0584.jpg


combined layers effect
IMG_0586.jpg


and the masks after being cut and weeded
IMG_0588.jpg


same process really - start with white and progress through the masks and paints
IMG_0589.jpg

IMG_0590.jpg

IMG_0591.jpg

IMG_0592.jpg

IMG_0593.jpg

IMG_0594.jpg

IMG_0595.jpg

IMG_0596.jpg


i also found by lightly 1500 the paint to tone it down if you went too heavy yellowed the white coat which gave it a bit more definition
IMG_0597.jpg

IMG_0599.jpg


copper
IMG_0601.jpg


lastly pearl
IMG_0603.jpg

IMG_0604.jpg

IMG_0605.jpg

IMG_0607.jpg

IMG_0608.jpg

IMG_0609.jpg


detailing
IMG_0611.jpg

IMG_0612.jpg


tailfan was similar - tint of white, blue and copper then the whole thing pearled
IMG_0613.jpg

IMG_0615.jpg

IMG_0616.jpg


stock decals added
IMG_0618.jpg


pylon painting - a case of mask on and paint, next mask and paint and so on
IMG_0620.jpg

IMG_0621.jpg

IMG_0623.jpg


and after 4 colours
IMG_0624.jpg

IMG_0625.jpg

IMG_0626.jpg


black lines added
IMG_0627.jpg


and blue
IMG_0628.jpg

IMG_0629.jpg


the biggest dread - was all set to have this as a water slide but i wanted paint - so i drew it in and seperated it all for masks
IMG_0632.jpg

IMG_0633.jpg


masks were numbered so i have different shades of blue 0 being the lightest and 4 the darkest

IMG_0634.jpg


the shades i mixed
IMG_0635.jpg


but first the blue details
IMG_0636.jpg

IMG_0637.jpg

IMG_0638.jpg

IMG_0639.jpg


no time to hold back lets go for it
IMG_0640.jpg


looking great with one blue to go
IMG_0641.jpg

IMG_0642.jpg

IMG_0643.jpg

IMG_0644.jpg


eagle eyes will spot the blue colour on the neck a tad greener - ill repaint those bits
IMG_0646.jpg

IMG_0647.jpg


repainted
IMG_0651.jpg
 
This is why I sold my Refit before building it. I just can't compete with the awesomeness of builds like this! Great fantastic job youv'e done here!
 
A shame you've glued the saucer together. The impulse crystal was always yellow/orange in the movies, not blue

i did see one in that colour - but hey its a minor mistake - but mainly as the led under there was supplied blue by trekmodeler it was always going to stay that colour for me. theres a few little differences in this build - difference in colours etc etc - but all a learning curve and if i did another id certainly address those........but i dont intend another at this time :)
 
IMG_0671.jpg

IMG_0672.jpg


thrusters
IMG_0673.jpg

IMG_0674.jpg

IMG_0675.jpg

IMG_0676.jpg


completed deflector
IMG_0677.jpg

IMG_0680.jpg

IMG_0681.jpg


cureent state
IMG_0682.jpg


add some decals - i always like the "a" sounding part to the reg number so i used those
IMG_0683.jpg

IMG_0684.jpg

IMG_0685.jpg

IMG_0686.jpg

IMG_0687.jpg

IMG_0688.jpg

IMG_0689.jpg

IMG_0690.jpg

IMG_0691.jpg

IMG_0692.jpg


nacelle paint time - the last part to paint
IMG_0693.jpg


seps
IMG_0694.jpg


and the masks
IMG_0695.jpg

IMG_0696.jpg

IMG_0697.jpg

IMG_0698.jpg

IMG_0699.jpg

IMG_0700.jpg


after white and blue we ahve this
IMG_0706.jpg

IMG_0710.jpg


and copper
IMG_0711.jpg

IMG_0712.jpg

IMG_0714.jpg

IMG_0716.jpg


pearl time
IMG_0717.jpg

IMG_0718.jpg

IMG_0719.jpg


paint done
IMG_0720.jpg

IMG_0721.jpg

IMG_0722.jpg

IMG_0723.jpg

IMG_0727.jpg

IMG_0728.jpg


final black to go on
IMG_0730.jpg

IMG_0731.jpg

IMG_0732.jpg


decals
IMG_0733.jpg

IMG_0734.jpg

IMG_0735.jpg

IMG_0736.jpg

IMG_0738.jpg

IMG_0739.jpg


red line added
IMG_0740.jpg

IMG_0741.jpg


side decals
IMG_0745.jpg


wiring to the box - need to connect those fibres up
IMG_0751.jpg


0.5mm holes drilled into the leds and epoxyed into place
IMG_0753.jpg


a quick test to see if all is well
IMG_0755.jpg


all assembled and done
IMG_0756.jpg

IMG_0757.jpg

IMG_0758.jpg

IMG_0759.jpg

IMG_0760.jpg

IMG_0762.jpg

IMG_0763.jpg
 
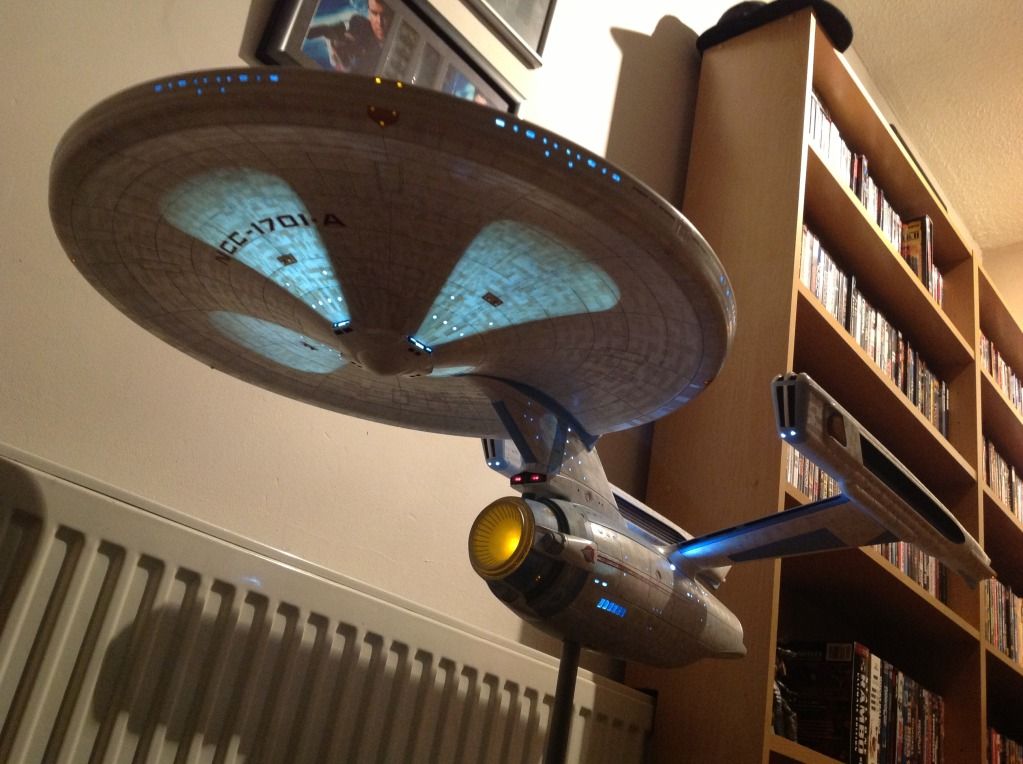
Re: Polar lights 1/350 enterprise NEW build up
Simply astonishing!!!

I've never been in to Trek model kits before, but this has changed my mind


The exact same thing that made me build it myself, I'm not a Trekkie but the kit was great
 
Just amazed at this...

Were you able to apply the aztec masks in large sections? Or did you have to individually apply each one?

Sean
 
Just incredible Rich, wow what goes into the paint job is amazing you have a show winner there just a beautifull piece.
 
That paint job is just out of this world. I agree with Ray that's a show winner and if not they need their eyes checked lol.
 
Back
Top