Painting polyurethane problems.

Technoboots

Active Member
For some reason I am having a lot of issues with painting resin. Sometimes it works, other times it doesn't and I can't work out what the problem is.
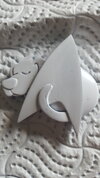
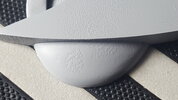
I get these little spots in the paint for some reason. I've stripped the paint off and resprayed it with a different primer resulting in the same problem.
Any advice would be helpful.
 

Attachments

  • 20210708_173703.jpg
    20210708_173703.jpg
    1.8 MB · Views: 115
Technoboots , are you referring to the pinholes in your resin objects or the bumps in the paint?
Usually, the primer has a chemical that etches into what it's painted on. Unnoticeable bubbles just under the surface of the resin will be more evident as some of the resin is melted or eaten away, sometimes revealing a big mess.
You can try and correct this problem by using Mr. Surfacer or something similar like thin filler. It needs to flow into these tiny holes. Tamiya putty has a chemical in it that melts the resin but you may need several layers.

TazMan2000
 
I've washed the cast with soapy water and there was no difference. I'm leaning to the option that it is bubbles under the surface as the dimples in the paint are in the same place even after stripping and cleaning the cast. I've just put some filler on one of the problem casts and will sand when set to see if that helps.
Do you think that using a slower setting resin would helpbwith undersurface bubbles? I'm using Polycraft FC100 resin to make the casts.
 
If this is a one piece mold, you could try warming the mold in the microwave for a minute until it gets warm, then dusting the insides of the mould with baby powder and shaking afterwards. Mix the two part resin well, but try and avoid too much mixing as that will introduce more bubbles.

After I pour, I sometimes take a toothpick and go over the insides of the mold and loosen up any resin bubbles, or even pick up and slam down the mould to get them to come to the surface. Of course if you do that wrong, you might be wearing the resin.

TazMan2000
 
lightly sand and then paint with thin layers of XTC. Use metal powder or pigment mixed in the XTC.

After a few coats, lightly sand and clearcoat

Some resins don't like to be cast too thick, you may want to try pouring half of it, then the second half.

Also, Degass
 
It is a one part mold so I'll try the warming and dusting as I actually have some stuff in I can use. I'll give an update as to whether I can get it to work though I did search for info and it says it helps break up small bubbles on the surface and that warming should help with thermal shock.
I have had success with metal powder mixed in with resin to make a metallic badge.
I don't have anything to degass with and the resin has a demold time of 20 minutes which is why I'm considering getting one with a longer pot life.
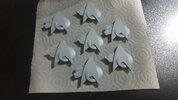
Here are my successful metal casts.
 

Attachments

  • 20210705_162027.jpg
    20210705_162027.jpg
    7.2 MB · Views: 102
  • Like
Reactions: JPH
I've not had much luck with any new casts. I've tried powder in the mold as well as warming the mold with little success. I'm debating whether a slow cure resin will work better as well as a way to vibrate the mold once the resin is in to release any micro bubbles from the surface of the mold.
 

Attachments

  • 20210711_122204.jpg
    20210711_122204.jpg
    1.7 MB · Views: 94
  • Wow
Reactions: JPH
I've not had much luck with any new casts. I've tried powder in the mold as well as warming the mold with little success. I'm debating whether a slow cure resin will work better as well as a way to vibrate the mold once the resin is in to release any micro bubbles from the surface of the mold.
Please seriously consider a degasser.

I was not a fan of them until I needed something cast that I wanted to see through.

The 20 min time shouldnt be an issue. Degass the mix *before* mixing, then marry the two resin components and mix sssssllllooooowwwwlyyy, scraping the sides. Also make sure you are not in a humid area.

You prop looks great! Something I'd make out of metal
 
Unfortunately I don't have the space for a degasser as I like in a small studio flat. Would measuring it out and leaving the unmixed parts for an hour help?
 
  • Like
Reactions: JPH
Unfortunately I don't have the space for a degasser as I like in a small studio flat. Would measuring it out and leaving the unmixed parts for an hour help?
No, leaving it out would make it worse.

Is your resin new? When was it first opened?

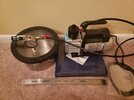
This is the footprint of my baby degasser setup.
 

Attachments

  • 20210711_085830.jpg
    20210711_085830.jpg
    3.7 MB · Views: 102
The resin is new, I only got it last week. I make sure to rotate the bottles a few times to ensure each part is mixed together before weighing out each part.
Unfortunatly that setup is still too big, got too much stuff as it is.

The cat badge is based on the design on a poster I have, the dog one was an idea from someone I knoe.
 
that looks like solvent pop on the surface. usually caused by not allowing the first coat of paint to dry. Not sure if you resolved this issue by now.
 
Are those your designs? They're wonderful.
I'd print them out with a 25 micron Form 3 printer and make the molds. Will send you the molds if you want to sell them on Etsy or whatever. Just want to make these myself. They are beautiful.
 
I've managed to get new casts which paint up well. Switched to a different resin with a longer pot life to give me more time to work. It must have been the resin that was the problem as I used the same molds for the new casts.
Going to start storing the resin in a sealed container to minimise any moisture that gets inside the bottles, hopefully that will help in future.
The primer I am now using is actually the cheap stuff from poundland. Foes on much better than I was expecting it to. Will save me quite a bit in the future.
I've been selling these through facebook, not keen on setting up an etsy store.
 

Attachments

  • 20220411_163829.jpg
    20220411_163829.jpg
    4.4 MB · Views: 67
Back
Top