Sorenzo
Well-Known Member
Frickin LOVED Pacific Rim, haven't enjoyed a movie so much in quite a while. I'm flat out working on other commissions but I always like to have a couple of 'distraction' projects on the go.

I've decided that I'm going to build the Jaeger Pilot suit, the level of detail is just incredible, so many amazing features, I simply NEED to have one. Its going to be a slow build, probably over the next 9-12 months, but I'm going to do it bit by bit, as and when I can (until somebody commissions me to build the full thing, then I can spend all my time on it)
I will be using a combination of processes, scratch builds from what ever I have lying around, CNC'ing and 3D printing when I can afford it. There are so many elements to the suit, and I want to try an recreate them all as accurately as possible.
Any suggestions, information, criticism (constructive please) would be greatly appreciated.
Starting out with the shoulder pads, one of my favourite pieces of the entire suit. I started this about a day after the movie dropped here in the UK, and I've made a bit of progress on it, so I'll get you up to speed as quickly as possible.
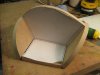
Had bugger all cash to throw at it, so it was started as a budget scratch build. I drew up some CAD files and used tom to create a MDF base. This was then filled with foam board and sanded back to reveal the basic shape of the pad.
At the time I was renovating my apartment and was installing rigid board insulation. I took a piece to the workshop to play around with. It was nasty as hell, full of glass (respirator and goggles worn,of course) but it cut, sanded and took resin and Bondo well. It is not as nice to work with as modelling foam or tooling board, but it cheap as hell in comparison.


Once happy with the shape I coated it with a layer of fibreglass, using the matting paper to keep it relatively smooth. Once cured, it was robust enough to take a skim of bondo. Couple of hours of sanding and it was nice and smooth.


Next up was creating the trim. I split some PVC pipe down the middle, the using the heat gun, carefully heated the pipe so it became flexible, the wrapped it around the piece fixing it with superglue as I went. It worked a lot better than I expected to be honest.


I've decided that I'm going to build the Jaeger Pilot suit, the level of detail is just incredible, so many amazing features, I simply NEED to have one. Its going to be a slow build, probably over the next 9-12 months, but I'm going to do it bit by bit, as and when I can (until somebody commissions me to build the full thing, then I can spend all my time on it)
I will be using a combination of processes, scratch builds from what ever I have lying around, CNC'ing and 3D printing when I can afford it. There are so many elements to the suit, and I want to try an recreate them all as accurately as possible.
Any suggestions, information, criticism (constructive please) would be greatly appreciated.
Starting out with the shoulder pads, one of my favourite pieces of the entire suit. I started this about a day after the movie dropped here in the UK, and I've made a bit of progress on it, so I'll get you up to speed as quickly as possible.
Had bugger all cash to throw at it, so it was started as a budget scratch build. I drew up some CAD files and used tom to create a MDF base. This was then filled with foam board and sanded back to reveal the basic shape of the pad.
At the time I was renovating my apartment and was installing rigid board insulation. I took a piece to the workshop to play around with. It was nasty as hell, full of glass (respirator and goggles worn,of course) but it cut, sanded and took resin and Bondo well. It is not as nice to work with as modelling foam or tooling board, but it cheap as hell in comparison.
Once happy with the shape I coated it with a layer of fibreglass, using the matting paper to keep it relatively smooth. Once cured, it was robust enough to take a skim of bondo. Couple of hours of sanding and it was nice and smooth.
Next up was creating the trim. I split some PVC pipe down the middle, the using the heat gun, carefully heated the pipe so it became flexible, the wrapped it around the piece fixing it with superglue as I went. It worked a lot better than I expected to be honest.


")