frejus
New Member
Hi!
In this thread i will be posting my entire Nomad Genji from Blizzards Overwatch build, down to the smallest detail. Without too much of an introduction, lets begin!
(I am making this due to the incredible amount of questions i got regarding my first cosplay build, Classic Genji, started in april 2016. You can find the post here: http://www.therpf.com/showthread.php?t=259128&highlight=genji ) and pictures from the finished cosplay here: https://www.facebook.com/justcosplayandprops/
Bear in mind this is my second cosplay build, so go easy on me.
I will do a list of all the materials and cost at the very end, as well as a link to my templates (i might make them avaible for like 3 or 4 dollars, as a kit if people are interested") )
)
Part one: Reference
Part two: Helmet/cowl
Part three: Goggles and gold headband!
Part four: Fabric
Part five: Buckles and beads
Part six: TBA
-
Part one: Reference
Gathering good reference material is always crucial for a good result. Having loads of screenshots from all angles helps a great deal, and a lot of pictures can be found on the web. Since this particular skin doesnt yet have a reference kit (https://playoverwatch.com/en-us/media/) like the original classic skins, it took a bit more fiddeling to get what i wanted.
All in all, this is what will be created (hopefully...) For the sake of the already picture-heavy post, i wont upload ALL of my reference material. Most of it is avaible online with a quick google search!

Part two: Helmet/cowl
First thing to notice is that the face is very "inhuman". Also, for the sake of not having to wrap a turban around my head every time i wanted to wear it, i decided to make a faceshell ( a kind of mask that goes over your face, to prevent your facial details from showing ) and attach the cloth to it. I found a great Pepakura file for a spiderman faceshell here: https://www.pepakura.eu/all/spiderman-faceshell-foam/
Since the pepakura is inteded for Foam, i used some 2mm EVA foam to craft it. Use pins to hold the template in place on the EVA foam when you trace out the patterns. Using a sharp but cheap boxcutter, i cut it to shape according to the pepakura template, then superglue the edges together, before heating the entire faceshell gently with a hot air gun and giving it a better shape.


This along would be too soft for the faceshell i needed, so i took some brown Worbla (thermoplastic sheets) and started covering the mask with it (only on the outside!) I didnt really use a pattern here, but just cut out pieces that would fit it approximately. I heated the worbla using my hot air gun, and removed any airbubbles or ugly seams with a sculpting tool dipped in water.
A good tip is to always have a cup of ice cold water to dip your fingers in when working with worbla, as it gets really hot, and you are likely to hurt your fingers working with it. The water also helps to make sure that your fingers and tools dont stick to the worbla.
To make sure the worbla you cut is the right size, you can make templates using masking tape, by taping onto the surface that needs covering, and drawing with a sharpie or pen. Cut out the pattern, and transfer it to the worbla.


I tried the mask on, and realized i needed some more ventilation. I went ahead and drilled some holes near where my nose is, and made the four holes according to the reference pictures. Lastly, i narrowed down the eyes, as spidermans eyes are way to big.
After a last testfit, i was satisfied with the fit, visibility and breathability, and could move on.
The next step was to cover it in cloth. I took a test just stretching my fabric over the mask and taping it on the inside. The fit was good, but a lot of seams and uneven spots was showing through. The solution was to cover the face in cotton batting underneath the fabric. I traced out a rough sketch of the head, and drew where all the ventilation holes and eyes would go with a pen. After cutting out the holes, i could start figuring out how to attach the fabric to the mask.


Before i attached the fabric, i had to sew the "scarf" part of the shemagh (Traditional bedouin headdress) so that it would align around the face,
and sit the way its supposed to. In the picture below, you can see how the fabric is cut before sewing it together, leaving a small gap on the top og the head. I will include these patterns in my kit later

I actually ended up watching a lot of videos on how to tie a shemagh, so that the end result was convincing!
To fasten the fabric to the faceshelll, i drilled small holes all along the outer rim of the mask, and hand-sewing the fabric to the faceshell, with the cotton batting in between.
The stiches would go almost on top of there the seam between the face part and the scarf part is.
The result was pretty alright, although it looks weird without any details and the goggles.

To get the right feel of the cowl, i made a 10 cm strip of the fabric, and fashioned it into a headband that i would tie around the forehead. This helped keep the mask in place so that i wouldnt need elastic bands or anything, and it also looked more like the original. To create the folds and overlapping fabric that makes it look like its a tied headdress and not a helmet, took some effort and a LOT of trial and error.
This part is hard to explain, but i ended up taking fabric from the middle of the long scarf, and sew a point of it right above the left ear, and the doing the same on the right ear.
The result looked something like this, and i was happy! (the headband is loose here, so it looks kind of weird)

Part three: Goggles and gold headband!
This is one of the things i was super excited about. The goggles are really iconic, and it really makes the character.
I started by drawing a pretty rough sketch, cutting it out, and testing to see if it had a good fit to the hole for my eyes.

I made some alterations, and got a size and shape i was happy with. Lastly, i did a check to see if i could actually see anytihing, and cut out the lens section of the goggle. The vision was good, and i could go ahead and do a final version that would serve as a template for later.


I traced out the main body of the goggles on 6 mm EVA foam, and the details on 2mm EVA foam.
Superglue was used to attach the details of the main body, and everything was sanwiched with black worbla. The triangles and curved ear-piece thing was attached by just pressing it tohether (worbla sticks to itself)

The golden headband followed the exactly same steps, and was made with black worbla with 2mm EVA foam core for the "coins" and brown worbla (double layer) for the band. On the backside of both the goggles and headband, i secured everything with small strips of worbla instead of glue, to make sure nothing would come apart.


Both pieces was done, so i could go ahead and make them smooth using 2 layers of spray filler (auto filler) with some 500 grit sanding in between for extra smoothness!

After the final coat had dried 24h, i could give it a solid layer of Goldchrome spraypaint ( https://www.montana-cans.com/en/spray-cans/spray-paint/gold-400ml/montana-gold-400ml Montana Gold spraypaint used, its pretty cheap here, and works insanely good! :O ) One coat was enough, and the result was beyond great! In the back you can also see my girlfriends widowmaker parts in the making!

When the parts was completly dry (48 hours, rather wait too long then too short!) I weathered them with black and a bit of brown acrylic. Brush it in the cracks and corners of everything, and then wipe it off, leaving some of it in the cracks and crevices. I also had to paint the goggle detail with a dark grey. Lastly, i took some silver acrylic and lightly went around some of the edges giving it a highlight/scratch effect.
As for the lenses, i plan on dying some PETG plastic in a turqouise color, and installing small LED's in the visor so it lights up like in-game. I will write more on this when i have everything i need.
Result so far: (Painted the ventilation holes with black acrylic )

Part four: Fabric
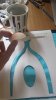
The fabric that goes over the shoulder was a pretty straight forward process. Started again by making a test pattern to see roughly the size, and experimented untill i got it right. I cut the fabric to shape based on the reference material, and painted the details using a mix of 50/50 White and turqouise fabric paint. In hindsight, the result would have been smoother if i made a stencil, but i am overall happy with the result.
The first picture show the basic shape of the two pices. Picture number two is after i cleaned up the edges with my sewing machine, and the turning it all inside out.


In this thread i will be posting my entire Nomad Genji from Blizzards Overwatch build, down to the smallest detail. Without too much of an introduction, lets begin!
(I am making this due to the incredible amount of questions i got regarding my first cosplay build, Classic Genji, started in april 2016. You can find the post here: http://www.therpf.com/showthread.php?t=259128&highlight=genji ) and pictures from the finished cosplay here: https://www.facebook.com/justcosplayandprops/
Bear in mind this is my second cosplay build, so go easy on me.
I will do a list of all the materials and cost at the very end, as well as a link to my templates (i might make them avaible for like 3 or 4 dollars, as a kit if people are interested
)Part one: Reference
Part two: Helmet/cowl
Part three: Goggles and gold headband!
Part four: Fabric
Part five: Buckles and beads
Part six: TBA
-
Part one: Reference
Gathering good reference material is always crucial for a good result. Having loads of screenshots from all angles helps a great deal, and a lot of pictures can be found on the web. Since this particular skin doesnt yet have a reference kit (https://playoverwatch.com/en-us/media/) like the original classic skins, it took a bit more fiddeling to get what i wanted.
All in all, this is what will be created (hopefully...) For the sake of the already picture-heavy post, i wont upload ALL of my reference material. Most of it is avaible online with a quick google search!
Part two: Helmet/cowl
First thing to notice is that the face is very "inhuman". Also, for the sake of not having to wrap a turban around my head every time i wanted to wear it, i decided to make a faceshell ( a kind of mask that goes over your face, to prevent your facial details from showing ) and attach the cloth to it. I found a great Pepakura file for a spiderman faceshell here: https://www.pepakura.eu/all/spiderman-faceshell-foam/
Since the pepakura is inteded for Foam, i used some 2mm EVA foam to craft it. Use pins to hold the template in place on the EVA foam when you trace out the patterns. Using a sharp but cheap boxcutter, i cut it to shape according to the pepakura template, then superglue the edges together, before heating the entire faceshell gently with a hot air gun and giving it a better shape.
This along would be too soft for the faceshell i needed, so i took some brown Worbla (thermoplastic sheets) and started covering the mask with it (only on the outside!) I didnt really use a pattern here, but just cut out pieces that would fit it approximately. I heated the worbla using my hot air gun, and removed any airbubbles or ugly seams with a sculpting tool dipped in water.
A good tip is to always have a cup of ice cold water to dip your fingers in when working with worbla, as it gets really hot, and you are likely to hurt your fingers working with it. The water also helps to make sure that your fingers and tools dont stick to the worbla.
To make sure the worbla you cut is the right size, you can make templates using masking tape, by taping onto the surface that needs covering, and drawing with a sharpie or pen. Cut out the pattern, and transfer it to the worbla.
I tried the mask on, and realized i needed some more ventilation. I went ahead and drilled some holes near where my nose is, and made the four holes according to the reference pictures. Lastly, i narrowed down the eyes, as spidermans eyes are way to big.
After a last testfit, i was satisfied with the fit, visibility and breathability, and could move on.
The next step was to cover it in cloth. I took a test just stretching my fabric over the mask and taping it on the inside. The fit was good, but a lot of seams and uneven spots was showing through. The solution was to cover the face in cotton batting underneath the fabric. I traced out a rough sketch of the head, and drew where all the ventilation holes and eyes would go with a pen. After cutting out the holes, i could start figuring out how to attach the fabric to the mask.
Before i attached the fabric, i had to sew the "scarf" part of the shemagh (Traditional bedouin headdress) so that it would align around the face,
and sit the way its supposed to. In the picture below, you can see how the fabric is cut before sewing it together, leaving a small gap on the top og the head. I will include these patterns in my kit later
I actually ended up watching a lot of videos on how to tie a shemagh, so that the end result was convincing!
To fasten the fabric to the faceshelll, i drilled small holes all along the outer rim of the mask, and hand-sewing the fabric to the faceshell, with the cotton batting in between.
The stiches would go almost on top of there the seam between the face part and the scarf part is.
The result was pretty alright, although it looks weird without any details and the goggles.
To get the right feel of the cowl, i made a 10 cm strip of the fabric, and fashioned it into a headband that i would tie around the forehead. This helped keep the mask in place so that i wouldnt need elastic bands or anything, and it also looked more like the original. To create the folds and overlapping fabric that makes it look like its a tied headdress and not a helmet, took some effort and a LOT of trial and error.
This part is hard to explain, but i ended up taking fabric from the middle of the long scarf, and sew a point of it right above the left ear, and the doing the same on the right ear.
The result looked something like this, and i was happy! (the headband is loose here, so it looks kind of weird)
Part three: Goggles and gold headband!
This is one of the things i was super excited about. The goggles are really iconic, and it really makes the character.
I started by drawing a pretty rough sketch, cutting it out, and testing to see if it had a good fit to the hole for my eyes.
I made some alterations, and got a size and shape i was happy with. Lastly, i did a check to see if i could actually see anytihing, and cut out the lens section of the goggle. The vision was good, and i could go ahead and do a final version that would serve as a template for later.
I traced out the main body of the goggles on 6 mm EVA foam, and the details on 2mm EVA foam.
Superglue was used to attach the details of the main body, and everything was sanwiched with black worbla. The triangles and curved ear-piece thing was attached by just pressing it tohether (worbla sticks to itself)
The golden headband followed the exactly same steps, and was made with black worbla with 2mm EVA foam core for the "coins" and brown worbla (double layer) for the band. On the backside of both the goggles and headband, i secured everything with small strips of worbla instead of glue, to make sure nothing would come apart.
Both pieces was done, so i could go ahead and make them smooth using 2 layers of spray filler (auto filler) with some 500 grit sanding in between for extra smoothness!
After the final coat had dried 24h, i could give it a solid layer of Goldchrome spraypaint ( https://www.montana-cans.com/en/spray-cans/spray-paint/gold-400ml/montana-gold-400ml Montana Gold spraypaint used, its pretty cheap here, and works insanely good! :O ) One coat was enough, and the result was beyond great! In the back you can also see my girlfriends widowmaker parts in the making!
When the parts was completly dry (48 hours, rather wait too long then too short!) I weathered them with black and a bit of brown acrylic. Brush it in the cracks and corners of everything, and then wipe it off, leaving some of it in the cracks and crevices. I also had to paint the goggle detail with a dark grey. Lastly, i took some silver acrylic and lightly went around some of the edges giving it a highlight/scratch effect.
As for the lenses, i plan on dying some PETG plastic in a turqouise color, and installing small LED's in the visor so it lights up like in-game. I will write more on this when i have everything i need.
Result so far: (Painted the ventilation holes with black acrylic )
Part four: Fabric
The fabric that goes over the shoulder was a pretty straight forward process. Started again by making a test pattern to see roughly the size, and experimented untill i got it right. I cut the fabric to shape based on the reference material, and painted the details using a mix of 50/50 White and turqouise fabric paint. In hindsight, the result would have been smoother if i made a stencil, but i am overall happy with the result.
The first picture show the basic shape of the two pices. Picture number two is after i cleaned up the edges with my sewing machine, and the turning it all inside out.