With the screws - you'll need a precision screwdriver that is snug. If you find the screws dont come out spray them with WD40 and leave overnight to do their magic. Then next day they should wind out okay. I did the same thing as you and then had to buy a better set of screwdrivers.
So the mounting can be done multiple ways but I tried to engineer as much a modular way as possible. I actually ended going through several types of clothing snap fasteners, like you'd find on the hem of a duvet for example. You want fairly hard-wearing ones that keep their grip. I had four of these round the back of the lens to fasten the body of the print. My 3D print was a little deeper than I needed by half a centimetre or so, so I actually used a dense foam as a backing to the snaps. Way I saw it, they would act as little shock absorbers too (as I was concerned the vibration from the lens might go through the body and make a strange noise or feeling). If you're super confident you are done you could hot melt glue gun the whole lens assembly in there, but I had far too many tweaks to do.
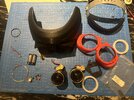
As for things I'd change about the print - it came out okay. I had to open up some of the screw holes a bit more and sand back where the tubing meets the eye front piece, but all in all the shapeway print was so accurate I had nothing to worry about. It all fit straight out of the box. I think my sanding improved as time went on, but that wasn't anything to do with the print. I might have been a bit severe on sanding the front piece, but it gives it more of a vac-formed look so I'm ok with that.
I did spend months making the 3D printed section - that took the longest planning and checking. I definitely used the measure twice print once approach. And I sent for test prints to get an idea of the finish, fit and scale in hand. I just printed a half section of the front portion. Test prints for fitting are always a good idea if they aren't too costly.
I will eventually release them for free for hobbyists, just don't want to release them while there's a licensed product on the horizon. The whole world has a right to these goggles as Hammond would say.
")