madebyap

Member
Good morning and happy Fall everyone! This is the time of year where horror movies are on loop in my house. I love the end of September through October haha.

I've been a fan of the Elm Street series since the first one came out in 1984. Due to the irresponsibility of my parents, and a lack of baby sitters in rural Maine, my father and step-mother took me with them to see this on the big screen when I was four... yes... you read that right. I blame them for my lifelong passion for the horror of course.

This Halloween I wanted to create a display piece in one of our rooms. And of course, that led me to the paper mache replica of Nancy's house from Nightmare on Elm Street 3: Dream Warriors!

I did some cursory searching and wasn't able to find any decent screenshots from the film, so I popped in my Bluray and took some pics with my iPhone. Yep, the “hold the cassette recorder up to the speaker while recording off the radio” version of taking screenshots…

IMG_2790.jpeg


IMG_2798.jpeg


IMG_2805.jpeg


IMG_2793.jpeg


IMG_2806.jpeg


Hopefully, these larger pictures will help you on your build!

Okay next up, figuring out how big this thing is.
 
There was some discussion about the size of the house here if it helps:
 
Thank you DavyVO! I saw that one. Some pretty interesting stuff, especially around the estimate of the size of the desk, the binder, etc. etc.

I went a more basic route!

First, I found 5.4375" x 0.39" popsicle sticks. I picked up some popsicle sticks from my craft store but come to find out they were only 4.5", which was really tiny! There are jumbo ones that are longer but they are way thicker.

The 5.4375" were perfect (in my eyes).

With that, both sides of the door are made up of the full-length sticks. I calculated about 3.5" for the door and 0.195" for the edge of the house. That brought me to approximately 14.765" (rounding up to 15" for the first-floor piece.

IMG_2823.jpeg


For the second-floor, and roofline, I went 15.5" (to give a .25" overhang on both sides. The height I just calculated to be the length of the popsicle sticks (5.4375").

Then for the sides of the house, which remind me of a very demonic looking face... I created a pattern on rosin paper (I have a ton of it) by eyeballing the angles, for one half of the house. Folded the paper in half, and then cut it out, creating a full-size pattern (thank you to my Nana for teaching me that trick haha).

After I had my pattern on paper, I transferred it to a piece of cardboard then cut it out.

IMG_2814.jpeg


I'm pretty satisfied with the dimensions. It feels like it's pretty close to the size in the film. Here's what it looks like right now.

IMG_2828.jpeg
 
You mean something amazing like this haha. The possibilities are ENDLESS!
Screen Shot 2020-09-27 at 9.14.05 PM.png


Oh, and if it's been awhile - this is absolutely worth a rewatch. It's so bad it's amazing. You almost expect Rick Astley to appear halfway through to let you know that this isn't real... but it is. It's very real.

 
I can tell you after studying & comparing various Sticks,... Small...Thin Coffee Stirrers are what they used for the boarded up Windows...
 
Now that the structure is complete, time for the paper mache. I went with an Elmer's glue recipe because I didn't want to run the risk of mold or rot in a flour-based glue. Probably completely unfounded concerns but I want to make sure that this will last awhile.

The recipe I ended up using was one cup of glue to about 3/4 cups of water. I found some recipes online that added salt to the equation. Not sure exactly why but I threw in a teaspoon of salt... because who am I to question instructions I find on the internet?

After stirring it all up to the consistency of whole milk, I just proceeded as normal. I made sure to cover my table, and actually let it all dry on a piece of wax paper for easy removal.

IMG_2839.jpeg


I'm loving the dutch colonial look, and how damn creepy it is! A Nightmare on Amityville Street haha!
 
Oh quick follow-up. Because you lose the muting and texture that flour glue provides, I lightly sprayed Tamiya XF-2 (flat white) over the whole thing to dull down the paper. Looking much better now (to me at least).
 
Now that the structure is complete, time for the paper mache. I went with an Elmer's glue recipe because I didn't want to run the risk of mold or rot in a flour-based glue. Probably completely unfounded concerns but I want to make sure that this will last awhile.

The recipe I ended up using was one cup of glue to about 3/4 cups of water. I found some recipes online that added salt to the equation. Not sure exactly why but I threw in a teaspoon of salt... because who am I to question instructions I find on the internet?

After stirring it all up to the consistency of whole milk, I just proceeded as normal. I made sure to cover my table, and actually let it all dry on a piece of wax paper for easy removal.

View attachment 1353414

I'm loving the dutch colonial look, and how damn creepy it is! A Nightmare on Amityville Street haha!
Looking really good so far!
 
Thank you propsculptor!

My evening update (this one is going fast, I needed a break from some other projects, this was just what I needed).

I started putting up the popsicle sticks!

Of course, in the movie, Patricia Arquette used markers to color the sticks. I didn't go that route, I airbrushed them instead. I primed everything with Vallejo black surface primer, and then for the clapboards, I used Tamiya Flat White, for the roof, Tamiya Park Green, and for the front door, just Tamiya Flat Red. I think the colors came out spectacular. The airbrush overspray is light enough to let the black primer come through, making the sticks look dirty and weathered.

I love it when things start coming together!

IMG_2845.jpeg


IMG_2851.jpeg
 
Thanks scarflikeness !

Today's update. I'm actually done! Here's what I did...

I added in the boards over the windows.

I didn't end up using the stir sticks like propsculptor advised. I just didn't have any on hand, and during my quest for popsicle sticks I bought all kinds of different sizes. Including a thousand 4.5" ones... so, I figured I'd start going through that supply haha.

I primed the sticks black, then washed them and scrubbed them with a wire brush to get a nice, aged and weathered look.

Here's where I screwed up and strayed from "replica prop". This was a pure accident due to the fact that I was lazy and didn't have my phone or the printed photo near me for reference purposes. I was going off of memory and boy was my memory wrong.

Here's what they are supposed to look like.

IMG_2802.jpeg


Instead, I splintered them up, all very uneven, and not straight up and down at all like the film version. I will say that it does add a level of creep factor to it that I really like though.

IMG_2873.jpeg


Since I'm also adding lights to this, I decided to put wax paper behind all the windows to serve as a diffuser. I simply hot glued the wax paper from the back.

IMG_2862.jpeg


Finally! The columns! Okay I think this could have been a no-brainer, but I made it more complicated than it should have been. I took some 1/2" copper pipe, and paper mached over that. In hindsight, I should have just rolled up some paper to the desired thickness, taped it, and then paper mached it... oh well.

These columns are solid though, and don't weigh THAT much. So... if I do this again, I'll try the rolled paper route.

To get the slight curvature of the overhang, I took a piece of styrene, and gently bent it to the desired level of roundness... I then just hot glued the sticks on... again, if I were to do this again, I'd paint the undersides. Ah well.

IMG_2875.jpeg


Final pics and a video to show the lights coming in a bit!
 
Here are the lights in action - I had a color-changing LED lamp from something, and it was perfect for this!


And here are pics of the final product!

IMG_2901.jpeg


IMG_2914.jpeg


IMG_2900.jpeg


I made a more robust build video that I'll share tomorrow! This was a ton of fun, and it actually got me thinking about doing a version of this that looks like my own house. How fun would that be? Haha.
 
Bam, here's the build video!


So what did I learn:

1) I love the Elmers glue paper mache... glue. It's clean. It's gluten-free. You can't go wrong!
2) As I look more and more at the screenshots it looks like the sticks are different widths, like the shingles are different widths from the sticks over the center gable window (not the boards, those are coffee stir sticks!).
3) I don't need copper pipes for the columns. I don't know what I was smoking there.
4) Getting a brighter light source. I just used a cheap LED thing that I got from God knows where. It works, but it could be brighter for sure.

Overall, this project cost me maybe $20 in glue and popsicle sticks (actually maybe $10 in materials, and another $10 in different sized popsicle sticks as part of my "research" phase). The time commitment, mostly the drying of the glue, but this was pounded out over the course of three days. It probably could have gone faster but... well... kids... day job... you know. Stuff.

Okay, back to my other projects ha.
 
Hi folks! I think I've figured out a way to make this into a kit that would really only require hot gluing all the pre-made panels together. If I offered something like that up for sale for like $75 + shipping would any of you be interested in that?
 
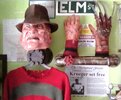
Think the house may be my next project to add to my Freddy Krueger costume display area here's my current display
 

Attachments

  • IMG_20210816_144148_kindlephoto-2948257.jpg
    IMG_20210816_144148_kindlephoto-2948257.jpg
    203.8 KB · Views: 162

Your message may be considered spam for the following reasons:

If you wish to reply despite these issues, check the box below before replying.
Be aware that malicious compliance may result in more severe penalties.
Back
Top