Nightmare in Silver Cyberman

lochsloy

New Member
Hi folks,

I've been working on a Nightmare in Silver Cyberman for a while now and will use this thread to update my progress. My first task will be to document what I've done so far and then I'll post progress as I move along. I'm not the fastest builder out there so there may be weeks or months where no progress is made but it will eventually get done.

The first thing I tackled was the head. If I can't get it right, there's no point in working on the rest of the body.

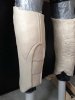
I took measurements of my head with my glasses on first to make sure the head I was going to build would fit over the head I already have. I then roughed out the shape of the head in clay so it would be big enough.
Apologies for the way some of the photos appear as attachments. I'm not sure what I did to mess things up and I can't figure out how to fix them.

View attachment 336190
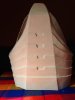
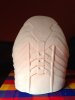
Next, I started working on the overall shape and adding the details.
View attachment 336191 View attachment 336192 View attachment 336193 View attachment 336194
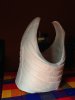
After fiddling around way too much on the details, I decided to start making the mould. I used silicon followed by a plaster of paris (with burlap) mother shell.
cyberman-head-13.jpgcyberman-head-15.jpgcyberman-head-17.jpg
I decided to make the mother shell in two pieces so the ear parts wouldn't cause problems when de-moulding.
cyberman-head-18.jpgcyberman-head-21.jpg
The two halves came of nicely and fit back together with no problems.

cyberman-head-23.jpgcyberman-head-24.jpg
The silicon came off of the clay very easily and fits nicely into the mother shell, ready for making the head.
cyberman-head-26.jpgcyberman-head-28.jpg
 
Last edited:
After the face, I fixed up the sculpt so the cut-outs I made were filled back in and proceeded to make the silicon mould and mother shell for the back of the head.
I didn't have to make the mother shell in two pieces because there were no parts sticking out.

2013-12-04 20.29.41.jpg2013-12-05 08.03.41.jpg


After de-moulding, I used AquaResin to create the final pieces from the front and back moulds.

2013-12-22 10.18.37.jpg2013-12-22 10.18.51.jpg2013-12-24 16.32.41.jpg

I've done a fair bit of clean up and have basically rebuilt the part around the neck. The two pieces fit together snugly and I'm pleased with the way the turned out considering this is m first time working with these materials.
 
Here is the cleaned up head (without the "handles").
2014-06-11 09.15.41.jpg2014-06-11 09.16.01.jpg

I've tested the fit and my head fits and it will be no problem wearing my glasses inside the helmet.
I think there will be sufficient room for a small fan too. My plan is to cut a hole in the "crest" recess which should be hidden by the additional details I have yet to add.
 
I started on the lower torso next. The first blocking out of the details was off. The sections were too big and were not low enough.
cyber-1.jpg
so I started again and got a layout that was a better layout.
cyber-4.jpg
Then it was a matter of slopping on the silicon, then a mother shell and I was ready to create the final piece out of aqua-resin.
cyber-5.jpgcyber-6.jpg
The back of the torso was next. As with the front, I ended up having to redo the details since the first attempt didn't look right. I was happier with the second attempt.
cyber-7.jpg
cyber-8.jpgcyber-9.jpg
After making the front and back torso, I tried them on for fit and found that it was too tight. The tape body cast I made must have shrunk. There is no other explanation.
Time to improvise. I used cardboard to create an extension that joined the front and the back into a single unit. I can just squeeze the resulting unit up over my hips but the resulting torso is a good fit. I am going to cut down the sides so they will be two separate pieces when I wear it but for now, I'm going to finish off the details and fix up the join as a single unit.
Here's what it looks like so far:
cyber-extra-3.jpgcyber-extra-2.jpgcyber-extra-1.jpg
Is it just me or does the first photo look like a sand worm heading for a spice blow?
 

Attachments

  • cyber-10.jpg
    cyber-10.jpg
    45 KB · Views: 81
  • cyber-6.1.jpg
    cyber-6.1.jpg
    1.6 MB · Views: 101
  • cyber-6.2.jpg
    cyber-6.2.jpg
    1.5 MB · Views: 89
  • cyber6.3.jpg
    cyber6.3.jpg
    1.6 MB · Views: 102
Thank, P4rt4dox86, I've never tried a build like this before and I'm getting a lot of useful information from the forum and then winging it when I make mistakes or something goes wrong.
I'm not sure how the picture of the lower leg got in there. That was supposed to be in the next post. Eventually I will catch up and update posts will slow down.
 
Last edited:
The legs were started next. I sculpted both at the same time so I would have a greater chance of getting them symmetrical.
cyber-10.jpg cyber-11.jpg


Then it became a bit more difficult to work on the Cyberman. I broke my wrist playing soccer.
So what do you do when you are working on a Cyberman and have a cast on your arm?

cyber-18.jpg cyber-19.jpg cyber-20.jpg cyber-21.jpg

But a broken wrist wasn't going to stop me. It slowed me down but I managed to get the lower leg pieces ready for silicon with just one hand.

cyber-22.jpg
 
Last edited:
After I got my cast off, I was able to proceed with silicon and the mother shell.

cyber-12.jpg

After the mother shell was set, I removed it and took the silicon off in a single piece.

cyber-13.jpg

The goal was to cast a single piece and then cut it along the sides to create front and back pieces that match up perfectly. I wrapped the mother shells together to make sure they stayed aligned and didn't move while I was putting the aqua-resin inside.

cyber-14.jpg cyber-15.jpg

The leg pieces after de-molding and cutting them in two.

cyber-leg-5.jpg

They are fairly tight fit and they may be a bit long. I will deal with the length if necessary when I create the shoes.

cyber-leg-6.jpg cyber-leg-7.jpg

I'm currently working on filling, sanding, filling, sanding, repeat ad nauseum all of the imperfections. When I get tired of that, I'll say it's good enough.
 
A while back (before the broken wrist), I started working on the voice mod. The Nightmare in Silver has a deeper, more threatening voice than the previous model which I think was fed through a ring modulator voice mod similar to the one that is used for the Dalek voices.

After a bit of research, I decided to go with an Arduino with a Wave Shield. I soldered all the components of the Wave Shield together and surprisingly, it worked properly (this is my first time soldering components so I was pleasantly surprised).

Here's the Arduino with the Wave Shield:
cyber-17.jpg

I jury-rigged the speaker and microphone and tried it out after a few modifications of the program running on the Arduino.

[video=vimeo;98866771]https://vimeo.com/98866771[/video]
 
I've been working on the details of the "handles" for the Cyberman head. I wasn't happy with my first attempt so I started again. The details inside the handle were a pain. I tried various methods to create the details without success but then tried metallic duct tape. I wrapped it around some wooden dowelling several times and then cut out the indent. I then sanded the raised portion to enhance the contrast with the indents.

cyber-head-3.jpg

I had sanded the openings in the metal tubing but was not happy with it because it didn't look right so I re-made them using a dremel tool with a cut-off disk.
I used either plastic connectors or wooden cowling to connect the pieces.

cyber-head-2.jpgcyber-head-1.jpg

I'm still not happy with some of the details but trying to fix them would take a lot of time that I'd rather spend on making the rest of the Cyberman. I've already spent too much time on them by restarting them.

I'm now working on finishing off the exterior of the head by filling and sanding the imperfections. I'll attach the handles once the head is painted to avoid having to mask out the handles when painting the head.
 
Some more progress:

I've been trying out some silver paints to see what sort of finish looks best. Each segment is a different silver/platinum/steel spray paint. It's getting expensive just to test paints, let alone buying the final paint! It turns out that none of these paints is what I want. I ended up choosing Duplicolor Chrome.

test-1.jpg

I've added a coat or two of primer to the head.

head-2.jpghead-1.jpg

I've also been working on the forearms. This is my first attempt. I went through the whole process to create the final piece and then took a more critical look at the result. It was twisted and after looking at video and photos again, I determined that it wasn't even close to what the Cyberman's forearm looks like. So I started again. All is not lost though. I'm using the finished piece for tests of finishing and paint so I don't mess up a good piece of the armour if the results aren't satisfactory.

forearms-2.jpgforearms-1.jpgforearms-3.jpg

I decided to build both of the new forearms at the same time. The following photo shows the silicon moulds in the mother shells after removing them from the clay sculpt. The clay got a bit squished during the removal. I'm a lot happier with the new forearms.

forearms-4.jpg
 
Would you be interested in selling a full set of armor? Just the raw pull doesn't need to be painted. If so could you PM me a price?
 
Thanks for the compliments davidnagel, You say you can't wait but I'm afraid it's going to be a long wait based on how slowly I'm going on this build :) Patience is a virtue!

IamION, I'm not sure that the cyberman will fit too many people as is. I'm 6' 1" and 200+ lb with a long torso. Since I'm building it for me, I'm making it so it is a tight fit on me with everything sized for my proportions - shins, forearms, biceps, and head. About the only piece I think would fit people with no problems is the head - I have a big head (no comments from the peanut gallery needed thanks). It will probably take me at least another year to complete and I already have plans for the next build which will involve building techniques I haven't tried on the Dalek and Cyberman builds. So making copies won't be high on my priorities list. Besides, I don't want to get into copyright issues with the BBC :)

On to the build... A big roadblock for me was figuring out how to get into the lower torso. I had to split it so I could get in and it took a long time to figure out the best way to join the two halves together. I split the torso along one of the lines and then built a lip so the two pieces would fit back together nicely. I then added what look like hinges (but they don't work like hinges) so I can insert a metal rod through the hinges to keep the two parts firmly together. The are a bit bulky - this is going to be heavy.

cyber-2.jpgcyber-3.jpgcyber-1.jpgcyber-4.jpgcyber-5.jpg

Once I got the lower half sorted, I started on the upper torso. The first step was to build one out of foam and hot glue. I did this to get the sizing right. I made it as tight to my body as possible but also had to leave enough space for it to fit over the lower torso. Finding the right proportions was a bit tricky and involved numerous adjustments to get the curves and general look right.

cyber-6.jpg

I then started sculpting on top of the foam. I quickly discovered that the foam wasn't strong enough to hold its shape with the weight of the clay so I added structural reinforcements.
cyber-7.jpg

As you can see, I'm keeping the upper torso over the lower torso as I sculpt so the shape won't get distorted. It should fit over the lower torso quite nicely when I'm done.

Sculpting was a challenge since I'm just basing the shape on screen shots that I have printed out. I blocked things out very roughly and then started adjusting as I compared the results with the photos.

cyber-8.jpg

As you can see in the above photo, the right side of the torso (the left of the picture) is more accurate than the initial blocking that you see no the left side of the torso. There is still a lot of adjusting to do and the end results that follow took several nights to get to the point where I was satisfied.

cyber-10.jpgcyber-9.jpg

Eventually I ran out of things to fiddle with. I'm still not entirely satisfied with the spine but I had to move on. Silicon is being added now.

cyber-11.jpg

I've started on one of the forearms by building a foam prototype but don't want to get too far because I need the upper torso before I can finalize the shape to make sure I have a good range of motion for my arms. That brings me up to date on progress so far. Hopefully I'll have a friend for my Dalek to play with within a year's time :)
 
Wow! This is excellent work! There is a pdf of the Cyberman build out of foam that might be worth a look. It's on the rpf here... Can't remember the guy's name but his work is pretty good.

its fun figuring things out on your own though, isn't it?

Hurry up! :)
 
Thanks Grimwood. I don't want to rush things - that's when I start making mistakes. I'm going as fast as I can! :)

I'm not sure whether it's more fun to build or to wear the finished product. Dalek Clifton is a LOT of fun and I'm pretty sure I'll have as much fun in the Cyberman although I have a feeling I'll be a lot hotter and more uncomfortable in the Cyberman. I have a seat, a fan and cup holders inside my Dalek :)

I'm really enjoying the sculpting and it is very satisfying building something from scratch.
 
It's been a while since I last Progress has been slow - I got stuck trying to figure out what to do for the elbow and Dalek upgrades took over.

I didn't like the finish of the head so I did some more sanding and filling and am much happier with the finish now. The photo doesn't really show it but it is much nicer - trust me :)

head-1.jpghead-2.jpg

As for the elbow and knee, I ended up sculpting an inverse pattern and then adding silver tinted silicon first, then black, then the untinted silicon. This process took a LONG time. To prevent drips and keep the layers even, I ended up rotating the piece horizontally until the silicon set. That's a lot of time just twirling a piece of clay. I put the time to good use though - I binge watched a couple of shows while turning.

elbow-1.jpgelbow-2.jpgelbow-3.jpg

And the knee...

knee-1.jpgknee-4.jpgknee-2.jpgknee-3.jpg

Note to self: while the silicon is still setting, don't knock it over because then you will have to start all over again.

The next piece I'm working on is the upper arm. I first made a foam template to get the right size and shape. I then cut out a strip to make it a bit smaller to compensate for the clay that goes on top of the foam. Lots of fiddling with clay has given me the left upper arm that is almost ready for silicon.

upperarm-1.jpgupperarm-2.jpg

I've also spent many hours working on the upper torso. After weeks of sanding and filling and I'm finally getting closer to having the finish I want. No photos for this work. You wouldn't be able to see much of a difference in any before and after comparison. I think I've got to stop trying to make it perfect if I'm ever going to finish this :)
 
More progress: I have made the mould, cast and pulled the left shoulder. I've just finished sculpting the right shoulder (I'm holding the left) and am almost ready to put the silicon on it (I still have to adjust the curves of a few lines and double check some of the dimensions so they are the same on both pieces).

While working with the silicon, I'm planning on making a mould of the finished head so I can make a second one without having to do all the sanding and finishing I had to do on the first one. I hope to use less AquaResin so it will be lighter. The first one can then be turned into a "Handles".

bicep-1.jpgbicep-2.jpgbicep-3.jpg
 
This thread is more than 5 years old.

Your message may be considered spam for the following reasons:

  1. This thread hasn't been active in some time. A new post in this thread might not contribute constructively to this discussion after so long.
If you wish to reply despite these issues, check the box below before replying.
Be aware that malicious compliance may result in more severe penalties.
Back
Top