Hi Guys!
To Mr. Tony & Mr. Salzo,
Any news on the resins kits? Still very much waiting for it...can't really move forward with the build without those amazing pieces.")
Hey!
It's coming!!! very close!
http://www.therpf.com/showthread.php?t=236309


Hi Guys!
To Mr. Tony & Mr. Salzo,
Any news on the resins kits? Still very much waiting for it...can't really move forward with the build without those amazing pieces.


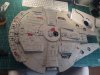
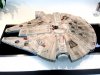
Finished the second step of Weathering and will start Modulation of individual panels an streaking on the weekend. I have a feeling that the color is a tad to warm.. depending on what light condition you have the model really changes color all the time. can't decide if the color is right or not
Cheers, still not sure about the "Tan" tone...been in agony whole day as what to do...I might mist over a thin layer of white and see what that does. Buy the way, got the Han fig from you and TrongodNice paint job! I like the weathering of the red panels!
, will put some primer on later and post.


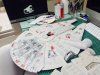
As promised some pics showing the Han Solo RP Model from Trongod/Tony
Comaprison to the Wizards of the Coast Figures
Brillant Detailing on the Han from Trongod /Tony compared to the Gamimg Figure
The quallity of the RP parts are simply great.
Had to alply a thin Coat of Tamiya Matt White/ Tamiya Matt Earth/Tamiya Medium Gray to get the right hue that I am looking for, might not show up in the pics but in real life it just looks right.
Still a lot of work to be done, streaking and Modulation of Panels and also on.
More parts from Randy... and Steve thinks I am going MAD and simply sits there...
, never mind its a hunka junk anyway.


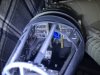
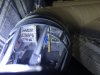
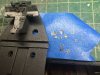
 Thought I'd share. I've started my second Hasbro Falcon. Starting with the cockpit. Dressed up the Shapways parts with F-18 fighter jet cockpit photoetch upgrads, gives it more depth. Still figuring out a few things but here's the WIP.


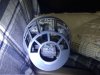
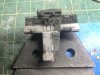
 and yea!!! they went brittle and broke off. Had to redo it all with epoxy, now its ok. I am still sort a pondering on how the frack everything is gonna fit in to the falcon, what I mean is the Fibers coming out of the upper part,
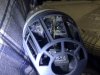
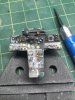
Cockpit done. 128 strands of .275mm fiber and 3D printed upgrades from FZ6 and 43 hours of my life.