iowadude41
Active Member
Hey everyone,
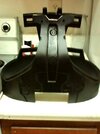
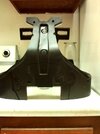
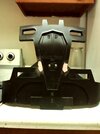
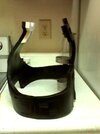
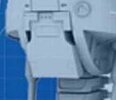
Just posting an update on my T-800. I'm working on the chest cavity, and it's coming along great, but slow due to the freaking cold weather here in Iowa. I only get a couple hours here, and there when I can stand working working in the outside garage. I created the front and back plates, and glued them together. Not perfect, but looks pretty good. I put a lower pvc beam on the bottom to plates to give it support once mounted, but looked crappy, so took it out, and now using a plastic strap that goes around the support pole going up the inside. This will leave plenty of room to add all the pistons, hoses, and other things. I'll attach a few pics to show you my progress, but I also have a general question. Toward the lower section of the chest plate, there's a mechanism. I'll attach a pic for that as well. I need to know if it moves in and out or if it is stationary? Also, is it one piece or two? I have paper cut outs for templates, and it's in 2 pieces, top and bottom. Any help would be appreciated as I'm trying hard to make everything movie perfect.
Thanks