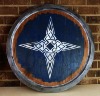
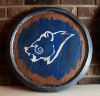
You've seen plenty of Skyrim shields, but here are mine anyway. =) I made a 24" Dawnstar for me and a 18" Windhelm for my son.


You can check out my blog for detailed instructions and more pictures, but since you guys are advanced I'll provide a quick synopsis video and a few pictures.
I scaled it from in-game pictures to a 24" diameter.

I sandwiched half inch foam between 1/8" plywood sheets.
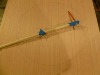
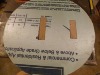
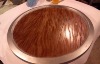
I made a homemade projector to draw the wood grain, but I would have been better off to print a few letter sheets off and tape them together.
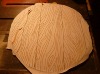
I used spray glue on the paper and let it sit fifteen minutes so it was just tacky enough to stick to the wood, yet still easily removed. I did this for both plywood pieces, mirroring the pattern so the grain is consistent front to back.

I used a router and v-groove bit to trace the wood grain lines.
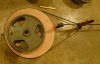
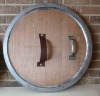
I recessed half inch wood blocks into the foam for the arm strap and handle. I should have bought my handle first, but luckily it just barely fit.

I used a scroll saw to cut the plywood into boards, then glued the plywood and foam together with gorilla glue. I used 1/8" hardboard as edge banding to cover the exposed foam.

I used a car engine belt and clamp to glue the edge banding.

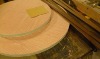
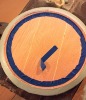
I cut half inch strips of polystyrene and glued it to the face of the shield vertically to act as a guide for the body filler to form a consistent metal edging.

Painters tape served as a guide for the inner ring. Body filler will stain the wood.

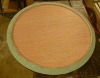
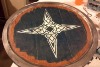
I primed and painted the edging with silver metallic paint before staining the wood.

I used a black wash on the silver to age it.

The arm strap is scrap leather with screw in snap buttons. The strap and handle are screwed into the wood blocking embedded in the foam.

You can check out my blog for detailed instructions and more pictures, but since you guys are advanced I'll provide a quick synopsis video and a few pictures.
I scaled it from in-game pictures to a 24" diameter.
I sandwiched half inch foam between 1/8" plywood sheets.
I made a homemade projector to draw the wood grain, but I would have been better off to print a few letter sheets off and tape them together.
I used spray glue on the paper and let it sit fifteen minutes so it was just tacky enough to stick to the wood, yet still easily removed. I did this for both plywood pieces, mirroring the pattern so the grain is consistent front to back.
I used a router and v-groove bit to trace the wood grain lines.
I recessed half inch wood blocks into the foam for the arm strap and handle. I should have bought my handle first, but luckily it just barely fit.
I used a scroll saw to cut the plywood into boards, then glued the plywood and foam together with gorilla glue. I used 1/8" hardboard as edge banding to cover the exposed foam.
I used a car engine belt and clamp to glue the edge banding.
I cut half inch strips of polystyrene and glued it to the face of the shield vertically to act as a guide for the body filler to form a consistent metal edging.
Painters tape served as a guide for the inner ring. Body filler will stain the wood.
I primed and painted the edging with silver metallic paint before staining the wood.
I used a black wash on the silver to age it.
The arm strap is scrap leather with screw in snap buttons. The strap and handle are screwed into the wood blocking embedded in the foam.
Attachments
-
 P1030819%2Bcopy.jpg51.6 KB · Views: 243
 -
 P1030822%2Bcopy.jpg43.1 KB · Views: 304
 -
 P1030176.jpg25.1 KB · Views: 93
 -
 P1030186.jpg39.2 KB · Views: 97
 -
 P1030187.jpg38.5 KB · Views: 132
 -
 P1030450.jpg27.5 KB · Views: 92
 -
 P1030462.jpg28.9 KB · Views: 123
 -
 P1030470.jpg27.4 KB · Views: 126
 -
 2015-06-06_11-47-28_248.jpg36.7 KB · Views: 126
 -
 2015-07-08_23-35-56_952.jpg30.4 KB · Views: 79
 -
 2015-07-11_09-52-25_820.jpg41.2 KB · Views: 139
 -
 P1030827.jpg41.7 KB · Views: 1,973
Last edited by a moderator: