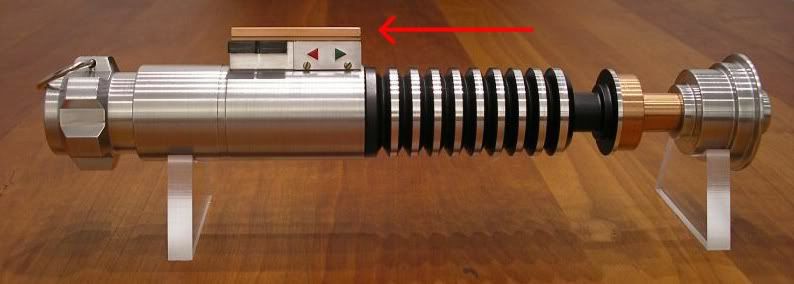
My ROTJ Luke hilt

GeneralFROSTY

Master Member
RPF PREMIUM MEMBER
This hilt was purchased pre-owned by another RPF member (thanks again for such an incredible price) and, from what I have been told, is from the run offered by RPF member Nicksdad.
The hilt arrived unpainted and unassembled, so I based my finish off of images I found online.
While I wasn't going for a particular look in general, I wanted to to the nicest paint job withing my skill limits.
Thank you to those who offered input on painting techniques.
The hilt was airbrushed using Model Master enamel paints and standard Testors brand copper.
Flat black coats, finished off with flat clearcoat, then a stiff paper towel dampened with thinner was used to wipe off the raised areas for very clean black recesses.
Overall I'm pretty satisfied with it - the weight of it feels great when held and I look forward to getting a display stand.
Been wanting one of these for many years but always turned off by the high prices they typically go for - especially the MR versions. I am very happy to have gotten one for an exceptional price.
Thanks again!
56e55981.jpg

5be3c459.jpg

DSC_0098.jpg

DSC_0100.jpg

DSC_0101.jpg

DSC_0103.jpg
 
That came out looking great! The clear coat certainly made it look stellar.

For your last step, did using paint thinner and wiping off the rings take any of the black in the recessed part? Did you just paint it all black and wiped it off with paint thinner? Certainly is better than my using sandpaper method.

What I did was fold a paper towel over and over until it became 'stiff' then dampened it with thinner.
I pressed the paper towel against the raised area and rubbed the paint right off - it only came off the flat surface of the raised area and did not affect the recessed parts. If the paper towel were not stiffened, or soaked with more thinner then I suppose it would have run into the recesses and rubbed that out too.
The method worked like a charm and I was grateful to have gotten it right on the first try.

It came out looking great! I'm going to use that method for when i finish my stormpath saber. Thanks!
 
GF You are a maniac! :thumbsup Nice work.

I love how NicksDad's copper section breaks down to avoid taping. Brilliant

Did you leave the pommel as a friction fit or glue it?
 
GF You are a maniac! :thumbsup Nice work.

I love how NicksDad's copper section breaks down to avoid taping. Brilliant

Did you leave the pommel as a friction fit or glue it?

I was relieved that the whole thing was designed to break down the way it did. To say it was a big help during the painting process is an understatement.
I figured I didn't need to glue anything since it held together quite well once I tightened the pieces together. It's a display piece, so it's really overkill to use glue for those parts.
For the copper part, I first airbrushed two coats of gloss black enamel paint, then several coats of standard Testors brand copper enamel. Finished it the part off with a gloss coat.
Thanks for the compliments!:)
 
Hi there,

Nice paintjob!!! You may want to consider painting the top part of your controlbox in a copper color as well . . . like
in the Star Wars Archive Book and as seen here in an early picture of my Luke's ROTJ version:


LukeROTJ02.jpg


Meanwhile I have replaced the incorrect D-ring with a custom made Tri-Ring and had it also weathered to resemble
the darker Tri-Ring on Luke's lightsaber in the SW Archive Book.


-Chaim
 
Last edited:
I had seen photos of the control box with and without copper. I went without the copper because I preferred the look. If I change my mind someday, it will be easy to add the color.
BTW - where did you get those display stands for the saber? I could really use those for mine!
 
OK. Sounds like a plan.

Sorry mate those stands in the picture belong to the previous owner I'm afraid. I've forgotten his name so couldn't give him the proper photocredit.
But it's a rather simple design to make from perspex and you have the curve of your lightsaber to use.

-Chaim
 
What I did was fold a paper towel over and over until it became 'stiff' then dampened it with thinner.
I pressed the paper towel against the raised area and rubbed the paint right off - it only came off the flat surface of the raised area and did not affect the recessed parts. If the paper towel were not stiffened, or soaked with more thinner then I suppose it would have run into the recesses and rubbed that out too.
The method worked like a charm and I was grateful to have gotten it right on the first try.


Years ago someone did a big run of ROTJ Luke saber blanks as a kit. I think everyone painted that area exactly like that. It works great.
 
yeah it turned out nice. I'm usually lack confiedence to do things like this myself because I'm always afraid of messing things up so I'm relieved I achieved pleasing results.
I just wish I had a nice display stand for it!!!
 
Back
Top