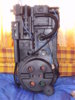
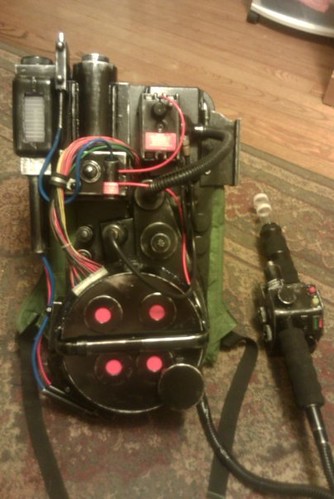
I don't expect too many comments on this one as I'm not a pro builder by any means and I'm sure there have been plenty of Proton Packs built and shown here that are 100% better than mine. Still, I thought I'd show it off all the same. As you can tell from the Photos it's not 100% accurate,but my goal isn't to make a screen accurate pack but to build something and have fun doing it. I've been working on this since January and it's almost finished. Just need to wait on a few parts on order.
You are using an out of date browser. It may not display this or other websites correctly.
You should upgrade or use an alternative browser.
You should upgrade or use an alternative browser.
My Proton Pack Build (Work in Progress)
- Thread starter Jesso
- Start date
-
- Tags
- ghostbusters
bustermedic
Well-Known Member
Looks great to me! I have a pack that's a hybrid between GB1 and GB2 styles for the simple fact I don't like the straight up and down thrower mount and GB1...well...the packs just look better to me for some reason. The only way to know that you're doing it right is to have fun while you do it. As long as you're happy with it, really and truly what else matters?!?! I see your wand looks like mine... a wiring NIGHTMARE lol
Looks great to me! I have a pack that's a hybrid between GB1 and GB2 styles for the simple fact I don't like the straight up and down thrower mount and GB1...well...the packs just look better to me for some reason. The only way to know that you're doing it right is to have fun while you do it. As long as you're happy with it, really and truly what else matters?!?! I see your wand looks like mine... a wiring NIGHTMARE lol
I'm having a great time putting this together, sure it's been frustrating at times and I've had to resort to buying items and customize/modifying it for my needs but overall I'll be quite satisfied with the end product. In case anyone is wondering, aside from the resin parts I bought from Multimediamayhem the Majority of this pack was built from items I bought from a local Dollar Store. The parts are made out of lightweight wood mounted on a Teflon chopping board. Yeah I had to be really creative. A couple of people suggested a Vacuum Pack shell but they looked too flimsy and I can't really afford a Fiberglass shell mounted on an aluminum Motherboard.
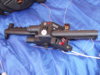
You are so right about the wand. It would've been easier to buy a Jupiter Electronics Thrower kit but again for Budget reasons I've had to go with an alternative lighting setup. In this case what you are looking at is a 5 LED VU Meter that has the LED output mirrored so that when the sound effect is activated the Bargraph Lights up to it. If you ever saw Knight Rider you'll know what I'm talking about.
I'd like to see your pack, Packs that are made differently Interest me a lot and as far as I'm concerned that's the way they are suppose to be. If you think about it the movie packs were supposedly hand made so each one would have slight variations.
bustermedic
Well-Known Member
I'll see if I can get some pics up of my pack and possibly a video for ya. Getting started on some other things GB related for the Halloween season, but I'll get on it ASAP for ya!
indiefilmgeek
Sr Member
It's looking good! I built one for my daughter years ago out of found parts and some battery pack powered LED x-mas lights - it was a very fun project!
My big suggestion is to find some silver Rub-n-Buff and just lightly brush it (with a foam sponge) against some of the edges. It's a fast and cheap way to make the pack look like it's been bumped and battered a bit from wear. If I can find a picture of Tia's pack, I'll post it.
Keep building!") )
)
My big suggestion is to find some silver Rub-n-Buff and just lightly brush it (with a foam sponge) against some of the edges. It's a fast and cheap way to make the pack look like it's been bumped and battered a bit from wear. If I can find a picture of Tia's pack, I'll post it.
Keep building!
)indiefilmgeek
Sr Member
Found a couple pics... It's hard to tell in these poor pictures, but the silvered edges really give this type of piece a 'lived in' look. Highly recommended.
This build was for a 6yr old, so it's pretty tiny and not at all screen-accurate. It probably cost me under $50 to make the whole thing.
This build was for a 6yr old, so it's pretty tiny and not at all screen-accurate. It probably cost me under $50 to make the whole thing.
This build was for a 6yr old, so it's pretty tiny and not at all screen-accurate. It probably cost me under $50 to make the whole thing.
That's okay, I love packs that are not 100% screen accurate, this shows a lot of creativity which is what I enjoy more than the screen accurate packs. Don't get me wrong, I like those too. I'll definitely look for that Rub-n-Buff, you might've noticed some spots where I didn't have time to perfectly sand it, so that would be good places to add a bit of silver, if I can't find the stuff I think I still have some model paint that might do the job.
LuciousFox
Active Member
Hi ive built quite a view packs and yours is looking very good my friend i also should add that if you have a hot glue gun that you should add some welds aroung the pipes and aslong as your happy with it then it does not mater since not many people apart from gb fans know what is right or wrong
Hi ive built quite a view packs and yours is looking very good my friend i also should add that if you have a hot glue gun that you should add some welds aroung the pipes and aslong as your happy with it then it does not mater since not many people apart from gb fans know what is right or wrong
I was thinking the same thing, Having used hot glue guns before I know they can be rather messy to apply if your not careful. I was thinking of using JB weld epoxy for some places as it's the right color and will blend in better. I'll have to go through my reference pics again to see where I need to do this. Thanks for the info.:thumbsup
Its look great, keep going on it! and don't sweat inaccuracies or anything, the fans can't tell the difference, they are just excited to see a pack
In my opinion, inaccuracies is what makes a Proton Pack unique from any other packs that may be built.
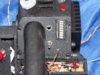
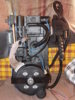
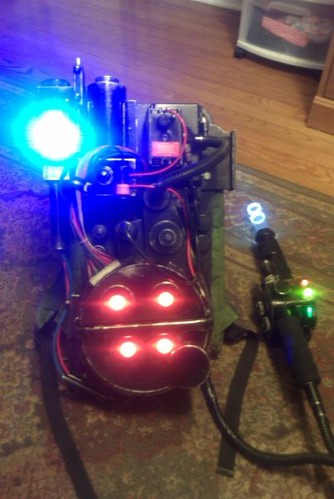
Here's an update on the pack, just about finished.


You'll note a few updates. For one the lenses are all installed, so are all the necessary electronics and I've added some weld texture. As far as wear and scraps go I had to guess, mostly I put them in spots where I didn't have time to properly sand or some other existing Defect. Had an issue with the gun. One of my switches turned out defective and without time to order a new one I installed a push button. Push that and the Pack Vent sound effect goes off. I also added two switches to the pack itself that turns on the VU Meter (had to re-work that as it wasn't sensitive enough to pick up the sound chip) and the sound Chip. All that remains are the decals. I'm debating whether to order a set or just print off some black and white ones for now and get the actual decals another time.

Daniel Nelms
Sr Member
This looks great man! After years of dreaming about it I have finally started working on my own. I am using a combination of a vacuum formed shell and 3d printed parts, and lots of bondo!
I'm trying to figure out what to do for the motherboard, I don't own a pickup truck to buy a large piece of plywood or a jigsaw to cut it with. I've seen some metal ones on ebay going for around $50 plus shipping but I am desperately trying to keep my costs down as low as possible.
Do you think a thick piece of foam board might work?
This looks great man! After years of dreaming about it I have finally started working on my own. I am using a combination of a vacuum formed shell and 3d printed parts, and lots of bondo!
I'm trying to figure out what to do for the motherboard, I don't own a pickup truck to buy a large piece of plywood or a jigsaw to cut it with. I've seen some metal ones on ebay going for around $50 plus shipping but I am desperately trying to keep my costs down as low as possible.
Do you think a thick piece of foam board might work?
Damn, I hadn't realized someone had posted a coment here. Sorry about that. I have know way of knowing if you continued to work on your pack but I'll tell you what I did. I used two teflon cutting boards joined together (One was cut in Half in order to get the 25 inch motherboard length) with brackets for mine. Mostly because I needed the strength as I plan to keep this one around for a few years. Foam might work depending on the materials you plan to use for the rest of the pack. Also some spray paints have a tendency to break foam into it's basic componants so experiment on a bit of scrap first.
Daniel Nelms
Sr Member
Jesso I did finish it and I think it turned out pretty good. It's actually hanging up on my wall right now.
I was able to complete it before halloween and wore it to my daughter's school where I hosted both of their parties as well as that evening. It was a big hit
I used the studio creations shell, 3d printed parts, bondo, apoxscult, etc. I am using my matty wand for now until I feel motivated to build my own. The electronics worked out fine except I got in a hurry and mounted/glued in the blue ladder LEDs upside down I'll just pretend that I did that on purpose.
But yeah the build took well over a year but that was mostly due to lack of finances, I had to kludge it together little by little as time/money would allow but ended up with a complete pack and uniform. I haven't worked on any other GB stuff of late because I've been full steam on all the GOTG props and runs.
If you are using regular hobby foam I would recommend sealing it first before you try to paint it. Elmer's white glue mixed with a little water works pretty good for that and creates a smooth surface for the paint to stick on.
I was able to complete it before halloween and wore it to my daughter's school where I hosted both of their parties as well as that evening. It was a big hit
I used the studio creations shell, 3d printed parts, bondo, apoxscult, etc. I am using my matty wand for now until I feel motivated to build my own. The electronics worked out fine except I got in a hurry and mounted/glued in the blue ladder LEDs upside down
I'll just pretend that I did that on purpose.But yeah the build took well over a year but that was mostly due to lack of finances, I had to kludge it together little by little as time/money would allow but ended up with a complete pack and uniform. I haven't worked on any other GB stuff of late because I've been full steam on all the GOTG props and runs.
If you are using regular hobby foam I would recommend sealing it first before you try to paint it. Elmer's white glue mixed with a little water works pretty good for that and creates a smooth surface for the paint to stick on.
Last edited by a moderator:
@Jesso I did finish it and I think it turned out pretty good. It's actually hanging up on my wall right now.
I was able to complete it before halloween and wore it to my daughter's school where I hosted both of their parties as well as that evening. It was a big hit
I know the feeling, The first Halloween I wore my pack I was un prepared for the reaction I received from Adults and Kids alike. Someone yelled from a passing car "Don't Cross the Streams!" It was nothing though compared to the reaction I got when I went to my first Sci fi convention. I walked into a room sat down, and when someone mentioned there was a Ghostbuster in the room I got an ovation. Not to mention the amount of pictures being taken. The Ironic thing about it was that the convention was being held at a Hotel. My buddy and I used the elevator and while in it reinacted the scene from the movie.
I used the studio creations shell, 3d printed parts, bondo, apoxscult, etc. I am using my matty wand for now until I feel motivated to build my own. The electronics worked out fine except I got in a hurry and mounted/glued in the blue ladder LEDs upside down
I'd like to see your pack. I almost mounted the Blue strip upside down too. Good thing I made the power cell in such a way that it could be opened easily and I was able to flip it around.
But yeah the build took well over a year but that was mostly due to lack of finances, I had to kludge it together little by little as time/money would allow but ended up with a complete pack and uniform. I haven't worked on any other GB stuff of late because I've been full steam on all the GOTG props and runs.If you are using regular hobby foam I would recommend sealing it first before you try to paint it. Elmer's white glue mixed with a little water works pretty good for that and creates a smooth surface for the paint to stick on.
Mine took nine months give or take from research to completion. Money is a big issue with these packs and when you are on a budget (Like myself) you need to be creative. I used wooden Boxes in my construction because I wanted it to be strong and light weight (Batteries in the pack weighs about 30-35 pounds) and the wooden surface made it easier for the paint to cling to. Never used Hobby foam. Mostly because There isn't a store around that sells the stuff.
pbryantknight
New Member
I think that looks awesome man. Some good work gone into that.
Like many have said, Only someone that has taken the time to also build a pack will be able to notice very small inaccuracies. but that said, who cares. It looks great to me.
Peter
Like many have said, Only someone that has taken the time to also build a pack will be able to notice very small inaccuracies. but that said, who cares. It looks great to me.
Peter
Daniel Nelms
Sr Member
Jesso Yeah I posted some pictures in this thread http://www.therpf.com/f9/proton-pac...ndex3.html?highlight=proton+pack+daniel+nelms
Last edited by a moderator:
Similar threads
- Replies
- 0
- Views
- 414