My Newbery TARDIS build (Tom Baker era)

Whovian

Well-Known Member
I have been a Dr. Who fan since I first saw Tom Baker as 'The Doctor' back in 1974, in his first episode 'Robot'. I was 10, and hooked instantly. I've loved the show, and the character in all his regenerations (well, maybe not Colin Baker) ever since.

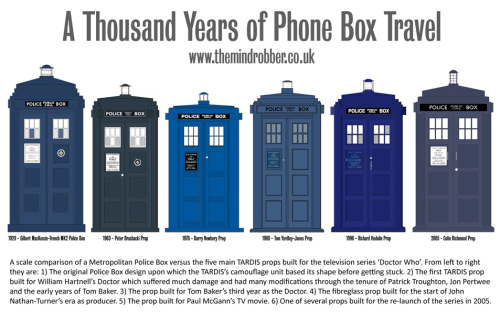
I have always wanted my own TARDIS, and while all the various versions have their good and bad points, the Barry Newbery model from 1976 was always my favorite (see image below, 3rd from left).
tumblr_lzgx0fecGO1qfrg47o1_500.png


So, since the Newbery TARDIS doesn't seem to get a whole lot of love, I finally decided to go ahead and build one for use as a garden shed (homeowners association be damned) :lol

This is an ongoing project, and I'll update the thread as I move forward.
 
Essentially, I researched all over the internet for specs, measurements, screenshots, etc., and came up with what I felt were the closest to actual measurements I was likely to find.

This is an image from zbignievhamson over at TARDIS BUILDERS, and it is the basis for my build (I'll be tweaking as needed).
 
The first step in construction, was to ready the location I chose for the TARDIS.

I put down 2" of fine gravel as a base, then put 6"x6"x2" concrete paving stones about 5' across. This should give it a firm, level base to rest on.

Next week starts actual construction.
 
I just watched the Masque of Mandragora, with the introduction of the secondary console room. I absolutely loved the wooden effect, with the writing desk style of the central console. I still like the multicolour brightness of the Dalek movie TARDIS though!
 
Location location location, that’s what they say, my backyard just looked like a backyard until I landed the TYJ Tardis there, now it has a curtain feel to it I think. And once you finish your Newbery Tardis and land it in your garden location you will see what I mean.

Good luck with your build, and good to see you have taken on the Newbery Tardis, very few Tardis builders take on that design due to it’s unique shape.

Will drop in from time to time to keep you motivated and to see were you at with your Tardis build.
 
OK, got a little side tracked building a TARDIS bedroom door for my 11 yr old son ;)

Today, I completes the base for the Newbery TARDIS. My diagram says 56" across, but it was closer to 54", as I was working with a 4'x8'x1/2" sheet of pressure treated plywood, with a 2x4 frame around that (when I did the diagrams, I had forgotten about the lip around the inside of the 2x4 frame to support the plywood). The notching of the 2x4's for the plywood to lay flat in along the edges was fun (not really), but the table saw I bought on Ebay for $60 worked like a champ.

Here's a few shots of the base. I put it on a bed of 6"x6"x2" cement paving stones, for stability.

Next week, I'll start on the corner posts.
 
Last edited:
Nice work with the base, are you going to seal the under side from water.

Thanks!

The pavers should keep it out of any standing water (there is also 2 inches of a gravel base for drainage under the pavers). It's hard to see from the photos, but the yard slopes back slightly so water usually drains out well behind the spot I picked for this. As for sealing, I'm not sure. The plywood and 2x4 frame are all pressure treated, so they should be okay. I'll figure out if I want extra protection later on.
 
Ok, got a little more done on my build.

After the base, the next step was to build the corner posts. I used 1x6x8 planks from Home Depot, and ripped them down to 1x4 and 1x5 using my table saw.

Each post consists of 3 1x4's and a 1x5, with 1/4 round molding at the center and each edge.

The corner pieces were glued together with Liquid Nails (awesome stuff), clamped, and screws. The screw holes will be filled with wood fill later on. The 1/4 round was glued in and nailed. Side note... the clams are from Harbor Freight, and while usually 5.99/ea, go on sale almost monthly at 1.99!

Next update will probably be the 3 non opening wall panels.
 
Looks great so far! Eventually I'll be tackling one of these 'garden sheds', and I learn something new from each build log I see. If you haven't checked out Philip Wise's excellent TARDIS build, you should for some inspiration:

http://www.therpf.com/f9/my-new-series-doctor-who-tardis-build-99629/

Since I did a lot of work on the screen-used McGann innards earlier this year I'm going for the McGann version of the box, which is a bit smaller like yours. It will be very interesting to see how one of the 'smaller' variants looks when finished, most of the recent builds are of the massive New Series props which are a little less convenient to break down and transport to 'park' next to our resident BTTF delorean at movie car charity shows.

--Brian
 
Ok, better late than never...lol. Time for a progress report.

I added a 3/4" sheet to the base to raise the floor up like I've seen in all the pictures online and in the dvd's (using my complete Tom Baker era set as reference). Also, got all four corners done and mounted.

Here's a shot from the front, showing the corner posts, and the back wall. The braces are temporary, just until the walls are up.
 
Here's the one wall, finished, on my dining room table.

The bevels are 45 degree, done with my trusty True Value table saw (I love ebay...lol). The door is about 82" high, and the panel sizes are just a touch smaller, but proportional, to the plans I posted earlier in the thread.
 
I don't know how well you can see it on the inside here, but on each side of the opening where the wall panels go, I put a 1x4 board all the way up, with just 1" showing from the outside. That gives the wall panels something besides the corner itself to connect to, and frames it nicely, looking very much like the Newbery prop.

The outside shots show it better. I know that last one looks like the panels get progressively smaller as you go down, but it's just the angle and my crappy cell phone camera.:$
 
The only problem I can see so far, is that my corner posts are about 1" too short. I have 6" above the wall panels, and I need to get the sign box as well as some additional wall above that before the roof begins, as seen in this image. I may have to make the sign box a little less in height than it should be, but there's not a lot I can do about that at this point. It'll work out.

EDIT: Check out post #41 for a picture showing the short posts. Turns out they are actually about 4" short, as they currently end right above the sign boxes. Remain calm... all is well ;)

index.php
 
Last edited:
This thread is more than 10 years old.

Your message may be considered spam for the following reasons:

  1. This thread hasn't been active in some time. A new post in this thread might not contribute constructively to this discussion after so long.
If you wish to reply despite these issues, check the box below before replying.
Be aware that malicious compliance may result in more severe penalties.
Back
Top