You are using an out of date browser. It may not display this or other websites correctly.
You should upgrade or use an alternative browser.
You should upgrade or use an alternative browser.
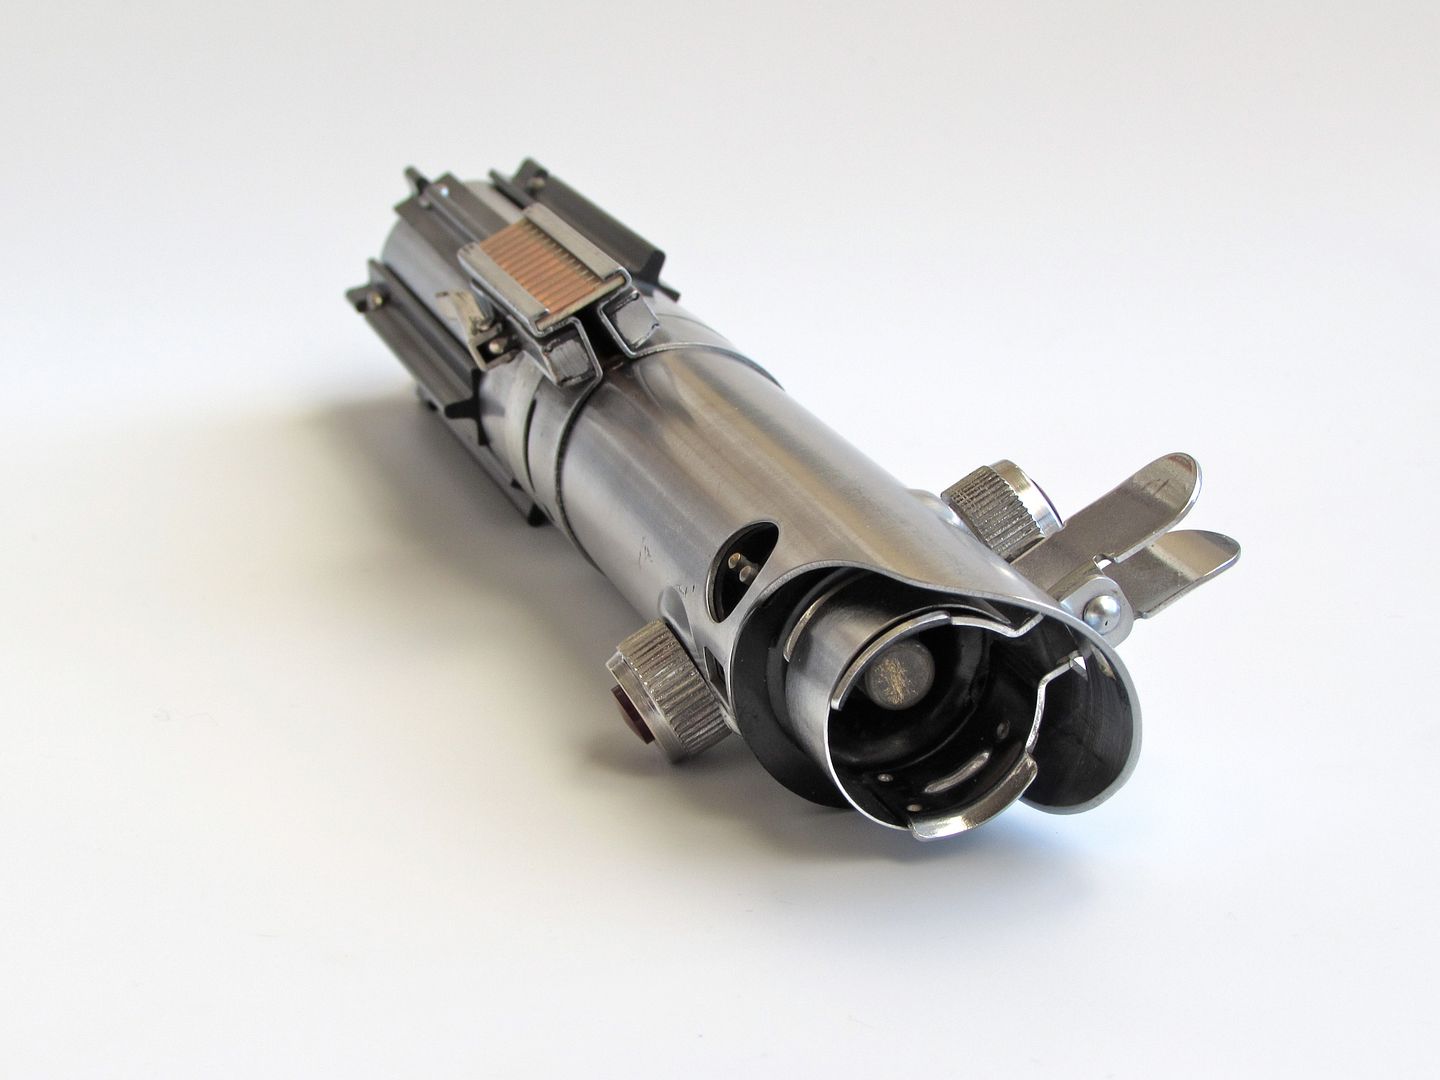
My Luke ESB Graflex Lightsaber
- Thread starter matty matt
- Start date
cayman shen
Master Member
May I ask what you did to age the Kobold and chrome tape? It looks very natural, very subtle. Blends with the flash wonderfully. (Or was the tape just years of handling?)
matty matt
Sr Member
Looks great... never get tired of seeing graflex conversions... ever. It's weird.
Yeah, I feel the same way. They never get old.
May I ask what you did to age the Kobold and chrome tape? It looks very natural, very subtle. Blends with the flash wonderfully. (Or was the tape just years of handling?)
The tape was actually on another clamp and I peeled it off and reused it. I think that added a little character to it. I beat up the Kobold with some metal files on the edges, paying particular attention to the one reference photo we have. I also weathered it a little bit with some paint. Just a little bit.
mortifactor
Well-Known Member
Looks very nice. I hope to follow you soon, my graflex 3 cell is in the post! I have the same kit from roy and have been weathering it. Couple of dents on the kobold and I rubbed the activation board with an old receipt which left a lovely feint "grubby" transfer similar to how the imperial guys rub their armour with newsprint. Would probably work on the shiny tape if anybody's looked too new.
I have the screws and t-track outside in a pot of water and rubble hoping they age a bit haha. The idea is they get covered in silt, and when dry it remains as a fine dust in the cracks/edges. We'll see lol
I have the screws and t-track outside in a pot of water and rubble hoping they age a bit haha. The idea is they get covered in silt, and when dry it remains as a fine dust in the cracks/edges. We'll see lol
Hi, great job, looks great. I just finished mine, but I think I am gonna update the dent on the kobold. I used one of Roys kits,they are great. I have been waiting over a year to get a Kobold from Parks, but he never delivered it. I used Roy's circuit board and went to polish the contacts as they were tarnishing, I used thinners and the silver came off. I then soldered the little ends and then used gold paint marker on the contacts as they appear more gold looking in the photos. I used some fine steel wool on the mylar tape. And by the way, nothing is screwed on, its all glued on with Quick Grip, I think it's called Barge Cement in the US. This is stuck on very well, it wont fall off. If I want to remove it, acetone disolves the glue. So no Graflex was harmed in the making. I don't have the heart to drill into a piece of history, but hey, that's just me. The D ring I got from Strap works, (1") I scaled and measured it to the strips on the circuit board from the ESB promo photos of Luke. The Grips have been lightly weathered. I also used a bit of super glue on the pin so the tab clamp thing does not move around. As for screws and rivets, well if they mated you would get the hex 'screw' methinks, so I went with that, it looks more scifi, I used some black marker on them, I wanted to blue them with gun blue but they were stainless steel.


matty matt
Sr Member
Thanks guys. Nice Graflex Aison. Looks great.
matty matt
Sr Member
Broke out the old Graflex in honor of TFA. It was cool to see it on screen again and I liked that they left a little mystery around it.

AnubisGuard
Master Member
I plan on obtaining a replica 3-cell bottom from RomansEmpire once they're available and drilling/screwing into that. The idea of faking screws and rivets just doesn't sit right with me. I want real, dangit!
JaxAndTheMoon
Sr Member
For me it was all about retaining the integrity of the flash itself that made me to decide to cut my rivet down and glue it onto the bottom of my graflex. To me it's not worth destroying the bottom just to put on a little D ring. So dollar store super glue worked on my part and it holds surprisingly well as I run around with it on.
Sym-Cha
Master Member
So what do most people do? Drill or glue their screws? I'm about to use Roy's parts and still undecided. Anyone know where to get a decent replica Graflex button or willing to part with an original?
Hi there and welcome aboard
") You can always post a WTB in the Junkyard section. Personally I'd like to drill everything to be most secured to the vintage flash ... it's not like that vintage flash will pop a lightbulb ever again, is it now?
You can always post a WTB in the Junkyard section. Personally I'd like to drill everything to be most secured to the vintage flash ... it's not like that vintage flash will pop a lightbulb ever again, is it now?Chaim
DarkAcid
New Member
Hi there and welcome aboard
Chaim
Thank you for the welcome. I've been on Astromech and just finished building R2 so I'd figure I would do the Lightsaber next. I'll post on the Junkyard sections and you're right! It will never be used as a flash so why not drill holes? Hole drilling I will do.
DarkAcid
New Member
Anyone know how much an authentic Graflex red button is worth these days?
- - - Updated - - -
I understand that keeping a part of history is intact, and part of the reason why I had to think about drilling holes or not. Since I will never see it used as a flash, I may as well drill the holes.
- - - Updated - - -
For me it was all about retaining the integrity of the flash itself that made me to decide to cut my rivet down and glue it onto the bottom of my graflex. To me it's not worth destroying the bottom just to put on a little D ring. So dollar store super glue worked on my part and it holds surprisingly well as I run around with it on.
I understand that keeping a part of history is intact, and part of the reason why I had to think about drilling holes or not. Since I will never see it used as a flash, I may as well drill the holes.
matty matt
Sr Member
My thinking has always been that if you want a lightsaber, drill away. If you want an antique flash, keep it pristine.
Sym-Cha
Master Member
Anyone know how much an authentic Graflex red button is worth these days?
I've seen them go between $65 and $125 nowadays ... on ebay. But before you condemn those values ... it's a matter of demand vs availability ... and how much you're willing to spend for accuracy. An alternative can be to seek for a 2 Cell with correct button
Chaim
ChillyKiwi
Active Member
I decided to glue my screws and rivets in the end. It still looks the part, and if I ever want to change my Graflex to a different version I can just clean it up and start from scratch. I'd post pics but I'm on my phone.
Similar threads
- Replies
- 46
- Views
- 2,591
- Sale
- Replies
- 1
- Views
- 301
- Replies
- 42
- Views
- 4,391