My Hasbro Black Series Storm/Shadow Trooper helmet mod

Inquisitor Peregrinus

Master Member
RPF PREMIUM MEMBER
January 2021 Update: For those just starting this or re-reading, I learned a lot from my initial breakdown of this thing, and much of this first page is still accurate, but much has also been superseded. I'm leaving it up to chronicle my learning curve, though. Much as I hate that I don't know everything (I'm working on it), I'm learning all the time. I just try to make my mistakes... non-unrecoverable.

* * *

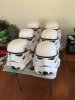
This is the Amazon exclusive Battlefront Shadow Trooper helmet -- which I am not using for a Shadow Trooper. All will become clear. ;) As I said over in the regular HBS Stormtrooper helmet thread, my out-of-the-box impression is a good one. I ditched the electronics, removed most of the interior pieces, the lenses, cut out the battery box, and ground away most of the interior clutter. Here's a look after my initial butchery:

yyugc_zpsmo61q8gr.jpg


gdk_zpsohnpltfr.jpg


I epoxied the battery compartment door in place, the cap to the back (using the crown's brow-band for accurate placement), and the ears to that assembly (after cutting out the ear greeblies and grinding out the unneeded interior stuff). I used epoxy putty to fill the tube slits, the gap between cap and back, and the speaker grille. Following that, I sanded everything to call out defects like lines from the injection-molding dies, divots where there were screw posts on the inside, and such like. I cut out the aerator backing piece, and my accurate Hovi-Mix aerator replicas' bases fit perfectly:

DSC02448_zpsedvrhnw4.jpg


So I added a bit of 1mm scrap sintra to the back to build up the thickness, plus a slightly larger plastic washer to provide a lip, and epoxied them in place:

DSC02449_zpsxrb9rh2w.jpg


I've also got a pair of VaderPainter bubble lenses, trimmed and cleaned up. The test fit looks quite nice:

DSC02451_zpssfmr3hwh.jpg


I'm going to back them with the semi-mirrored tint sheet that came as part of the Shadow Trooper helmet (in front of the regular flat green hard plastic lenses).

I finally got a workaround to Photobucket's recent uploading issues, so more will be coming tonight. I wanted to at least get the thread going for now, though, now that I could finally upload my earlier pics.

--Jonah
 
Last edited:
One more update for the evening. I've finished clearing all the other unneeded crud out of the cap'n'back combined piece, reinforced the seams on the inside, and trimmed the leading edges of the earcaps to fit the faceplate whose back edges I've extended slightly. I want it to look like the originals -- with the faceplate going back inside the earcaps, not the earcaps cutting into the faceplate.

DSC02454_zpsgopsaqbs.jpg


And from the outside:

DSC02455_zpsn2q8mrmn.jpg


About all that's left here is a bit of final cleanup on the putty after it's all cured, drilling out the slits in the rear traps, and re-finishing the earcap greeblies. Once that's all done (most likely tomorrow), it'll be ready for priming as soon as I get even a slight break in the weather. :) I'll have more pics of the faceplate tomorrow, too.

--Jonah
 
what putty are u using?

I use a few. For this stage of things, everything you're seeing is Ace Hardware's store brand two-part plumbing epoxy putty. I love this stuff. It's sticky as hell, sets up like concrete, and then can be ground to shape, drilled, tapped, engraved... It's a pretty nice medium. Later, when I get to the fiddly stuff, I'll finish any minor defects with Testors' white modeling putty. Anything more subtle than those together can take care of will get blended out in successive primer layers, sanded between.

--Jonah

i have never used that in the prop replica world. but i have used it in the field many times to fix old cast iron pipes that have cracked. and like you have said it works great. you can shape it to almost anything, and can get it very smooth with little effort.

the grey color made my think miliput. thanks for sharing your source, this is going to come out great!
 
Okay, non-update update. The tube slits are taking longer than anticipated to get properly measured and marked. And I was a little off on a couple of the slits in the tears and need to fill them with that Testors putty I mentioned and re-do 'em. *sigh* Some pictures, at least, coming later tonight...

--Jonah
 
So, as I said, the tube stripes/slits were giving me a headache. I've gotten a good idea from photocaling and, absent knowing hard numbers from anyone involved in the production helmets, I've rounded things off to reasonable-seeming values. I have the slits starting 10mm from the angle up to the cheek. The photos show that to be uniform all the way back, so I don't know why Hasbro had them creep closer as they get farther back. The slits, themselves, after making allowances for the soft, rounded edges on the toy versus the nice crisp edges on the original, look to be 15mm long. Also, the front slit looks to be in about the right position and at the right angle. So. How's this look?

DSC02456_zpshsk4ifht.jpg


DSC02457_zpsxlp603zs.jpg


After setting that front slit, I played with 2mm wide slits spaced 3mm apart, but after penciling that in, it was too squished together. So I erased all the derived pencil lines and I'm going to tackle it fresh tomorrow.

Meantime, here's how the earcaps look with the thin plastic backing glued in place and the greeblie approximately positioned. Once I have the tube stripes looking right, I'm going to reward myself with the much easier task of measuring and marking exactly where the earcap greeblies go, and starting filling in the surrounding area.

DSC02458_zpsap75vhq2.jpg


A last thought. I just realized this evening that as soon as I paint these pieces, y'all are in for a week of silence while I let it cure, and before you see what comes next. Sorry about that. :cry

--Jonah
 
intresting, looking forward for more updates.

But was wondering, did you try removing the rubber trim from eye brow, mouth, neck lining? I tried removing mine, but they seemed fused to the plastic. I mean tried very lightly on the neck trim, didn't give much force, don't want to damage the helmet and rubber trim.
Cause if I ever get a cheap white helmet, I would love to remove the rubber trim for easy repainting
 
The faceplate was "double shot". That is, rubber was put in those places in the die and before it set up the plastic was injected behind it. This fuses it together annoyingly durably. I'm leaving the brow trim and chin grille rubber. Gonna repaint them, once the work I'm doing on them is done, with automotive rubber bumper spray paint. Patient effort gets the neck trim off. An X-acto knife to get it separated from the plastic, and once you can get a grip on the rubber, just keep pulling it way from the faceplate and working your way along. Once you're within an inch of the chin grille, you'll have enough separated that you can pull it away from the edge and around to pull it away from the inside of the faceplace. The bit around the chin grille is more annoying, as it's part of the rubber on the grille. I very carefully cut it at the dividing line between grille and neck trim and much yanking and cussing eventually got it off. I have yet to clean up that area and get the undercut properly extended, but it's well along.

No pictures tonight. I solved the tube slit spacing. I treated the first few as properly placed -- even if the edges were too soft. I noticed standard units worked better than metric, and once I made that mental switch, everything clicked. 5/16" from center to center. If the slits are an eighth of an inch wide, that's 3/16 between them, which works beautifully. I just have to fix the spacing and angle of the last few on each side.

I've got the faceplate sides extended an eighth of an inch rearward, and am fine-tuning the earcap edges for proper fit.

And, related to the first paragraph... Notice how the lower edge of the side tubes curves downward in the last half-inch or so? It shouldn't. I've ground them to the right shape as part of preparing the lower edge of the faceplate to extend to my preferred extent.

I'll take pictures Friday or Saturday. All my free time the last 48 hours has gone into drafting a pattern to my head measurements, cutting, and sewing an ANH Imperial Stormtrooper Officer cap to wear to the Rogue One premiere tomorrow.

--Jonah
 
So I had sorted out that the gap between the faceplate and the helmet cap was partially due to the faceplate being tipped up, relative to the rest of the line between cap and back. The OT helmets had it usually a straight line, as do the Rogue One troopers. About the only one who had the brow line trimmed up was the "surprised" Sandtrooper, and the faceplate was still kept in the same position as the rest, resulting in a lot of white showing between brow trim and eyes. The bottom edge of this helmet's cap needs to be lengthened in front. This is complicated by the mating surface on the inside of the faceplate curving up from 3/32" back at the sides to 1/32" at center front. So I had to take that into account, too... :rolleyes

Here it is puttied up:

DSC02468_zpsibtlh5ad.jpg


After curing, being filed smooth, and having been shot with primer to see how it looks:

DSC02476_zps4dn71rnn.jpg


More on earcaps and tube stripes tomorrow.

--Jonah
 
Will be. I did not, in fact, find the rest of my Dremel collets. I grumpily had to go plunk down for a new set so I could use my smaller drill bits. Then Winter set in and since I have to paint outside, nothing much got done past this point until just recently when it started consistently getting warm and un-windy enough. I got a good template of symmetrical, accurately-sized and -spaced Original Trilogy style (i.e., curved) tube stripes, so those have now been drilled and cleaned up. The slits in the tears and rear traps are all drilled out and cleaned up. The bottom edge of the faceplate has been lengthened to the correct OT Stunt length and the seam filled and smoothed. The mating of faceplate to earcaps is getting slowly refined, as are the earcap greeblie slots.

All that's left is extending and cleaning up the chin grille, finishing the work on the earcaps (including drilling holes for admittedly-mostly-decorative screws), and I should be ready to paint. I'm focusing now on the earcap work, which means I should have the cap-'n'-back primed and painted and off to the side to cure by the end of the weekend (if it doesn't rain *sigh*).

I'm on my work computer right now. I thought I had all my pics uploaded to Photobucket, but the last few I took after the one in my post above don't seem to be there. I didn't think I'd forgotten to upload them, but... :confused I'll see what's what when I get home and, if necessary, take new pictures of where I am currently.

--Jonah
 
I just managed to pick one of these up at TrU this afternoon. Looking forward to seeing what can be done to improve upon it although I have to admit I am pretty happy with it as is. It's not replica quality but pretty cool nonetheless.
 
Blowing the dust off this thread, too. As with the Black Series Boba helmet, I had a bunch of insights and realizations, a portion or three of cringe, some changed premises, and a -- typical for me -- multiplicative effect. I now have three Shadow Trooper helmets and a regular white Stormtrooper. All have been stripped and gutted, but the mods I'm making now are both more and less extensive. I had meant to post on this some months ago, but my primary costuming laptop died and preliminary attempts at hard-drive recovery have, thus far, failed. I have a lot of the images on other devices, and I've been re-collating everything to see what I've got and what I need to re-take. Thank you, all, for your patience. If I haven't gotten stuff up by this weekend, I will over the course of next week.
 

Your message may be considered spam for the following reasons:

If you wish to reply despite these issues, check the box below before replying.
Be aware that malicious compliance may result in more severe penalties.
Back
Top