My Ghostbuster costume, in progress

That was a temporary pack and frame I put together for Halloween years ago. I'll be getting a real frame and straps soon :)

The frame is made from aluminum strips and electrical tape wrapped around it about a million times. The backpack is attached to the frame with strong wire.

frame.jpg


IMAG0102d.jpg
 
Last edited:
Ok, my new year's resolution; GET IN GEAR! That meaning, get my 'busting gear finished by the end of the year. Egon, your gear looks too good to see. Ggreat work dude!
-Ville
 
Big update on my pack.

I added new lights to my packs power cell. I went and bought a 24 LED emergency light from Dollar General and disassembled it. I then pried off the LED's and soldered them to wire I had from the old "Shirt Lights" I was originally going to use from Hobby Lobby.

I then cut a small piece of balsa wood and drilled 15 holes into it placing each of the LED's into the holes. I then mounted the lights into the pack. The push button switch is hidden below the plastic of the pack on the side. It just takes a small push and the lights come on or turn off. No need to remove screws to get inside the pack to turn it on and no need for a switch to show.

Picture34343009.jpg

Picture34343008.jpg

Picture34343007.jpg


Picture34343012.jpg


Yesterday I bought another emergency light kit and removed the LED's and rewired them, but this time for the gun.

The lights are wired to the top switch on the gun.

gunlightsnew-002.jpg

gunlightsnew-007.jpg


gunlightsnew-006.jpg
 
Nice work on the lights. Way to improvise. I always like to see things made from cheap, real world items.
 
the baileys bandit: Thanks! Yeah I just kept searching for something cheap to use and I found it at the dollar store. Good deal huh? LED'S that bright cost a fortune at Radio Shack.

CommanderCody: Hahahaha nice. Thanks!

Nataku: Thank you! Me too! :) How are things up in Pittsburgh? I lived there a good part of my life :)

I know, radio shack will rape you on led's, guess I found a new source, thanks bro
 
Bringing back an old topic, but it's mine so yeah.

I've recently been working my butt off on repairing the Proton Pack I originally posted about in this topic, as well as putting together one for my wife using a StudioCreations shell.

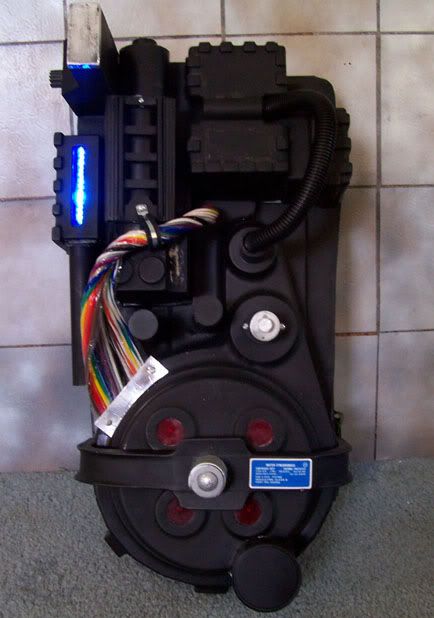
8/2012. Beginning to repair my Proton Pack shell. Photo before work began. I stripped it down completely. The proton pack shell was a flawed pull I got a discount on years ago from Javamonkey. Since that time the thin walled sections of it got pretty roughed up and cracked all over. I used styrene to repair the damaged sections.

attachment.php


My proton pack after extensive repairs and work.
attachment.php


My Wifes Studio Creations pack after a ton of work.
attachment.php


The bumper on her pack is only temporary until I can make or buy a better one. This one I made out of foam core board. I also, for both packs, made the colored wires by using clear tubing and spray paint. I also made the ion arms, the booster ladders, HGA's, N-Filters, and custom made alternative parts to use as the Clippard brass elbows. I purchased brass compression caps from Home Depot, drilled holes in the sides of them, stuck a clipped off piece of screw into them and slipped the tubing over. Looks good. The Ion Arms are made of plastic for sale signs and epoxy putty. The ends of the Ion arms are made from wood blocks cut to size and covered with Aluminum tape. I then painted over the ends and sanded off some of the paint for a weathered look. The "copper" tubing is actually just plastic tubing spray painted gold, but it looks good I think. I also attached the two halves of the Studio creations shell together to make it all one piece. I even custom made the Clippard valves, including the bases using epoxy putting and PVC pipe. I still need to add the tops and dull the shine a bit.

Comparison shot of the two. Still need to add the mother board to her pack and mount it to a frame.

attachment.php
 
Last edited:
Back
Top