My Fieldmarshall/Warmachine Mandalorian Blaster

Filandrius

Sr Member
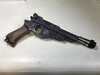
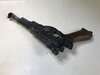
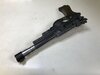
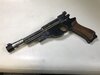
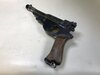
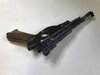
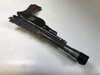
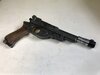
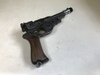
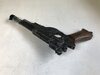
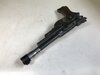
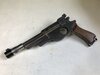
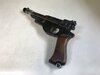
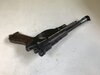
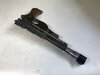
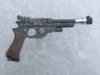
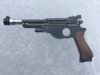
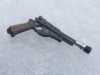
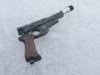
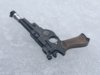
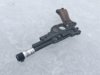
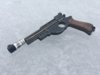
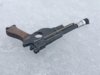
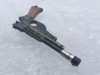
Hey everyone! In addition of posting a few pics in the sales thread, I thought I'd show my appreciation for Chris' kit by posting pics of my completed blaster in here. The kit is easy and fun to build, and the end result is amazing. The completed blaster is light as a feather and rock solid.

For my build I used JB Weld for all the parts that don't hold together with screws or such. Since I wanted it to look like a 100+ years old firearm as much as possible, I didn't use paint, and blued all the parts with Aluminum Black, going veeery slowly and applying several coats until I was satisfied with the finish (The only part I did paint was the tip of the flash hider) I also used Aluminum Black to weather the brass parts and the exposed part of the flash hider, but I used it sparingly, slowly building up the "shading". For the grips I used several coats of stain that turn into varnish the more coats you apply, which gives them a nice, dark satin finish.

That thing is surprisingly hard to shoot (pun intended) the final finish is slightly uneven and has many subtle shades of color that don't show up in pictures.
 

Attachments

  • IMG_2302 (1).jpg
    IMG_2302 (1).jpg
    2.2 MB · Views: 271
  • IMG_2304 (1).jpg
    IMG_2304 (1).jpg
    2.1 MB · Views: 262
  • IMG_2305 (1).jpg
    IMG_2305 (1).jpg
    1.9 MB · Views: 216
  • IMG_2306 (1).jpg
    IMG_2306 (1).jpg
    1.9 MB · Views: 189
  • IMG_2307 (1).jpg
    IMG_2307 (1).jpg
    2 MB · Views: 189
  • IMG_2308 (1).jpg
    IMG_2308 (1).jpg
    1.9 MB · Views: 195
  • IMG_2309 (1).jpg
    IMG_2309 (1).jpg
    2 MB · Views: 196
  • IMG_2310 (1).jpg
    IMG_2310 (1).jpg
    1.9 MB · Views: 181
  • IMG_2311 (1).jpg
    IMG_2311 (1).jpg
    1.9 MB · Views: 190
  • IMG_2312 (1).jpg
    IMG_2312 (1).jpg
    1.9 MB · Views: 175
Thanks. :)

I blued everything before. Since a lot of parts overlap, it would’ve been impossible to do a clean job after assembly (or at least it would’ve been a lot harder)
 
Last edited:
Thanks. :)

I blued everything before. Since a lot of parts overlap, it would’ve been impossible to do a clean job after assembly (or at least it would’ve been a lot harder)

thats what I was thinking too. I did the barrel and it seems to be coming out good. What did you clean the pieces with before? Any tips on the process would be great!
 
Well since the parts are already deburred and that the aluminum has been in contact in air long enough to create a natural patina, there's not much you can do to prepare the surface for the Aluminum Black. You just have to be patient and let the stuff work.

While I was bluing the parts, I discovered that most of them don't react at all when you first apply the AB. So I started applying it slowly with a Q-tip, letting it react with the surface before wiping it off (when you put too much and/or let it react too long, it creates a dark coat that'll scratch right off)

When the AB starts to reacts with the metal, microscopic bubbles will appear. That's the sign that the aluminum is "ready". After that it's a process of apply-wait-wipe-repeat until the part is dark enough (at this point the AB won't do anything more)

That's pretty much it. It's a long process but it's worth it. For mine I chose not the make the parts "perfect" because I wanted them to look like 100+ years old blued steel. Saved me from the separate weathering process afterwards.
 
Don't mind me, posting better pictures because I got a new phone. ;)
 

Attachments

  • IMG_2397.jpg
    IMG_2397.jpg
    1.4 MB · Views: 185
  • IMG_2398.jpg
    IMG_2398.jpg
    1.3 MB · Views: 192
  • IMG_2399.jpg
    IMG_2399.jpg
    1.4 MB · Views: 162
  • IMG_2400.jpg
    IMG_2400.jpg
    1.3 MB · Views: 154
  • IMG_2401.jpg
    IMG_2401.jpg
    1.4 MB · Views: 162
  • IMG_2402.jpg
    IMG_2402.jpg
    1.3 MB · Views: 141
  • IMG_2403.jpg
    IMG_2403.jpg
    1.3 MB · Views: 137
  • IMG_2404.jpg
    IMG_2404.jpg
    1.3 MB · Views: 144
Since we're still in quarantine and I'm out of projects, I've been inspecting my props way too much, finding things that bug me (damn OCD!) So, I've decided to pretty much completely redo the finish & weathering on my Mandalorian blaster. The main thing that was bugging me was the clear coat, which I shouldn't have applied (it was pointless and added a shine which didn't fit the prop at all) So after many hours of work, here's my revised replica (which looks a lot more like the one used in the show, IMHO)
 

Attachments

  • IMG_2618.JPG
    IMG_2618.JPG
    1.6 MB · Views: 117
  • IMG_2619.JPG
    IMG_2619.JPG
    1.7 MB · Views: 136
  • IMG_2620.JPG
    IMG_2620.JPG
    1.7 MB · Views: 105
  • IMG_2621.JPG
    IMG_2621.JPG
    1.6 MB · Views: 111
  • IMG_2622.JPG
    IMG_2622.JPG
    1.7 MB · Views: 125
  • IMG_2623.JPG
    IMG_2623.JPG
    1.6 MB · Views: 130
  • IMG_2624.JPG
    IMG_2624.JPG
    1.6 MB · Views: 106
  • IMG_2625.JPG
    IMG_2625.JPG
    1.5 MB · Views: 118
Well, I did a lot of things. Some of it were accidents, but don't hold that against me. ;)

I went over the brass parts with a rag dipped in Aluminum Black, wiping repeatedly until the bright, freshly machined brass was tarnished enough. After finishing the rest of the gun, like I said in the previous post, I went over everything with a clear coat, which I deeply regretted.

In the process of trying to remove said clear coat, after trying a lot of stuff, I figured that cured paint fails at high temperatures, so I chucked the whole gun (minus grips & flash hider) in my oven at broil. That killed the unwanted shine real quick, let me tell you that. But, while cooking away, the clear coat turned golden brown, and changed the color of some parts (like the brass parts) darkening them and (accidentaly) adding (simulated) years of wear & gonk. It also turned the steel safety a nice tarnished brown color, and the darn thing almost looks like brass now. So there you have it. :)
 
Broil, baby. Maximum power. ;)

Don’t forget that if your gun is painted it’ll fail too. I did it because my parts are darkened with Aluminum Black and I wanted to get rid of the clear coat. But you could always only heat up the brass parts.
 
While I was bluing the parts, I discovered that most of them don't react at all when you first apply the AB. So I started applying it slowly with a Q-tip, letting it react with the surface before wiping it off (when you put too much and/or let it react too long, it creates a dark coat that'll scratch right off)

Ahhh... This is the problem I've been having. I tested the aluminum black on some scrap aluminum. I used acetone to clean the piece, then #0000 steel wool, and acetone again but every time the black would just rub right off.

BTW - What color/brand stain did you use on the grips?

Cheers
Steven
 
Some Sico translucent exterior stain I had laying around. The color is coffee grain, if I'm not mistaken. I used on my deck yearly and I always have some around. I wouldn't recommend buying some only for some grips because it's crazy expensive. ;)
 
This thread is more than 3 years old.

Your message may be considered spam for the following reasons:

  1. This thread hasn't been active in some time. A new post in this thread might not contribute constructively to this discussion after so long.
If you wish to reply despite these issues, check the box below before replying.
Be aware that malicious compliance may result in more severe penalties.
Back
Top